background image


3

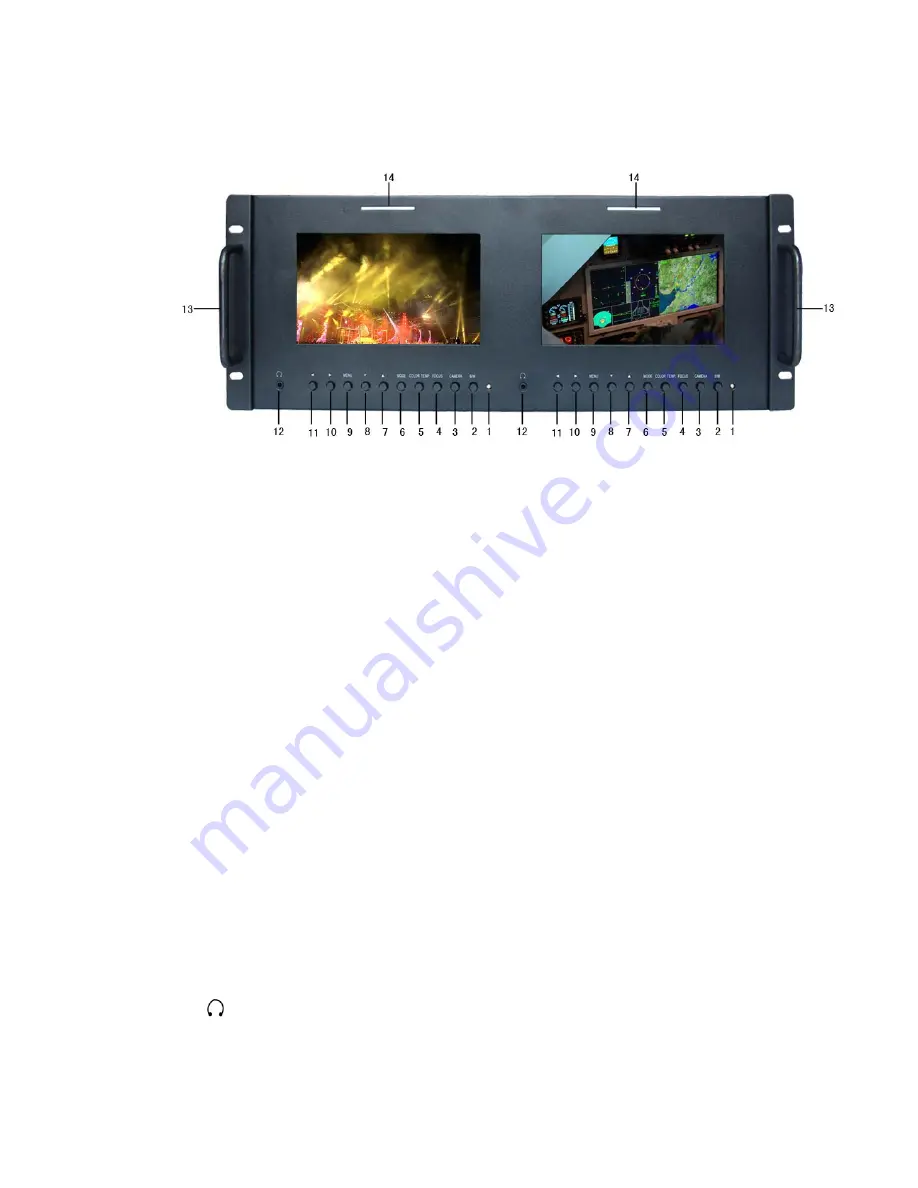
3. Panel function and button operating instruction 


1.  Power indicator  

2.  B/W 

  Switch on/off Check Field (Red

Green

Blue

Monochromatic and 

Color)


3.  CAMERA 

Canon 5D Mark II Camera Mode(camera mode is recording, 

full display on monitor, No delay, No black screen,No 

deform) 

4.  FOCUS :   

Crochet Focus Assist(Peaking Filter) key 

5.  COLOR TEMP: 

Color temperature selection 

6.  MODE:

    Signal input selection


 7.


:

        Menu item value up adjustment button. No Menu State to cycle 

adjust the 5 level brightness


8.


:    

Menu item value down adjustment button


9.  MENU:  

To activate or close OSD menu   

10.


:  

Right adjusting key, function confirmation or increase the menu 

analog value 

11. 


:  

Left adjusting key, function confirmation or decrease the menu 

analog value 

12. 

 :  

Earphone port 


13. 

The front handle


14. 

TALLY(Indicator light) No use for this monitor 

Summary of Contents for FW7D-DRM

Page 1: ...7inch Dual Rack Mount LCD Monitor Product Specification Product model FW7D DRM FW7D DRM O ...

Page 2: ...ions FW7D DRM O can also provide HDMI composite video signal output All video signals by digital processing high quality scaling on the screen Can be used in the TV news production editing broadcast and television special vehicles in areas such as video surveillance HD SD video HDMI component YPbPr composite video and audio input Composite video HDMI optional output 5 D camera mode Ⅱ Peaking filte...

Page 3: ...ightness 250 cd Contrast ratio 700 1 Response time 10ms Viewing angle 75 75 L R 70 75 U D Backlight LED Input signal HDMI YPbPr VIDEO AUDIO Signal output Video HDMI optional HDMI YPbPr support mode 480i 480p 576i 576p 720 50p 720 60p 1080 50i 60i 50p 60p Video color system PAL 4 43 NTSC 3 58 Input power voltage range DC 6 24V Unit power consumption 12W Standby current 100mA 12V Unit size 482 6mm 1...

Page 4: ...ing Filter key 5 COLOR TEMP Color temperature selection 6 MODE Signal input selection 7 Menu item value up adjustment button No Menu State to cycle adjust the 5 level brightness 8 Menu item value down adjustment button 9 MENU To activate or close OSD menu 10 Right adjusting key function confirmation or increase the menu analog value 11 Left adjusting key function confirmation or decrease the menu ...

Page 5: ...l output 5 HDMI IN HDMI HD signal input 6 HDMI OUT HDMI HD signal output 7 4 pin XLR DC power input interface 8 Power ON OFF switch 9 The rear handle 5 Power input way Users can use this monitor with attached power adapter for power supply can also use DC power which output power is more than 20W for power supply External power supply please click on the picture XLR marking the correct access powe...

Page 6: ...r into working state press the mode button on the unit according to the input video signal to switch signals under NO menu state using the shortcut button on the panel to operate Press button on the unit then enter into OSD menu operation Operate or on the unit to select or adjust the needed options color menu function sound After select options press or on the unit to confirm then using or to sel...

Page 7: ...icture lose the color of showy Tint On NTSC Video mode the image color tint difference is adjustable by tint Saturation To adjust color concentration Color temperature Enter into color menu press or on the unit to confirm press or to select the form of color temperature then press or on the unit to confirm then use or to select color temperature such as 9300 K 7500K 6500K or USER the monitor leave...

Page 8: ... button to confirm then enter into parameters adjust Using or button to select optional items then using or button to adjust the parameters Language Languages for OSD as below English 简体中文 Italians Francois Deutsch Español 繁体中文 Japanese Pycc ...

Page 9: ...Transparent To adjust the level of transparent Function After select function press or button to confirm then enter into parameters adjust Using or button to select adjustable items then using or button to adjust the parameters Reset Back to original setting Display Ratio To change the display ratio 16 9 4 3 Screen Marker 80 85 90 93 95 ...

Page 10: ...nd After select menu function press or button to confirm Then enter into parameters adjust Use or to select adjustable options then use or adjust specific parameters Volume To adjust the volume 8 Accessories ...

Reviews: