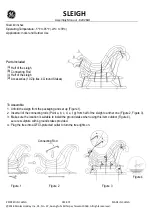
3. See figure 1. Three sets of mounting holes are provided
on the bracket to accommodate various mounting configurations.
Attach the bracket to the selected channel using the previously
installed screws and the two keps nuts (supplied with the light
head).
CAUTION
Before drilling holes in ANY part of vehicle, be sure that
both sides of the mounting surface are clear of parts that
could be damaged; such as brake lines, fuel lines, electri-
cal wiring or other vital parts.
4. Six 3/16" holes are also provided on the remaining brack-
et for mounting in the vehicle’s interior. Use the mounting bracket
as a template and scribe drill position marks onto the mounting
surface as required for your particular application. Use #8 screws
(not supplied) suitable for your mounting application to secure the
bracket on the mounting surface. Ensure the bracket is held firmly
in place to resist vibration when the vehicle is in motion.
5. Next, slide together and attach the bracket/light head
assembly to the surface mounted bracket using the supplied hex
head screws and locating the lockwashers between the brackets’
arms. Ensure the light assembly is facing in the intended direction
and tighten both screws.
6. After installation is completed, test the unit for proper
operation, and test drive the vehicle to ensure that vibration does
not loosen the light assembly.
CAUTION
After prolonged operation, the light head unit dissipates
heat and can cause burns. Do not hold the unit in your
hands for extended periods of time. Do not touch the unit
during, or shortly after, operation. Always allow the unit
to cool before handling.
E. MECHANICAL SPECIFICATIONS AND FEATURES.
Refer to the light head unit’s instruction sheet.
F.
ELECTRICAL SPECIFICATIONS AND FEATURES.
Refer to the light head unit’s instruction sheet.
SAFETY MESSAGE TO OPERATORS
WARNING
People’s lives depend on your safe use of our prod-
ucts.
Listed below are some important safety instruc-
tions and precautions you should follow:
•
Although your warning system is operating
properly, it may not be completely effective.
People may not see or heed your warning sig-
nal. You must recognize this fact and continue
driving cautiously.
•
Also, situations may occur which obstruct your
warning signal when natural or man-made
objects are between your vehicle and others,
such as: raising your hood or trunk lid. If
these situations occur, be especially careful.
•
At the start of your shift, you should ensure
that the light is securely attached and operat-
ing properly.
•
Products attached to this bracket contain high
intensity LED devices. To prevent eye dam-
age, DO NOT stare into the light beam at close
range.
Failure to follow these safety precautions may result
in property damage, serious injury, or death to you, to pas-
sengers, or to others.
RETAIN AND REFER TO THIS MESSAGE
G. MAINTENANCE.
1. General.
Check periodically to ensure that all bracket fasteners
are secure and that the intended light direction is maintained.
2. Replacement Parts.
This unit contains NO user replaceable components. Con-
sult the factory regarding warranty repairs/replacement issues.
Manufactured by:
Federal Signal Corporation
Emergency Products Group
2645 Federal Signal Drive
University Park, Illinois 60466
800-433-9132
800-343-9704 (fax)
Figure 1.
-2-
290A4688
BRACKET
KEPS NUTS
(SUPPLIED
WITH LIGHT)
CUDA TRIOPTIC
LIGHT HEAD
SCREW, 1/4-20 x 7/16"
HEX HEAD (2)
LOCKWASHER,
EXTERNAL
TOOTH (2)
BRACKET WITH
WARNING LABEL