background image

WARNING! EXERCISE CAUTION WHEN USING ELECTRIC TOOLS 

– THEIR STRENGTH CAN DAMAGE THE SCREWS.

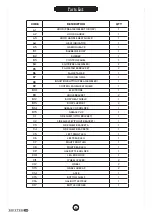
CODE

hard ware

QTY

D1

M6X15 BOLT

30

D2

M5X15 BOLT

2

D3

M5X10 BOLT

2

D4

M4X10 BOLT

4

D5

ST4.0X10 SCREW

4

D6

ST4.0X15 SCREW

4

D7

ST4.8X15 SCREW

6

D8

LOCKNUT

2

D9

M4 NUT

4

D10

M5 NUT

2

D11

SPACER

10

D12

HOSE CLIP

1

1

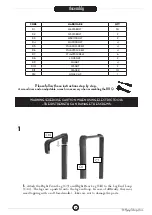
1.

  Attach the Right Front Leg (C7) and Right Rear Leg (C8) to the Leg End Loop 

(C10). The legs are a push fit onto the leg end loop. In case of difficulty, they may 

need tapping with a soft faced mallet. Take care not to damage the parts.

Please follow these instructions step by step. 


A screwdriver and an adjustable wrench is necessary when assembling the BBQ. 

7

Assembly

Summary of Contents for DRIFTER 2.0

Page 1: ... INSTRUCTION MANUAL MAINTENANCE Share the fun of cooking OUTDOOR USE ONLY READ THE OPERATING INSTRUCTIONS BEFORE USING THE APPLIANCE FCC G 19733 20 EX211A ...

Page 2: ... 0 4 Gas category 4 Exploded drawing 5 Parts list 6 Assembly instructions 7 Gas leak test 18 Regulator and hose 19 Last Check 20 Lighting instructions 21 Warnings 22 Maintenance 23 Grease fire 24 Recipe 25 Troubleshooting 27 Consumer Contact 28 2 ...

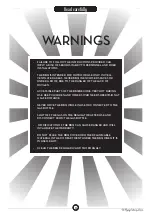
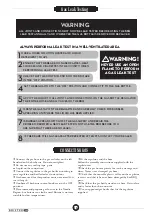
Page 3: ...RTS OF THE BBQ BECOME VERY HOT DURING USE KEEP CHILDREN AND OTHERS WHO NEED SUPERVISION AT A SAFE DISTANCE NEVER MOVE THE BBQ WHILE IN USE OR CONNECTED TO THE GAS BOTTLE SHUT OFF THE GAS ON THE REGULATOR AFTER USE AND DISCONNECT FROM THE GAS BOTTLE MODIFICATION OF THE BBQ CAN CAUSE DANGER AND WILL INVALIDATE THE WARRANTY DO NOT PLACE THE BBQ COVER OR OTHER FLAMMABLE MATERIAL IN THE COMPARTMENT UND...

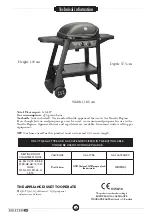
Page 4: ...for use in the Nordic Region Even though butane and propane gas can be used we recommend propane for use in the Nordic Region Approved hoses and regulators are available from most outlets selling gas equipment NB Gas hoses used for this product must not exceed 120 cm in length ONLY THE GAS TYPE AND GAS CATEGORY LISTED IN THE RATING LABLE COUILD BE USED ON YOUR APPLIANCE 0359 18 This product is pro...

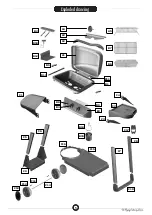
Page 5: ...Exploded drawing A2 B1 A1 B11 A5 B2 B12 B13 B10 B7 B6 B15 B14 C2 C3 C4 C6 C16 C9 C12 C14 C10 C7 C8 C15 C11 B8 B4 B3 B9 A4 C13 C17 A3 C1 C5 B5 5 ...

Page 6: ...NTROL PANELHEAT SHIELD 1 B10 ELECTRODE 1 B11 HINGE BRACKET 2 B12 BODY HEAT SHIELD 1 B13 BODY SUPPORT 2 B14 GREASE CUP HOLDER 1 B15 GREASE CUP 1 C1 SIDE SHELF WITH BRACKET 1 C2 SIDE SHELF WITHOUT BRACKET 1 C3 SIDE SHELF BRACKET A 1 C4 SIDE SHELF BRACKET B 1 C5 LEFT FRONT LEG 1 C6 LEFT REAR LEG 1 C7 RIGHT FRONT LEG 1 C8 RIGHT REAR LEG 1 C9 GAS BOTTLE HOLDER 1 C10 LEG END LOOP 1 C11 WHEEL SPACER 2 C1...

Page 7: ...6 D8 LOCKNUT 2 D9 M4 NUT 4 D10 M5 NUT 2 D11 SPACER 10 D12 HOSE CLIP 1 1 1 Attach the Right Front Leg C7 and Right Rear Leg C8 to the Leg End Loop C10 The legs are a push fit onto the leg end loop In case of difficulty they may need tapping with a soft faced mallet Take care not to damage the parts Please follow these instructions step by step A screwdriver and an adjustable wrench is necessary whe...

Page 8: ...bottom shelf assembly using M6x15 Bolts D1x4pcs 2 2 Attach the Gas Bottle Holder C9 to the Bottom Shelf C15 using ST4 8x15 Screws D7x2pcs Take care not to over tighten these screws which will damage the plastic gas bottle holder 8 Assembly ...

Page 9: ...ing screws Take care not to over tighten these screws which will damage the plastic gas bottle holder Slide a Wheel Spacer C11 over each end of the Axle C14 Note the spacers are packed in a plastic bag with the electrode grease cup holder and grease cup Slide the Wheels C12 over each end of the axle Secure the wheels into place with the Locknuts D8x2pcs Place the Wheel Hubcaps C13 onto the outside...

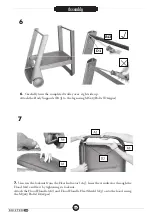
Page 10: ... the Hood A1 and fix it by tightening its locknut Attach the Hood Handle A2 and Hood Handle Heat Shield A3 onto the hood using the M5x15 Bolts D2x2pcs 6 6 Carefully turn the completed trolley over right side up Attach the Body Supports B13 to the legs using M6x15 Bolts D1x4pcs 10 Assembly ...

Page 11: ...inside of the legs WARNING DO NOT RELEASE THE BARBECUE BODY WHILE THE BARBECUE HAS NOT BEEN PROPERLY SEATED THIS MAY RESULT IN INJURY OR DAMAGE TO YOUR BARBECUE 9 Install a M6x15 Bolt D1 and a Spacer D11 into the upper fixing hole on each front leg Place the Control Panel B3 assembly in position by aligning the spacers with the slot on each side of control panel and fix it onto the trolley assembl...

Page 12: ...turi tubes are over the ends of the gas valves They are a loose fit and not a gas tight seal Secure the burner with the ST4 0x10 Screws D5x2pcs 10 10 Feed the Grease Cup Holder B14 through the hole in barbecue body Insert the Grease Cup B15 into the grease cup holder 12 Assembly ...

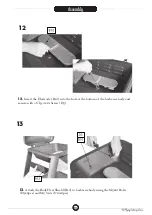
Page 13: ...the Body Heat Shield B12 to barbecue body using the M5x10 Bolts D3x2pcs and M5 Nuts D10x2pcs 12 Insert the Electrode B10 into the hole at the bottom of the barbecue body and secure with a ST4 0x10 Screw D5 13 Assembly ...

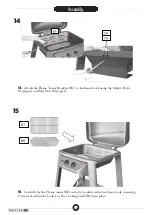
Page 14: ... B6 onto its brackets in the barbecue body ensuring it lies level within the body Lay the Cooking Grill B7 into place 14 14 Attach the Flame Tamer Brackets B5 to barbecue body using the M4x10 Bolts D4x4pcs and M4 Nuts D9x4pcs 14 Assembly ...

Page 15: ...ody as shown Make sure that the shorter fixed legs go through the holes in the hood then the swing legs fix to the body of the barbecue 17 Attach the Side Shelf Bracket A C3 and Side Shelf Bracket B C4 to the Side Shelf C2 using ST4 0x15 Screws D6x4pcs 15 Assembly ...

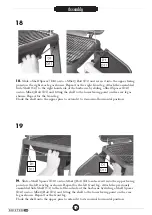
Page 16: ...or the front leg Hook the shelf onto the upper pins to extend it to its normal horizontal position 18 18 Slide a Shelf Spacer D11 onto a M6x15 Bolt D1 and screw it into the upper fixing point on the right rear leg as shown Repeat for the right front leg Attach the assembled Side Shelf C2 to the right hand side of the barbecue by sliding a Shelf Spacer D11 onto a M6x15 Bolt D1 and fitting the shelf...

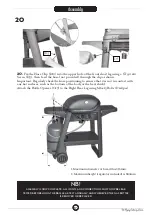
Page 17: ...front short leg using a ST4 0x10 Screw D5 then feed the hose not provided through the clip as shown Important Regularly check the hose positioning to ensure that it is not in contact with any hot surfaces such as the bottom of the body or the heat shield Attach the Bottle Opener C17 to the Right Rear Leg using M6x15 Bolts D1x2pcs 1 Maximum diameter or breadth is 315mm 2 Maximum height regulator in...

Page 18: ...TIONS ON THE GAS BOTTLE REGULATOR THE ENTIRE HOSE AND ALL VALVES ON THE BBQ WARNING NEVER USE AN OPEN FLAME TO PERFORM A GAS LEAK TEST Connect the gas hose to the gas rail inlet on the left hand side of the barbecue Do not overtighten Do not use any sealing tape paste or liquid on the connection Connect the regulator to the gas bottle according to your regulator and bottle dealer s instructions Ga...

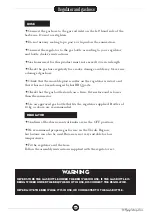
Page 19: ...ts Check that the gas bottle stands on a firm flat surface and is lower than the connector Use an approved gas bottle that fits the regulator supplied Bottles of 10 kg or above are recommended REGULATOR Confirm all barbecue control knobs are in the OFF position We recommend propane gas for use in the Nordic Region but butane can also be used Butane is not very suitable for low temperatures Fit the...

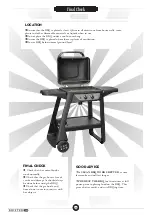
Page 20: ... below normal ground level FINAL CHECK Check that the control knobs work normally Check that the gas hose is free of cracks and damage it should always be done before using the BBQ Check that the gas bottle and hose do not come into contact with hot objects GOOD ADVICE A CLEAN BBQ WORKS BETTER causes less smoke and will last longer PREHEAT THE BBQ for 10 minutes at full power prior to placing food...

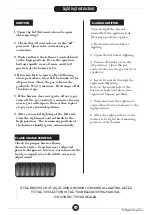
Page 21: ...tmost control knob to the high position Press the ignition button rapidly several times until left portion of the burner is lit 4 If burner fails to ignite after following above procedure turn all the knobs to the off position Close the gas valve on the gasbottle Wait 5 minutes Reattempt all of theabove steps 5 If the burner does not ignite after step 4 turn off the gas and wait 5 minutes for any e...

Page 22: ...Q WITH THE LID CLOSED PERFORM THE LEAK TEST REGULARLY AND ALWAYS WHEN CHANGING THE GAS BOTTLE AFTER LONG STORAGE ALWAYS CHECK THE GAS HOSE FOR DAMAGE AND CRACKS EACH TIME YOU USE THE BBQ DISCONNECT THE GAS BOTTLE WHEN THE BBQ IS IN USE OR BEFORE MOVING IT IF STORING THE BBQ IN A GARAGE OR BASEMENT BELOW GROUND LEVEL DO NOT STORE THE GAS BOTTLE THE SAME PLACE AS IT MUST BE STORED ABOVE NORMAL GROUN...

Page 23: ...wer can be used on stubborn stains then rinse with water Make sure the cooking grids are well dried before storage MAINTAIN THE BURNERS 1 Turn gas off at control knobs and LP Tank 2 Remove cooking grates grease tray and grease cup 3 Remove screw at end of burner using a screwdriver 4 Carefully lift each burner up and away from valve openings 5 Wire brush entire outer surface of burner to remove fo...

Page 24: ...removeresidues ofgreaseandfoodaftertheBBQhasbeenused Lack of maintenance may result in a grease fire because old fat and grease takes fire when it reaches high temperatures IN CASE OF GREASE FIRE Incaseofgreasefire closethegassupplyanddisconnectthecontrol ler Leavethelidopenandwaituntilthefiregoesoffbyitself NB YOUR BARBECUE IS NOT DESIGNED TO BE USED WITH MORE THAN 50 OF THE COOKING AREA AS A SOL...

Page 25: ...e it doesn t burn When the sugar is caramelised add the almonds and stir Place them on a greaseproof paper to cool off and roughly chop Make the chimichurri or your favourite sauce Grill the bread until dry and break up into pieces Brush the leeks with oil season with salt and pepper and grill until golden and tender Put on a plate with loads of chimichurri on top finely chop the spring onion and ...

Page 26: ...oked the four chefs for another event in Los Angeles The idea of The Flying Culinary Circus was created Fast forward The chefs have now travelled to more than 56 countries all over the world Royalties as well as celebrities have enjoyed the culinary concept the chefs offer tremendously But as the chefs say it s not about how famous our guests are it is all about sharing the fun of cooking 26 The F...

Page 27: ...IGNITOR BOX IS EMPTY CHANGE BATTERIES LOW FLAME EMPTY GAS BOTTLE REPLACE GAS BOTTLE IRREGULAR GAS SUPPLY CHECK REPLACE THE REGULATOR THE BURNER IS BLOCKED CLEAN THE BURNER GAS SUPPLY OR HOSE IS BLOCKED CLEAN GAS VENTURY OR HOSE LOW FLAME OR BACKFIRE GAS BOTTLE IS TOO SMALL 13 KG OR LARGER BOTTLE IS RECOMMENDED BURNER IS BLOCKED CLEAN THE BURNER GAS SUPPLY OR HOSE IS BLOCKED CLEAN GAS VENTURY OR HO...

Page 28: ...ults due to misuse lack of maintenance or modification of the product will invalidate the warranty Damaged parts not due to a fault with the product will be invoiced according to our price list carriage and administration fee If new parts are needed or in the event of a warranty claim please contact your dealer or consumer contact FCC PRODUCTS AS KJELLER VEST 3 2007 KJELLER NORWAY 4792478600 suppo...

Reviews: