background image

Tekniske data

Technical Data

Total Heat input:


13.2 kW (main burner: 9.9kW + side burner: 3.3.kW) 

Gas consumption:


G30 959.8g/h / G31 942.7g/h

Gas cylinder (not included):


Use standard cylinder approved for use in the Nordic Region. 

Even though butane and propane gas can be used, we recommend propane for use in the 

Nordic Region. Approved hoses and regulators are available from most outlets selling gas 

equipment.

NB!


Gas hoses used for this product must not exceed 120 cm in length. 

BE, BG, CY, CZ, DK, EE, 

FI, FR, GB, GR, HR, HU, 

IT, LT, LU, LV, MT, NL, NO, 

RO, SE, SI, SK, TR

ø0.89 mm main burner

ø0.89 mm side burner

G30(Butane) 

G31(Propane) 

and their mixtures

I3B/P(30)

H: 112.4 cm

W: 133.4cm

D: 60.8 cm

The product is manufactured in accordance with European Gas Appliances Regulation (EU) 2016/426

USE ONLY GAS TYPE AND GAS CATEGORY ENTERED IN THIS MANUAL.

!

Read before assembly

DESTINATION OF  

COUNTRIES TO USE

GAS TYPE

VALVE SIZE

GAS CATEGORY

 1336-22

Make sure that all parts and screws are included and that they are 
undamaged before assembling the product. 

If the barbecue is damaged during transport, do not assemble the 

barbecue before contacting your dealer or [email protected]

Transport damage to parts, varnish or enamel must be reported to 
the dealer or [email protected] before the barbecue is installed 
and used.

Please note that some parts may be located in the Styrofoam to 

protect the part during transport. If parts are missing, first check 

the packaging carefully.

Compare the parts list with the contents of the box. Do not 
assemble this grill if there is damages or parts are missing, contact 
your dealer or [email protected].
Remove all remnants of packaging material and any plastic wrap 
from the barbecue.


FOLLOW THE ORDER IN THIS MANUAL TO AVOID INCORRECT ASSEMBLY. 
PARTS OF THE ASSEMBLY WILL REQUIRE HEAVY LIFTING WHICH 
SHOULD BE PERFORMED BY TWO PEOPLE TOGETHER, TO AVOID 
PERSONAL INJURY AND DAMAGE TO THE BARBECUE. SOME METAL 
PARTS MAY BE SHARP, WEAR PROTECTIVE GLOVES.


POWER TOOLS SHOULD NOT BE USED TO ASSEMBLE THE BARBECUE.  
TOOLS WITH TOO MUCH FORCE CAN DAMAGE THE SURFACE 
TREATMENT ON SCREWS, DAMAGE ENAMELLED / LACQUERED PARTS 
OF THE BARBECUE, AS WELL AS LOOSEN PRE-ASSEMBLED NUTS.


IF THE PRODUCT'S VARNISH OR ENAMEL IS DAMAGED DURING 
ASSEMBLY, WE RECOMMEND THAT THE DAMAGE BE TREATED 
IMMEDIATELY TO AVOID LATER RUST DAMAGE. SUITABLE HEAT-
RESISTANT VARNISH CAN BE ORDERED FROM [email protected]

!

FOLLOW THESE INSTRUCTIONS CAREFULLY TO AVOID 

SERIOUS PERSON INJURY OR DAMAGE TO YOUR BARBECUE.

5

4

fccbbq.com

Summary of Contents for Fire 3.1

Page 1: ...n of cooking OUTDOOR USE ONLY READ THE MANUAL FOLLOW THE ASSEMBLY INSTRUCTIONS STEP BY STEP GET TO KNOW YOUR GRILL AND THE SAFETY INSTRUCTIONS BEFORE USING THE APPLIANCE SCAN QR CODE FOR BARBECUE ASSEMBLY VIDEO WARRANT SCAN QR CODE AND REGISTER BARBECUE FOR EXTENDED WARRANTY ...

Page 2: ...ASON ALWAYS CHECK THE GAS HOSE FOR DAMAGE AND CRACKS BEFORE USING THE BARBECUE NEVER BARBECUE IN CLOSED ROOMS OR UNDER ROOFS AS THIS MAY LEAD TO A LACK OF OXYGEN FAILURE TO FOLLOW THE INSTRUCTIONS PROVIDED CAN IMPLY A RISK OF SERIOUS INJURY TO PERSONNEL AND FIXED INSTALLATIONS REBUILDING MODIFYING THE BARBECUE CAN CAUSE DANGER AND WILL INVALIDATE THE WARRANTY ALWAYS SUPERVISE THE BARBECUE DURING U...

Page 3: ...bq com Transport damage to parts varnish or enamel must be reported to the dealer or support fccbbq com before the barbecue is installed and used Please note that some parts may be located in the Styrofoam to protect the part during transport If parts are missing first check the packaging carefully Compare the parts list with the contents of the box Do not assemble this grill if there is damages o...

Page 4: ...TTOM SHELF 1 20 TOP SUPPORT 1 21 RIGHT FRONT CORNER BRACE 1 22 RIGHT SIDE UPPER BRACE 1 23 RIGHT REAR CORNER BRACE 1 24 WHEEL COVER 2 25 WHEEL 2 26 AXLE 1 27 HEAT REFLECT PANEL 1 28 GREASE TRAY 1 29 OIL CUP 1 30 SMALL COOKING GRATE 1 31 ROUND COOKING GRATE 1 Parts list Parts list CODE DESCRIPTION QTY A SCREW M6x15 54 3 B WASHER Ø6 6 3 C LOCK WASHER Ø6 3 2 E M10 NUT 2 F SCREW M4x10 6 G FIBER WASHER...

Page 5: ...races with the lower and upper braces with 10 pcs M6x15 screws LEFT SIDE Assemble the corner braces with the lower and upper braces with 10 pcs M6x15 screws Attach the wheels with 2x M10 nuts Attach the front pa nel with 12 pcs M6x15 screws Install the support strut 9 8 fccbbq com ...

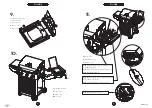
Page 6: ...BODY Turn the carriage upside down and install the bottom plate with 4 pcs M6x15 screws Fit the lower front panel using 4 pcs M6x15 screws Lift the grill body and place it on the base Fit the 4 screws M6x15 before tightening Fit the left side table A M6x15 4 stk H M6x15 2 stk B Ø6 5 2 stk 11 10 fccbbq com ...

Page 7: ...11 Step 4 Attach the side burner 8 with screw M4 x 10 F and fiber washer G Step 5 Put the side burner frame 7 on top F M4x10 6 pcs G Fiber Washer 4 pcs J ST4 2x10 3 pcs F J F G F J F G I ST6 3x16 3 stk B Ø6 5 3 stk C Ø6 5 3 stk Mount right side table A M6x15 4 pcs H M6x15 1 pcs B Ø6 5 1 pcs Assemble the front panel and left side table Step 6 Plug in the ignition wire 13 12 fccbbq com ...

Page 8: ...de tables with 2 pcs M6x15 screws Add flame tamers Insert the grill grate and warming shelf Place the plate in the grease tray and push it into the back of the barbecue Push in the grease cup The barbecue is now fully assembled 15 14 fccbbq com ...

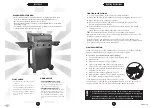
Page 9: ...ater mixture two parts dishwashing soap and one part water FOLLOW THESE INSTRUCTIONS CAREFULLY TO AVOID SERIOUS DAMAGE TO YOUR BBQ AND CAUSE PERSONAL INJURY HOSE Connect the gas hose to the gas inlet on the barbecue Tighten well Install the regulator and hose Follow the installation instructions that came with the controller set Do not use sealing tape glue or liquid on the connection Gas hoses us...

Page 10: ...s lit then the next burned may be lit with the same procedure Ignite the rest of the burners the same way as needed TIPS Preheat the barbecue for about 10 15 minutes on maximum temperature After completion of preheating turn all burners to the LO position for best cooking results If the burners do not ignite after 5 seconds set all control knobs to off red bar pointing upwards and close the gas va...

Page 11: ... NB DO NOT USE WATER TO EXTINGUISH GREASE FIRE CLEAN THE BARBECUE REGULARLY TO AVOID GREASE FIRES CLEANING All cleaning and maintenance must be performed when the barbecue is cold Make sure that the gas upply is switched OFF and the regulator is disconnected from the gas container Use a mixture of dishwashing detergent and water or use a separate grill cleaner with a nylon scrubbing brush scouring...

Page 12: ...cessories are used the heat will be trapped inside which will create an overheating that can damage the barbecue THIS PRODUCT IS INTENDED FOR USE IN PRIVATE HOUSEHOLDS AND IS NOT SUITABLE FOR PROFESSIONAL USE IN A RESTAURANT OR SIMILAR Coatings should not be applied until the barbecue is completely cold and dry Moisture on the inside of the cover will cause large formations of surface rust for tho...

Page 13: ...age to the product s packaging is attached to the complaint Faults due to misuse lack of maintenance or modification of the product will invalidate the warranty Damaged parts not due to a fault with the product will be invoiced according to our price list carriage and administration fee If new parts are needed or in the event of a warranty claim please contact your dealer or consumer contact FCC P...

Reviews: