6
I
UK
D
F
La tabella mostra le potenze, misurate
secondo lo standard AES, accettate dal
diffusore.
Tutti gli altoparlanti sono testati con un
fattore di cresta pari a 2 perciò in
applicazioni di alta qualità ( dove il
rapporto tra tensione media e tensione
impulsiva fornitaalsistema sia superiore o
uguale a 2 ), la FBT consiglia di usare un
amplificatore di potenza RMS doppia (su
impedenza pari a quella nominale del
diffusore o dei singoli altoparlanti) rispetto
a quella fornita in tabella.
l’amplificatore consigliato
permette di sfruttare interamente le
capacità dinamiche dei diffusori per
ottenere la massima qualità e pressione
sonora istantanea,
; in presenza di un programma
musicale fortemente compresso o se
l’amplificatore viene spinto in “clipping”, gli
altoparlanti possono danneggiarsi per
surriscaldamento o eccessiva escursione.
, per non
superare la capacità termica di
dissipazione degli altoparlanti. In ogni
caso, far lavorare l’amplificatore in
“clipping” comporta un aumento
consistente della potenza fornita al driver,
che potrebbe essere danneggiato
nonostante l’intervento della protezione
presentenelcx-over.
ATTENZIONE:
ma ciò non
garantisce la salvaguardia degli
altoparlanti in qualsiasi condizione di
utilizzo
Per programmi musicali a bassa
dinamica e forte distorsione, è
consigliabile usare un amplificatore
con potenza RMS pari o inferiore a
quella fornita in tabella
The table shows the power outputs,
measured in accordance with the AES
standard, that are acceptable by the
loudspeaker.
All the drivers are tested with a crest factor
of 2, thereby applying a criterion of high
quality (where the ratio between average
voltage and burst voltage supplied to the
system is greater than or equivalent to 2).
FBT recommends using an amplifier with
RMS output that is double the value given
in the table (into an impedance equivalent
to the nominal impedance of the
loudspeaker or of theindividualdriver).
the recommended amplifier
makes it possible to exploit the full
dynamic potential of the loudspeakers to
obtain the maximum sound quality and
SPL,
; in the case of a highly
compressed music program or if the
amplifier is driven to clipping levels the
drivers may be damaged due to
overheatingorexcessiveconeexcursion.
to avoid
exceeding the heat dissipation capacity of
the drivers. In any event, driving the
amplifier in clipping mode results in a
substantial rise in the power supplied to
the HF unit, which may therefore be
damaged despite tripping of the protection
inthe internal crossover.
WARNING:
but it does not guarantee the
protection of the speakers in any
condition of use
For music programs with reduced
dynamics and pronounced distortion it
is advisable to use an amplifier with an
RMS output that is equal to or lower
than the value given in the table
Le tableau indique les puissances
(mesurées conformément au standard
AES) tolérées par les haut-parleurs.
Tous les haut-parleurs sont testés avec un
facteur de crête de 2 ; dans les
applications de qualité (où le rapport entre
tension moyenne et crête de tension est
supérieur ou égal à 2), FBT recommande
l'utilisation d'un amplificateur avec double
puissance RMS (une impédance égale à
l'impédance nominale du diffuseur ou des
simples haut-parleurs) par rapport à celle
indiquéedansletableau.
: l'amplificateur conseillé
permet d'exploiter entièrement les
capacités dynamiques des haut-parleurs
afin d'obtenir qualité et pression sonore
i n s t a n t a n é e m a x i m u m , m a i s l a
sauvegarde des haut-parleurs
; en présence d'un
programme musical fortement comprimé
ou si l'amplificateur passe en saturation
“clipping”, les haut-parleurs peuvent subir
des dommages dus à la surchauffe ou à
une excursion excessive.
afin de ne pas dépasser la
capacité thermique de dissipation des
haut-parleurs. En tous cas, lorsque
l'amplificateur travaille en saturation
“clipping”, la puissance fournie au driver
augmente considérablement et peut lui
causer des dommages malgré la
protection présente dans lecx-over.
ATTENTION
n'est pas
garantie dans n'importe quelles
conditions d'usage
Pour les programmes musicaux
caractérisés par une faible dynamique
et distorsion importante, il est
conseillé d'utiliser un amplificateur
avec une puissance RMS égale ou
inférieure à celle indiquée dans le
tableau
Die Tabelle zeigt die gemäß AES-
Standard gemessenen Leistungen an, die
vonderLautsprecherbox.
Sämtliche Lautsprecher wurden mit
einem Spitzenfaktor 2 getestet. Bei
Anwendungen mit hohen Anforderungen
an die Klangqualität (mit einem Verhältnis
z w i s c h e n d e r d e m S y s t e m
bereitgestellten mittleren Spannung und
Impulsspannung von größer gleich 2 )
empfiehlt FBT daher, einen Verstärker mit
doppelter RMS-Leistung (bei Impedanz
g l e i c h d e r N e n n i m p e d a n z d e r
Lautsprecherbox oder der einzelnen
Lautsprecher) bezogen auf die in der
Tabelle angegebenen Leistung zu
verwenden.
mit dem empfohlenen
Verstärker können die dynamischen
Leistungen der Lautsprecher voll
a u s g e n u t z t u n d d a h e r h ö c h s t e
Klangqualität und sofortiger max.
Schalldruck erhalten werden;
; bei einem stark
komprimierten Musikprogramm oder bei
Übergang des Verstärkers ins “Clipping”
können die Lautsprecher infolge
Überhitzung oder übermäßigen Hubs
beschädigt werden.
, um die Verlustleistung der
Lautsprecher nicht zu überschreiten. Der
Betrieb des Verstärkers im “Clipping”-
Bereich führt in jedem Fall zu einem
starken Anstieg der an den Treiber
abgegebenen Leistung, der trotz
Auslösung der Schutzvorrichtung im cx-
over.
ACHTUNG:
dies
garantiert jedoch nicht den Schutz der
L a u t s p r e c h e r u n t e r j e d e r
Einsatzbedingung
Bei Musikprogrammen mit geringer
Dynamik und starker Verzerrung sollte
ein Verstärker mit RMS-Leistung
verwendet werden, die größer oder
unten der in der Tabelle angegebenen
Leistung ist
* 2 ore, pink noise con fattore di
cresta 2, tensione RMS
applicata corrispondente alla
potenza sul minimo del modulo
dell’impedenza del diffusore
mod.
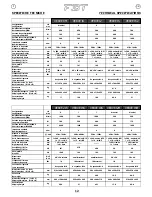
FULL-RANGE
VERVE 10
VERVE 12
VERVE 15
VERVE 215
VERVE 152
* power
* power
* power
* power
* power
125W / 8 OHM
150W / 8 OHM
200W / 8 OHM
350W / 8 OHM
700W / 4 OHM
* 2 hours, pink noise with crest
factor 2, applied RMS voltage
corresponding to the power on
the minimum of the modulus of
the impedance ofthespeaker.
* 2 heures, bruit rose avec
facteur de crête 2, valeur
efficace de la tension appliquée
correspondant à la puissance
m i n i m u m d u m o d u l e
d'impédence du haut-parleur
* 2 Stunden, pink noise mit
Spitzenfaktor 2,angewandte
Spannung RMS entsprechend
der angegebenen Leistung für
d e n M i n d e s t w e r t d e s
I m p e d a n z m o d u l s d e r
Lautsprecherbox
VERVE 15S
VERVE 18S
VERVE 12M
* power
* power
* power
350W / 4 OHM
HPF 35Hz - LPF 120Hz
600W / 4 OHM
HPF 30Hz - LPF 100Hz
150W / 8 OHM
VERVE 15M
* power
175W / 8 OHM
VERVE 8M
* power
125W / 8 OHM
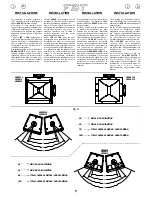
° Accertarsi che lo stativo supporti il
peso della cassa
° Non superare l’altezza consigliata
(160cm)
° Posizionare lo stativo su una
superficie non sdrucciolevole e piana
° Per rendere
stabile lo stativo
allargare al massimo i piedini
° Make sure the stand can support the
weight of thebox
° Do not exceed the recommended
height(160cm)
° Position the stand on a flat, non-skid
surface
° To make the stand more stable open
the feetaswideaspossible
° Assurez-vous que le statif supporte le
poidsdel’enceinte
° Evitez de dépasser la hauteur
conseillée(160cm)
° Positionnez le statif sur une surface
nonglissanteetplate
° Pour assurer la stabilité du statif
écartez les piedsauxmaximum
° Stellen Sie sicher, dass das stativ dem
GewichtderBoxangemessen
° Die empfohlene Höhe nicht
überschreiten (160cm)
° Das Stativ auf einer rutschfesten und
ebenenOberflächeaufstellen
° Sorgen Sie dafür, dass die Füße des
Stativs so weit wie möglich auseinander
gestellt sind, um optimale Stabilität
gewährleisten
STATIVO
STATIF
STAND
STATIV
° Per l’installazione sospesa del
diffusore selezionare con cura l’area
dove si intende posizionareilsistema.
° Assicurarsi che la struttura sia
adeguata a sopportare il pesodelbox.
° Inserirenegliappositi fori di fissaggioil
golfare.
° Se è necessariodareuna inclinazione
al box utilizzando la catena posteriore
° For suspended installation of the
loudspeaker choose the area in which
the system is tobepositionedwithcare.
° Make sure the loading structure is
strong enough to support the weight of
the loudspeaker.
° Fit the eyebolts in the threaded holes
in the cabinet.
° If necessary, tilt the cabinet forwards
by meansoftherearchain
° Pour l'installation du haut-parleur en
suspension, choisir soigneusement la
zone de positionnement du système.
° S'assurer que la structure est en
mesuredesupporterlepoidsduboîtier.
° Insérer le boulon à oeil dans les
orifices de fixation prévus à cet effet.
° Si nécessaire, incliner le boîtier à
l'aide de la chaîne postérieure.
° Bei der Hängebefestigung der
Lautsprecher muss der Installationsort
sorgfältig gewählt werden.
° Sicherstellen, dass die
Struktur für das Gewicht der
Lautsprecherbox geeignet ist.
° Die Ringschraube in die
e n t s p r e c h e n d e n
B e f e s t i g u n g s b o h r u n g e n
einsetzen.
° Für eine eventuelle Neigung der
BoxdiehintereKetteverwenden
GOLFARE
OEILLET
EYEBOLT
RINGSCHRAUBE


