


faytech Ltd. 2009
C
32
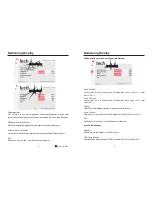
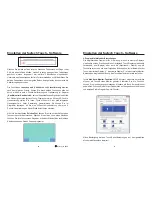
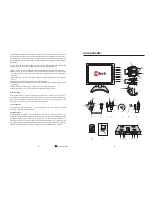
1.
LED - power indicator
2.
POWER: turn the display on or off
3.
VOL+: increase the volume
4.
VOL-: reduce the volume
5.
MENU: open the OSD menu
–
or- confirm selection in the OSD menu
6.
CH+: to navigate in the OSD menu
–
or- change the highlighted values
in the menu
7.
CH-: to navigate in the OSD menu
–
or- change the highlighted values
in the menu
8.
PC/AV/TV: switch from VGA to AV1 to AV2. Make sure the input
source is correct or you will not see any image on your screen
9.
Infrared receiver
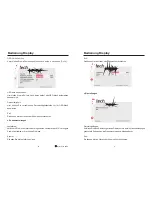
10.
VGA connector to PC and to display (26)
11.
USB connector to PC and to display (25)
12.
Mounting stand
13.
Cinch cable. Yellow and green: video input; white and red: audio input
14.
Video/audio connector (to 22)
15.
120 or 220V adaptor connects to input (27)
16.
120 or 220V power plug
17.
Driver CD
18.
Touch pen
19.
12V adaptor to cigarette lighter
20.
Remote control for the display
21.
User's guide
22.
Video/audio connector to 14 (This is not an S-video connector!)
23.
3.5mm headphone out
24.
3.5mm audio in
25.
USB Connector
26.
VGA connector
27.
12V DC power input
Components:
33
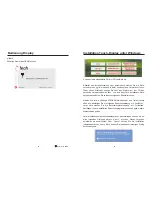
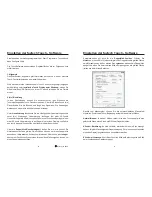
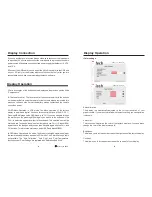
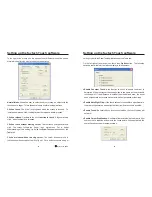
Display Connection
Each cable is labeled for easy connection. To operate your faytech display
properly, there must be at least one signal source and a power supply
connected. If you have the optional touch screen and you want to use it, you
also must have the USB port connected to your PC.
To connect the
, you have the following options:
On a PC: Connect the VGA cable from the faytech monitor to the VGA output
of your PC graphics card. Please change PC/AV/TV to VGA / RGB, so you
have an image on the screen.
On a PC: If you have only one DVI output on your PC, please purchase a DVI
to VGA adapter and connect the display via VGA to your PC.
To DVD-Player/camera/Video source: Connect one or two video inputs
(labeled Video1 or Video2) to a corresponding video source. Please be sure
to switch off the video source before you connect the cables. Switch
PC/AV/TV to the respective channel input (AV1 or AV2).
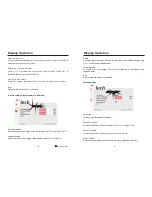
1.
signal source
l
l
l
In addition, the display has two stereo audio inputs, one for the PC (3.5mm
audio in) and one for the two video inputs (sound is carried on both channels),
white and red RCA connectors, labeled with AUDIO1-L and AUDIO1-R. Audio
comes through the speakers only if there is an image signal. Audio is also
available from the earphone output on the underside of the display. If
earphones are connected, the built-in speakers will not be active.
2
.Connect power using only one of these options (do not try to connect more
than one power source at the same time):
You can connect the faytech display with the included 120V/220V plug or the
12V power adapter. Insert one of these power sources into the input (27)
You can use the display simultaneously with all video signal
sources.
Use the PC/AV/TV button on the display or the
PC/AV/TV button on the remote control to switch between the
various signal inputs
Tip:


