


888-999-7715
www.FastListParts.com
15
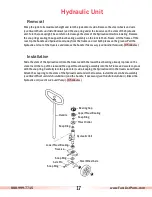
Hydraulic Unit
Inspection
Inspect the outside of the pump for oil leaks. Test the unit, under a load, to determine if there is a problem. This can be
done by lifting a heavy pallet and letting it stand for 15-20 minutes. Below are symptoms and solutions to common
hydraulic unit failures. If the following solutions fail to correct the problem, a complete rebuild of the malfunctioning unit
may be necessary.
Jack fails to lift load
•
Air Lock in Pump (Foot or Hand Control)
- Place the control mechanism in the release position, then pump handle
rapidly 10-15 times. (5 minutes)
•
Low Fluid Level (Foot or Hand Control)
- With the jack in a lowered position, remove filler plug slowly to avoid rapid
depressurization. Using RL-HO oil, fill the reservoir until the oil is level with the fill plug hole. Replace filler plug, rotating
no more than 360 degrees. Place the control mechanism in the lift position and pump the jack up to its maximum
height. Remove filler plug to allow air into the reservoir, then replace the filler plug, creating a snug fit. Do not
overtighten. (10 minutes)
NOTE: If lack of oil pressure is evident by short lifting strokes, repeat procedure. If failure is still evident, see Air Lock in
Pump..
•
Hand Control Out of Adjustment
- Place hand control in neutral. Loosen the lock nut on the adjustment screw. Back the
set screw out 3-4 turns, being careful not to completely remove it. Pump the handle slowly to raise the jack, then turn
the adjusting screw in until the jack stops raising. Now turn the adjusting screw an additional 1/4 of a turn and tighten
the lock nut. Test the jack by placing the handle control in the neutral position, then pump the handle. The jack should
not raise. Place the handle control in the lower position and the jack should lower. (
see Diagram on page 12 )
(10 minutes)
•
Foot Control Malfunctioning
- If the foot control shoulder bolt is bent, replace it. If the foot control pedal is worn to the
point that it is not properly engaging the actuator pin, replace the foot control pedal. If the foot control pedal appears to
be properly engaging the actuator pin, the problem is probably within the hydraulic unit.
Jack fails to lower
•
The foot control pedal shoulder bolt is loose or bent. Replace if necessary.
•
The hand control may be out of adjustment (
see Hand Control Out of Adjustment ).
•
Oil is too dense. Empty unit and refill with RL-HO oil.
•
Look for any bent or damaged frame parts (lifting link, push rod, etc.). Bent or damaged frame parts should be replaced.
•
Debris blocking an oil channel in the hydraulic unit. Contact us for our hydraulic core exchange program.
Jack lifts in short increments
•
Loss of oil pressure -
see Low Fluid Level.
•
Reservoir filler plug leaking - Replace the washer and restore air pressure (
see Low Fluid Level ).
One fork lifts, the other does not
Check for damage in the following areas and their attached parts:
•
Lifting link (lifting link pin and traverse shoulder pin)
•
Pushrod
•
Load roller bracket (pivot axle)


