


888-999-7715
www.FastListParts.com
11
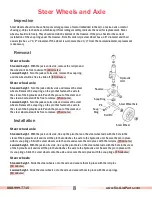
Installation - T Series
Standard height
- Insert the eccentric through the lifting link
and push rod. Secure it with its snap ring. Insert the push rod
axle through the bracket and push rod. Secure with its snap
rings. Slide the pivot axle through the frame and bracket.
Secure the axle in place with its snap rings.
Turn the jack upright and fully lower it. Adjust the push rod by
turning the eccentric with a large screwdriver through the
access hole on the side of the frame. By turning the eccentric
you effectively lengthen or shorten the push rod.
Test the adjustment by pumping the jack up and then lowering
it. If the forks hit bottom at the same time, then it is adjusted
correctly. If one fork hits bottom before the other, then further
adjustment is necessary.
Turn the eccentric about 1/8 to 1/4 of a turn and test the
adjustment again. Once the push rods are adjusted correctly,
turn the jack over onto its side and tighten the set screw down
to keep the eccentric from turning. (30 minutes)
Lowered height
- Thread the push rod onto the eye bolt and try
to match the other side if it is still assembled. If it isn't, adjust
the length after you have assembled the load roller bracket
onto the push rod.
Insert the push rod axle through the bracket and push rod.
Secure the axle in the bracket with the roll pin. Insert the pivot
axle through the frame and bracket. Secure the axle in the
bracket with the roll pin.
If you have not adjusted the push rod yet, place the lifting link
in a position that matches a fully lowered position. Spin the
push rod and bracket one way or the other until the pivot axle
hole on the bracket lines up with the frame. Then insert and
secure the pivot axle.
Test the adjustment by pumping the jack up and then lowering
it. If the forks hit bottom at the same time, then it is adjusted
correctly.
If one fork hits bottom before the other, then further adjustment
is necessary. You can either shorten the push rod on the fork
that hits first or lengthen the push rod on the fork that hits
second.
It is easier if you do the adjustment on the eye bolt end once
the load wheel bracket is attached to the frame. Remove one of
the snap rings on the pin that fastens the eye bolt to the lifting
link, and punch the pin out. Pull the eye bolt away from the
lifting link and turn it one way or the other to adjust as needed.
Assemble the eye bolt and the lifting link with the pin and its
snap rings. Turn the jack over and test the adjustment. Keep
adjusting until both forks hit bottom at the same time.
(25 minutes)
Installation - E Series
Standard height
- Thread the push rod onto the eye bolt. Try to
match the other side if it is still assembled. If it isn't, adjust the
length after you have assembled the load roller bracket onto
the push rod. Insert the push rod axle through the bracket and
push rod. Secure the axle with the snap rings. Insert the pivot
axle through the frame and bracket. Secure the axle in the
frame with the snap rings.
If you have not adjusted the push rod yet, place the lifting link
in a position that matches a fully lowered position. Spin the
push rod and bracket one way or the other until the pivot axle
hole on the bracket lines up with the frame. Then insert and
secure the pivot axle.
Test the adjustment by pumping the jack up and then lowering
it. If the forks hit bottom at the same time, then it is adjusted
correctly. Turn the jack over onto its side and tighten the nut on
the eye bolt up to the push rod to secure the adjustment during
any other repairs. If one fork hits bottom before the other, then
further adjustment is necessary. You can either shorten the
push rod on the fork that hits first or lengthen the push rod on
the fork that hits second. Keep adjusting until both forks hit
bottom at the same time. (25 minutes)
Lowered height
- Thread the push rod onto the eye bolt. Try to
match the other side if it is still assembled. If it isn't, adjust the
length after you have assembled the load roller bracket onto
the push rod. Insert the push rod axle through the bracket and
push rod. Secure the axle in the bracket with the roll pin. Insert
the pivot axle through the frame and bracket. Secure the axle in
the bracket with the roll pin.
If you have not adjusted the push rod yet, place the lifting link
in a position that matches a fully lowered position. Spin the
push rod and bracket one way or the other until the pivot axle
hole on the bracket lines up with the frame. Then insert and
secure the pivot axle.
Test the adjustment by pumping the jack up and then lowering
it. If the forks hit bottom at the same time, then it is adjusted
correctly. If one fork hits bottom before the other, then further
adjustment is necessary. You can either shorten the push rod
on the fork that hits first or lengthen the push rod on the fork
that hits second. Keep adjusting until both forks hit bottom at
the same time. (25 minutes)
Push Rods


