background image


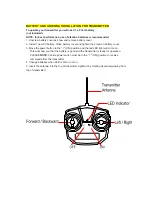
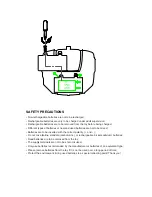
BATTERY AND ANTENNA INSTALLATION FOR TRANSMITTER 

To operate your transmitter you will need 1 x 9 Volt battery   

(not included).   

NOTE: for best performance, use of alkaline batteries is recommended. 

1. Unscrew battery cover as show and remove battery cover.   
2. Install 1 new 9V battery. Close battery cover and tighten the screw on battery cover. 
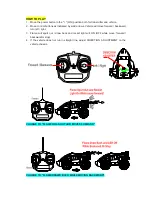
3. Move the power button to the " I "(ON) position and the red LED light will come on.   
      This will show you that the battery is good and the transmitter is ready for operation.   
   PLEASE 

NOTE

: Vehicle power switch must be in the " I " (ON) position to receive   

      commands from the transmitter.   
4. Change batteries when LED is dim or not on. 
5. Insert the antenna into the top of transmitter, tighten it by rotating clockwise(viewing from 
top of transmitter).   


Summary of Contents for FIRETECH

Page 1: ... while it is in motion keep hands hair and clothing away from this vehicle when the power switch is turned to the I ON position Remove batteries when vehicle is stored Avoid tire contact on painted or varnished surfaces The FIRETECH is built with an automatic shut off function if the vehicle reaches excessive temperature during operation If the vehicle stops after a prolonged period of operation t...

Page 2: ... separation between the equipment and receiver Connect the equipment into an outlet on a circuit different from that to which the receiver is connected Consult the dealer or an experienced radio TV technician for help U S FCC Warning Changes or modifications to this unit not expressly approved by the party responsible for compliance could void the user s authority to operate the equipment This dev...

Page 3: ...UP FLAME On the vehicle bottom switch to Try me position press Try me button on top of body NOTE THE BATTERIES INCLUDED IN THIS TOY ARE INTENDED FOR IN STORE DEMONSTRATION PURPOSE ONLY CHANGE TO LIGHT UP FLAME FIRES OUT ...

Page 4: ...bottom unscrew and remove the battery cover 2 Take out all batteries from compartment and insert 6 new AA LR6 batteries 3 Close battery cover and tighten screw 4 Turn power switch to the I ON position NOTE THE BATTERIES INCLUDED IN THIS TOY ARE INTENDED FOR IN STORE DEMONSTRATION PURPOSE ONLY For best performance use of alkaline batteries is recommended ...

Page 5: ...battery cover and tighten the screw on battery cover 3 Move the power button to the I ON position and the red LED light will come on This will show you that the battery is good and the transmitter is ready for operation PLEASE NOTE Vehicle power switch must be in the I ON position to receive commands from the transmitter 4 Change batteries when LED is dim or not on 5 Insert the antenna into the to...

Page 6: ...atteries are to be inserted with the correct polarity and Do not mix alkaline standard carbon zinc or rechargeable nickel cadmium batteries Dead batteries are to be removed from the toy The supply terminals are not to be short circuited Only use batteries recommended by the manufacturer or batteries of an equivalent type Please remove batteries from the toy if it is not be used over a long period ...

Page 7: ...s Vehicle will move forward backward turn left right 3 Flame will spurt out draw back and rocket light will ON OFF while move forward backward or stop 4 If the vehicle does not run in straight line adjust DIRECTION ADJUSTMENT on the vehicle chassis CHANGE TO FLAME FIRES OUT AND MOVES FORWARD CHANGE TO FLAME DRAWS BACK WHILE MOVING BACKWARD ...

Page 8: ...rom cars and other full size vehicles 4 Always store your vehicle in a cool dry place and off of painted or varnished surfaces 5 Avoid operating around CB radios high voltage electrical wires and large steel reinforced concrete buildings 6 Avoid operating your vehicle and another vehicle on the same frequency 7 DO NOT use in water 8 Vehicle and transmitter are not waterproof Do not immerse or use ...

Reviews: