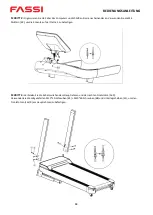


OPERATING INSTRUCTIONS
33
SAFETY INSTRUCTIONS
1.
Read the entire manual carefully before mounting or
operating the device.
2.
Only use the device as described in the instructions.
3.
Check that all screws and bolts are properly tightened before
using the device.
4.
Keep hands away from moving parts.
5.
Keep children and pets away from the device. Never leave
children alone with the device.
6.
Before training, check that all parts of the device are properly
assembled.
7.
The device may only be used by one person at a time.
8.
Mount and operate the device on a solid, level surface.
Always leave a free passage of one meter around the device.
9.
Do not use the device near water or outdoors.
10.
Make sure that
liquid never
enters the device.
11.
Keep sharp objects away from the device.
12.
Never use the device if it is not working properly.
13.
Do not attempt to repair the device yourself without first
consulting our service center.
14.
The device is intended for home use only and must not be
used in the commercial sector. The device complies with the
EN 957-1/6 HB
standard and is not suitable for therapeutic
use.
15.
The device is not suitable for persons with a body weight of
more than
150 kg.
CUSTOMER SERVICE:
In case of breakage, damage or missing parts,
please contact our service center for original spare parts. In the
meantime, do not use the device.
SAFETY INSTRUCTIONS FOR TRAINING
CAUTION
Before you start training, consult your physician. This is
especially important for users with existing health problems.
1.
Warm up well before starting the workout.
2.
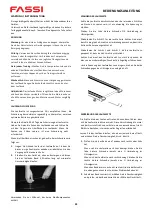
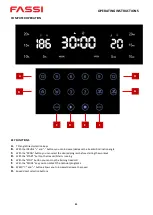
Insert the safety key, attach the other end to your clothing. If
you need to stop the motor quickly, simply pull the safety
key's cable so that it comes off the console; the mat will stop
immediately. To resume the workout, insert the safety key
back into the console.
3.
If the rope is damaged, please contact our service center.
4.
Remove the security key and store it in a safe place when the
device is not in use. Keep the security key out of the reach of
children.
5.
When exercising, always wear appropriate clothing that
cannot get caught in the equipment. Do not use the
equipment barefoot, always wear sneakers. Do not wear
untied shoes, with dangling laces or shoes with leather soles.
6.
Keep all hanging garments and towels away from the running
belt. If an object gets stuck, switch off the device
immediately.
7.
Use caution when starting or stopping the workout. Use the
handrail whenever possible. Hold onto the handrail when
running at a very low speed. Do not get off the treadmill while
it is running.
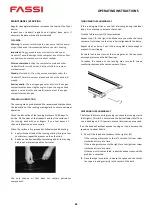
8.
Place both feet on the side covers, start the treadmill, and
only when the treadmill is running at a slow but steady speed,
step on the treadmill one foot at a time.
9.
Do not try to turn around while standing on the treadmill and
it is running. Keep your face and hands facing forward at all
times.
10.
Never operate the device when someone is on it.
11.
Do not swing or jump on the treadmill.
12.
If nausea, dizziness, pain, or other unusual physical symptoms
occur, discontinue exercise immediately and seek medical
attention.
13.
Disabled persons may use the device only in the presence of
qualified personnel or their physician.
14.
Children should only use the device in the presence of an
adult.
15.
In case of malaise, nausea, chest pain or other abnormal
symptoms, stop training immediately and consult a doctor.
ELECTRICAL SAFETY
This device is designed for a voltage of 220V + 5%. Do not
use extension cords, connect the power cord directly to
the wall outlet.
IMPORTANT:
Do not modify the power cord supplied with the
treadmill. If you cannot plug it in, use a suitable outlet installed
by a qualified technician.
OVER VOLTAGE:
This device is equipped with overvoltage
protection. In the event of a power surge, the unit will
automatically shut down. Should the unit turn off, set the
on-off switch to the "off" position and then turn it on again.
DISPOSAL INSTRUCTIONS
The packaging materials are recyclable.
Please dispose of the packaging in an
environmentally friendly manner.
Do not dispose of electrical equipment in
household waste. According to the European
Directive 2002/96/EC on waste electrical and
electronic equipment and its implementation in
national law, the following must be disposed of
Used electrical devices must be collected separately and recycled
in an environmentally friendly manner. If the products contain
batteries or rechargeable batteries that are not permanently
installed, these must be removed before disposal and disposed of
separately as batteries.
Summary of Contents for F 9.3
Page 1: ......
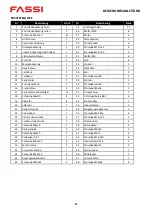
Page 9: ...ISTRUZIONI D USO 8 DISEGNO DELL ESPLOSIONE...
Page 25: ...BEDIENUNGSANLEITUNG 24 EXPLOSIONSZEICHNUNG...
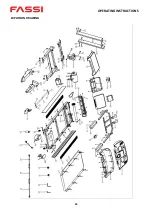
Page 41: ...OPERATING INSTRUCTIONS 40 EXPLOSION DRAWING...
Page 50: ......


