
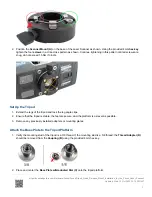


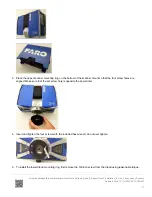


5. Check that the scanner and tripod are correctly locked gently lifting up on the bottom of the scanner. If it stays
attached to the tripod the scanner is secure.
6. Check the inclinometer and adjust your tripod to make sure it is secure before you begin your scan project.
To Achieve Stability and Rigidity
• Extend the tripod as little as possible. Less height
means more accuracy.
• Extend the thicker segments of the legs before the
thinner.
• You can extend a leg segment partially, if necessary,
to achieve a specific height, but do not partially extend
several segments of the same leg.
• The tripod has four leg segments, three of which are
extendable. Fully extend segment
②
, leaving
segments
③
and
④
collapsed. This results in a
working height of approximately 130 cm (51.2 in).
• The tripod is equipped with large, adjustable rubber
feet. Each time you move the tripod, ensure that the
feet are correctly resting on the ground. If you need to
place the tripod on unstable ground (e.g., grass,
gravel, mud), use the supplied spikes instead of the
rubber feet. Press the spikes individually into the
ground until they reach a stable, load-bearing layer.
• After you set the tripod on the ground, check the leg
latches. If any latches are loose, spread the legs
slightly until the latches cannot be wiggled. This
ensures that the tripod is firmly planted on the ground,
and unlikely to shake or vibrate during scanning.
Updated: Wed, 12 Oct 2022 22:14:00 GMT
14