


9
CHICK-INN
Revision date: 12.19.07
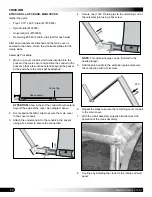
INSTALL END WALL FRAME ASSEMBLY: BACK
The back end wall framing includes a pedestrian door,
vertical framing, and a base rail attached between the end
rafter legs at ground level. Below describes one way to
install the end wall.
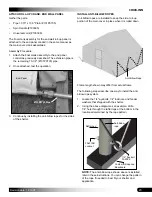
ATTENTION:
To prevent the rafter legs from sinking into
the ground, a perimeter, treated-wood base (or similar
support structure or material) must be placed beneath the
rafter legs and the base rails of the end wall framing.
Complete these steps to assemble the end wall framing for
the back end wall.
Required parts:
• 1.50" x 1.50" square tubes (#102897)
• Angled brackets (#QH1330)
• 1.66" band clamps (#QH1402)
• 36" x 80" door (#104706)
• Tek screws (#FA4472B)
• 5/16" x 2 1/2" carriage bolts (#FAH320B)
• 5/16" Nuts (#FALB32B)
ATTENTION:
Consult the End Wall Diagram for a quick
overview of the end wall.
Frame length shown may differ from actual frame.
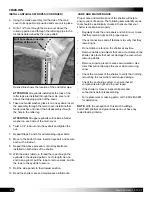
SQUARE THE ASSEMBLED FRAME
1. With the frame assembled and in position, perform
a final square of the frame by measuring diagonally
(corner-to-corner) at the bottom of the legs and verify
that the two measurements are equal. Adjust if needed.
2. Adjust width. Measure width from center of rafter leg to
center of other rafter leg of the
same rafter assembly
.
Adjust if needed.
3. Examine the frame and remove any sharp edges from
the frame or reposition screws so they do not come in
contact with the roof covers.
4. Verify that the screws used to secure the purlin pipe
joints are tight and positioned so they do not touch the
covers.
NOTE:
These purlin joints and Tek screws can be
taped to protect the cover if desired.
5. After the frame is squared, read or reread the
MUST
READ
document and continue with the anchoring of
the shelter.
ANCHOR THE FRAME
At this point in the assembly process, anchor the
assembled frame. Once the frame assembly is anchored
properly, continue with these instructions.
WARNING:
Securing the legs to concrete blocks or
wood boards set on the site is not a substitute for
properly anchoring the shelter. You must anchor the
shelter to the site.
FAILING TO PROPERLY ANCHOR THE SHELTER
WILL RESULT IN DAMAGE TO THE SHELTER AND
MAY CAUSE PERSONAL INJURY.
Turnbuckles and ground anchors are suitable to anchor this
type of shelter. Consult a reliable construction professional
if you need assistance when anchoring the assembled
frame.
CONSULT THE MUST READ DOCUMENT FOR
ANCHORING INSTRUCTIONS.
Contact Customer Service at 1-800-245-9881 to purchase
additional parts to anchor the shelter.


