


17
CHICK-INN
Revision date: 12.19.07
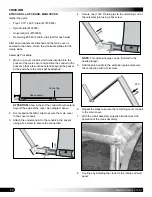
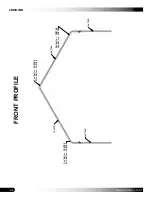
Space the fabric clips (#CC6213) evenly along the
rafter as shown below. Be certain to position the Tek
screws so they will not touch the main cover when it is
installed.
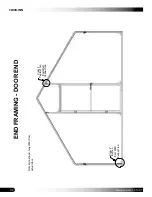
View shows the inside
surface of the end panel.
Fabric clip
and Tek screw
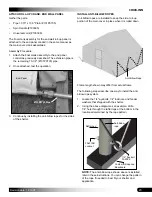
END PANEL INSTALLATION: BACK (CONTINUED)
The installation of wire mesh may cause you to fasten
the lower portion of the panel in a fashion different from
what is shown.
Trim the end panel as needed to achieve the best fit.
6. After securing the end panel to the rafter, cut the
opening for the pedestrian door.
CUT THE DOOR OPENING: BACK END PANEL
The end panel material is cut and removed from the rough
opening of the pedestrian door. These steps describe one
way to do this.
IMPORTANT:
The following steps do not account for an
installation of wire mesh (optional purchase–not included).
If you have purchased and installed wire mesh, you
may need to alter the following steps to account for that
installation.
1. Use a utility knife to cut the end panel as shown below.
The dashed lines show where to make three (3)
diagonal cuts.
2. After cutting the end panel in the locations shown by
the diagonal dashed lines, remove the part of the panel
shown by the shaded area in the above diagram.
ATTENTION:
Allow an 8" border to remain
inside the
door opening
. The white areas in the above diagram
identify this 8" border.
This material is wrapped around the door frame tubes
of the end wall and secured to the inside of the door
frame tubes using Tek screws and fender washers.
3. Remove the end panel material
from the base rail
between the vertical door frame tubes
. See diagram
above.
4. Continue by installing the pedestrian door.
Remove end panel material.
8" Border
(White area)
Remove
dark gray
area.
Cut on
dashed lines.
Door
Frame


