background image

3

HOMEDEPOT.COM

Please contact 1-877-527-0313 for further assistance.

Pre-Installation

Warranty

The supplier warrants the fan motor to be free from defects in workmanship and material present at time of shipment from the factory for a life-
time after the date of purchase by the original purchaser. The supplier also warrants that all other fan parts, excluding any glass or acrylic blades, 
to be free from defects in workmanship and material at the time of shipment from the factory for a period of two years after the date of purchase 
by the original purchaser. We agree to correct such defects without charge or at our option replace with a comparable or superior model if the 
product is returned. To obtain warranty service, you must present a copy of the receipt as proof of purchase. All costs of removing and reinstalling 
the product are your responsibility. Damage to any part such as by accident or misuse or improper installation or by affixing any accessories, is 
not covered by this warranty. Because of varying climatic conditions this warranty does not cover any changes in brass finish, including rusting, 
pitting, corroding, tarnishing, or peeling. Brass finishes of this type give their longest useful life when protected from varying weather condi-
tions. A certain amount of “wobble” is normal and should not be considered a defect. Servicing performed by unauthorized persons shall render 
the warranty invalid. There is no other express warranty. Home Depot hereby disclaims any and all warranties, including but not limited to those 
of merchantability and fitness for a particular purpose to the extent permitted by law. The duration of any implied warranty which cannot be 
disclaimed is limited to the time period as specified in the express warranty. Some states do not allow a limitation on how long an implied war-
ranty lasts, so the above limitation may not apply to you. The retailer shall not be liable for incidental, consequential, or special damages arising 
out of or in connection with product use or performance except as may otherwise be accorded by law. Some states do not allow the exclusion of 
incidental or consequential damages, so the above exclusion or limitation may not apply to you. This warranty gives specific legal rights, and you 
may also have other rights which vary from state to state. This warranty supersedes all prior warranties. Shipping costs for any return of product 
as part of a claim on the warranty must be paid by the customer.

Contact the Customer Service Team at 1-877-527-0313 or visit www.HOMEDEPOT.com.

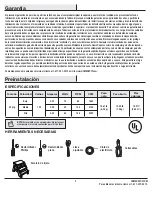
SPECIFICATIONS

TOOLS REQUIRED

NOTE:

 These are approximate measures. They do not

include the Amps and Wattage used by the light kit.

Phillips 
screwdriver

Flat blade 
screwdriver

Adjustable 
wrench

Electrical 
tape

Wire 
cutter

Step ladder

Size

Speed

Volts

Amps

Watts

RPM

CFM

Net

Weight

Gross

Weight

Cube Feet

52 in.

Low

Medium

High

120

0.23

0.39

0.54

10

30

64

60

108

148

1683

3143

4525

13.67 lb

(6.2 kg)

15.40 lb

(7.0 kg)

1.50 ft³

(0.04 m³)

Summary of Contents for 32764

Page 1: ...urchase of this ceiling fan We strive to continually create quality products designed to enhance your home Visit us online to see our full line of products available for your home improvement needs Thank you for choosing Home Depot To view an instructional video on how to install this product 1 Go to www homedepot com and enter either the Item or Model number found in the top right corner of the c...

Page 2: ... and the equipment grounding conductor on one side of the outlet box 7 All setscrews must be checked and retightened where necessary before installation WARNING To reduce the risk of personal injury do not bend the blade brackets also referred to as flanges during assembly or after installation Do not insert objects in the path of the blades WARNING To reduce the risk of fire or electric shock do ...

Page 3: ...all render the warranty invalid There is no other express warranty Home Depot hereby disclaims any and all warranties including but not limited to those of merchantability and fitness for a particular purpose to the extent permitted by law The duration of any implied warranty which cannot be disclaimed is limited to the time period as specified in the express warranty Some states do not allow a li...

Page 4: ...sket 1 BB Pull chain 1 CC Plastic wire connectors 3 DD Hanger pin 1 Part Description Quantity EE Locking pin 1 FF Blade attachment screws 15 Pre Installation continued HARDWARE INCLUDED NOTE Hardware not shown to actual size AA BB CC DD EE FF ...

Page 5: ...nrod assembly 1 C Canopy 1 D Canopy ring 1 Part Description Quantity E Fan motor assembly 1 F Blade 5 G Blade bracket 5 IMPORTANT This product and or components are governed by one or more of the following U S Patents 5 947 436 5 988 580 6 010 110 6 046 416 6 210 117 and other patents pending Pre Installation continued PACKAGE CONTENTS A C D E G F B ...

Page 6: ...tructure Use the appropriate fasteners and materials The outlet box and its bracing must be able to fully support the weight of the moving fan at least 35 lbs Do not use a plastic outlet box The illustrations below show three different ways to mount the outlet box If the canopy touches the downrod then remove the canopy bottom cover and turn the canopy 180 before attaching the canopy to the mounti...

Page 7: ...aps into its locked position Re tighten the two 2 setscrews JJ on the collar on top of the motor housing E Remove the canopy ring D from the canopy C by turning the ring counterclockwise until it unlocks Remove the mounting bracket A from the canopy C by loosening the two canopy screws HH located in the L shaped slots Remove and save the two canopy screws HH and lock washers GG in the round holes ...

Page 8: ...res 1 2 Remove canopy ring D from the canopy C by turning the ring counterclockwise until it unlocks Remove the mounting bracket A from the canopy C by loosening the two canopy screws HH located in the L shaped slots Remove and save the two canopy screws HH and lock washers GG in the round holes This will enable you to remove the mounting bracket A Remove the decorative canopy bottom cover N from ...

Page 9: ...ise until it is seated with the tab of the slide on mounting bracket aligned with the slot in the ball If using close to ceiling mounting hang the fan on the hook provided by utilizing one of the holes at the outer rim of the ceiling canopy C WARNING The hook XX is only to balance the fan while making the electrical connections Failure to hang as shown may result in the hook XX breaking causing th...

Page 10: ... from the ceiling mounting bracket since the ball downrod assembly is not used Connect the fan motor white wire to the household white wire using a wire connecting nut CC Connect the fan motor black and blue wires to the household black wire using a wire connecting nut CC Secure each wire connecting nut using electrical tape Turn the wire connecting nut CC upward and push the wiring into the outle...

Page 11: ... the two mounting screws firmly Install the two mounting screws HH saved from Assembly Step 1 Prepairing for mounting into the holes in the canopy C and tighten firmly Install the decorative canopy ring D by aligning the ring s slots with the screws in the canopy C Rotate the ring clockwise to lock in place Install the pull chain extension BB WARNING When using the standard ball downrod mounting t...

Page 12: ...the ceiling canopy are provided only as an aid to mounting Do not leave the fan assembly unattended until all four canopy screws are engaged and firmly tightened Carefully unhook the fan from the mounting bracket A and align the locking slots of the ceiling canopy C with the two screws in the mounting bracket A Push up to engage the slots and turn clockwise to lock the canopy C in place Immediatel...

Page 13: ... as follows 1 pull High 2 pulls Medium 3 pulls Low 4 pulls off The appropriate speed settings for warm or cool weather depends on factors such as the room size ceiling height and number of fans The slide switch YY controls the direction of the blades forward switch down or reverse switch up Warm weather Forward A downward airflow creates a cooling ef fect This allows you to set your air conditione...

Page 14: ...om a point on the center of the blade to the point on the ceiling Rotate the fan until the next blade is positioned for measurement and measure from the same point on each blade to the ceiling Repeat for each blade Any measurement deviation should be within 1 8 in Run the fan for ten minutes If the fan continues to wobble please contact Home Depot Customer Service and a balacing kit will be sent t...

Page 15: ... 0313 for further assistance Questions problems missing parts Before returning to the store call Home Depot Customer Service 8 a m 6 p m EST Monday Friday 9 a m 6 p m EST Saturday 1 877 527 0313 HOMEDEPOT COM Retain this manual for future use ...

Page 16: ...t al comprar este ventilador de techo Nos esforzamos para crear constantemente productos de calidad diseñados para tu hogar Visítanos por Internet para ver nuestra línea completa de productos disponibles para las necesidades de mejoras de tu hogar Gracias por elegir Home Depot Para ver un video instructivo sobre cómo instalar este producto 1 Ir a www homedepot com e introduzca el artículo o el núm...

Page 17: ...et box 7 All setscrews must be checked and retightened where necessary before installation ADVERTENCIA Para reducir el riesgo de lesiones personales no dobles los soportes de las aspas también llamados bridas durante o después de la instalación No coloques objetos en la trayectoria de las aspas ADVERTENCIA Para reducir el riesgo de incendio o descarga eléctrica no utilices este ventilador con ning...

Page 18: ... no autorizado invalidará la garantía No existe ninguna otra garantía expresa Mediante la presente Home Depot se exime de cualquier garantía incluyendo entre otras aquellas de comercialización e idoneidad para un fin particular de acuerdo con lo contemplado por la ley La duración de cualquier garantía implícita que no se pueda eximir está limitada al período de tiempo especificado en la garantía e...

Page 19: ...ena 1 CC Conectores plásticos para cables 3 DD Pasador de soporte 1 Pieza Descripción Cantidad EE Pasador de cierre 1 FF Tornillos para montaje de aspas 15 Preinstalación continuación HERRAJES INCLUIDOS NOTA No se muestra el tamaño real de los herrajes AA BB CC DD EE FF ...

Page 20: ...ubierta 1 D Anillo de la cubierta 1 Pieza Descripción Cantidad E Ensamblaje del motor del ventilador 1 F Aspa 5 G Soporte de aspa 5 IMPORTANTE Este producto o sus componentes están protegidos por una o más de las siguientes patentes de los EE UU 5 947 436 5 988 580 6 010 110 6 046 416 6 210 117 y otras patentes pendientes Preinstalación continuación CONTENIDO DEL PAQUETE A C D E G F B ...

Page 21: ...a sujetadores y materiales apropiados La caja eléctrica y su soporte deben sostener completamente el peso en movimiento del ventilador al menos 35 lb No uses una caja eléctrica de plástico Las ilustraciones a continuación muestran tres formas distintas de montar la caja eléctrica Si la cubierta toca el tubo bajante retira la tapa inferior de la cubierta y gira la cubierta 180º antes de fijarla a l...

Page 22: ...en su posición Vuelve a apretar los dos 2 tornillos de fijación JJ del collarín ubicado en la parte superior de la carcasa del motor E Retira el aro de cubierta D de la cubierta C girándolo en sentido contrario a las manecillas del reloj hasta soltarlo Retira el soporte de montaje A de la cubierta C aflojando los dos tornillos de la cubierta HH ubicados en las ranuras en forma de L Quita y guarda ...

Page 23: ...ierta D de la cubierta C girándolo en sentido contrario a las manecillas del reloj hasta soltarlo Retira el soporte de montaje A de la cubierta C aflojando los dos tornillos de la cubierta HH ubicados en las ranuras en forma de L Quita y guarda los dos tornillos de la cubierta HH y las arandelas de seguridad GG en los orificios redondos Esto te permitirá retirar el soporte de montaje A Retira la c...

Page 24: ...ierda a derecha hasta que quede encajado con la pestaña del soporte de montaje deslizante alineada con la ranura de la bola Si usas el montaje cerca del techo cuelga el ventilador del gancho suministrado usando uno de los orificios en el borde exterior de la cubierta de techo C ADVERTENCIA El gancho XX debe usarse para sostener el ventilador sólo mientras se hacen las conexiones eléctricas Si no s...

Page 25: ...ho ya que no se usa el ensamblaje de tubo bajante bola Conecta el cable blanco del motor del ventilador al cable blanco del hogar usando una tuerca de conexión de cables CC Conecta los cables negro o azul del motor del ventilador al cable negro del hogar usando una tuerca de conexión de cables CC Asegura cada tuerca de conexión de cables con cinta de electricista Gira la tuerca de conexión de cabl...

Page 26: ...stala los dos tornillos de montaje HH guardados en el paso 1 del ensamblaje cómo preparar la instalación en los orificios de la cubierta C y aprieta firmemente Instala el aro de cubierta decorativo D alineando las ranuras del aro con los tornillos en la cubierta C Gira el aro en sentido de las manecillas del reloj para fijarlo en su lugar Fija la extension de la cadena para halar BB ADVERTENCIA Cu...

Page 27: ...montaje No dejes sin supervisión el ensamblaje del ventilador hasta que los cuatro tornillos de la cubierta estén fijos y firmemente ajustados Con cuidado desengancha el ventilador del soporte de montaje A y alinea las ranuras de cierre de la cubierta del techo C con los dos tornillos en el soporte de montaje A Alza para enganchar las ranuras y gira en el sentido de las manecillas del reloj para a...

Page 28: ...a 1 vez alta 2 veces media 3 veces baja y 4 veces apagado Las configuraciones de velocidad apropiadas para clima cálido o frío dependen de factores como el tamaño de la habitación la altura del techo y la cantidad de ventiladores El interruptor deslizante controla YY la dirección de las aspas hacia adelante interruptor hacia abajo o reversa interruptor hacia arriba Clima cálido Hacia adelante Un f...

Page 29: ... este nivel seleccionando un punto en el techo sobre la punta de una de las aspas Mide desde un punto en el centro de cada aspa a un punto en el techo Rota el ventilador hasta que la siguiente aspa esté posicionada para medir y mide desde el mismo punto en cada aspa hasta el techo Repite para cada aspa Las desviaciones de la medición deben estar dentro de un rango de 1 8 de plg Enciende el ventila...

Page 30: ...piezas faltantes Antes de regresar a la tienda llama al servicio al cliente de Home Depot de lunes a viernes entre 8 00 a m y 7 00 p m hora estándar del Este y los sábados de 9 00 a m a 6 00 p m hora estándar del Este 1 877 527 0313 HOMEDEPOT COM Conserva este manual para uso en el futuro ...

Reviews: