background image

5

16

UK

ES

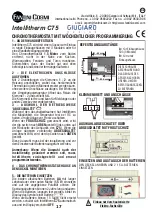
FITTING AND REPLACING THE BATTERIES

LIFT THE COVER AND FIT TWO 1.5 V BATTERIES

1 - WALL MOUNTING

Intellitherm C75 comes with a base suitable for 

flush-mounting in three-module or round boxes or 

for wall mounting.

Install the chronothermostat at 

1.5 metres

 above 

the floor level, far from kitchen ranges, sources of 

heat, windows and doors. Make sure the base is 

properly secured to a level surface, without 

straining.

2 - ELECTRIC CONNECTIONS

Connect terminals

1 - 2

 to the heating system with 

two wires thus replacing the traditional thermostat at 

any time and without adding further connections. 

When the ambient temperature increases, the relay 

will open terminals

1 - 2

 and will close terminals

1-4.

Terminal

4

 is free and it may be used for signalling or 

other purposes, as required.

3 - SELECTING THE "OFF" OPERATING MODE

When in OFF mode, Intellitherm may be set to keep a 

fix temperature of 5°C in order to protect the system 

from the risk of freezing.

To set the 

ANTIFREEZE

 protection move the dip 

switch (located on the left at the bottom on the back 

of the 

C75

 body) to 

HIGH

, whereas to switch the 

system

OFF

 completely, move the dip switch to 

LOW

.

This selection shall be made when installing the 

device and before fitting the batteries.

N.B. If at any time after installation this selection 

is to be changed, Intellitherm shall be reset and 

reprogrammed.

4 - FITTING THE CHRONOTHERMOSTAT BODY ON 

THE BASE

5 - FITTING THE BATTERIES

Fit two high-quality long life alkaline 

AA 1.5 V

batteries respecting the specified bias. Batteries 

could last approximately two years: when batteries 

begin to run down the battery symbol

on the

display will start to flash.

Should batteries be not replaced within 15 days, 

Intellitherm

C75

 will turn off automatically and the 

display will only show the word 

OFF

.

WEEKLY CHRONOTHERMOSTAT

A

=for flush-mounting

box, 503 type (three

modules)

B

=for round flush-

mounting boxes

LOOSEN THIS SCREW

AND TURN

THE DEVICE BODY

UPWARDS TO REMOVE

THE WALL-FIXING BASE

TERMINAL BOARD AND CONNECTIONS

SELECTING OFF or OFF WITH ANTIFREEZE

PROTECTION

SPACING DIMENSIONS FOR FIXING THE BASE

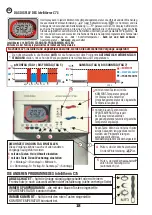
FUNCIONES AVANZADAS DE

Intellitherm C75

Con Intellitherm C75 es posible saber durante cuántas horas

ha sido “requerido calor” (relé cerrado ON) el día anterior y

desde el inicio del funcionamiento de Intellitherm (es decir,

desde la colocación de las pilas o desde un reset).

desplazar el conmutador

S

a la posición

desplazar el desviador

P

a la posición

PROG

lectura de las horas de funcionamiento del día anterior

lectura de las horas de funcionamiento desde el

encendido

2

3

4

HORAS DE FUNCIONAMIENTO DEL SISTEMA

Cuando se desplaza el desviador I a la posición

VERANO, Intellitherm C75 se

prepara para el funcionamiento del sistema de AIRE ACONDICIONADO.

Con el mando rojo se regula la temperatura de confort que se desea mantener en

el ambiente, mientras se excluye el funcionamiento ahorro y anticongelante.

Los sectores rojos de la corona en la pantalla indican los períodos de encendido

del sistema de aire acondicionado, aquellos de diferente color indican los períodos

en que está apagado.

FUNCIONAMIENTO ESTIVAL - AIRE ACONDICIONADO

No reservamos la facultad de introducir todas las modificaciones técnicas y de fabricación que consideremos 
necesarias sin obligación de aviso previo

Con Intellitherm C75 es posible controlar las temperaturas 

MÍNIMA y MÁXIMA que se han alcanzado en el ambiente el 

día anterior y la hora en la que han sido medidas 

desplazar el desviador

P

a la posición

PROG

2

lectura de la hora en la que se ha registrado la temperatura

MÍNIMA

o

MÁXIMA

4

TEMPERATURA AMBIENTE MÍNIMA Y MÁXIMA DEL DÍA ANTERIOR

desplazar el conmutador

S

a la posición

(ahorro) para la temperatura

MÍNIMA

o bien

a la posición

(confort) para la

MÁXIMA

1

CARACTERÍSTICAS TÉCNICAS

-

doble aislamiento

- Conforme a las normas CEI EN 60730-1 y segundas 

- Grado de protección IP20

partes

- Grado de polución 2 

- Capacidad contactos 5 (3)A 250V c.a.

- Microdesconexión (1BU)

- Alimentación sin conexiones a la línea eléctrica con 2 

-Software classe A

pilas alcalinas AA 1,5V

- Contacto en conmutación libre de tensión

- Duración de las pilas aproximadamente 2 años

- Regulación de la temperatura de:

- Control automático del estado de carga de las pilas, 

- confort de 2 a 62°C

con señalización en la pantalla en caso de carga 

- ahorro de 2 a 62°C

insuficiente

- Diferencial ± 0,25°C

-Sustitución de las pilas sin pérdida de datos 

- Gradiente térmico de referencia 4°K/h

programados

-Apagado con posibilidad de protección anticongelante

- Desviador para el funcionamiento invernal o estival

(5ºC) establecida por medio del dip switch

- Tecla de reset para restablecer el programa de fábrica

- Dimensiones: 144 x 84 x31 mm

- Tensión de impulso 4000V 

-Temperatura maxima ambiente T45

Via dell'Osio, 6 - 20090 Caleppio di Settala (MI) - ITALY

International calls: Phone no. +39 02 95682222  Fax no. +39 02 95307006

[email protected]  http//www.fantinicosmi.com

e-mail: e

Intellitherm C75

2

1

4

4

  1

  2

60 mm

B -

83,5 mm

60

m

m

A -

B

-

P

S

P

S

I

lectura de la temperatura ambiente

MÍNIMA

o

MÁXIMA

3

OFF

To be installed by qualified 

personnel only

!

ANTIFREEZE

(5°C)

Summary of Contents for Intellitherm C75

Page 1: ... dell installazione e prima di inserire le pile N B Se in un momento successivo all installa zione si volesse cambiare la selezione Intelli therm dovrà essere resettato e riprogrammato 4 MONTAREILCORPOCRONOTERMOSTATO SULLOZOCCOLO 5 INSERIRE LEPILE Inserire due pile stilo AA alcaline lunga durata di buona marca da 1 5 V facendo attenzione alla polarità indicata Le pile di alimentazione posso no dur...

Page 2: ...dì 2 martedì 3 mercoledì 4 giovedì 5 venerdì 6 sabato 7 domenica con i tasti azzurri si regola la temperatura di ECONOMIA Sul display al posto della temperatura ambiente si leg ge la temperatura impostata 3 con i tasti rossi si regola la temperatura di COMFORT Sul display al posto della temperatura ambiente si leg ge la temperatura impostata 2 verificare che il devia tore P sia in basso sulla posi...

Page 3: ...eamente il programma automatico senza modifi carlo per ottenere continuamente da 1 a 240 ore sempre la temperatura desiderata comfort economia spento Trascorso il tempo impostato Intellitherm riprenderà il programma automatico Per ridurre o escludere il periodo JOLLY prima del tempo previsto premere un tasto di colore diverso di quello della corona sul display commutatore S sulla posizione AUTO de...

Page 4: ...a raggiunto il giorno precedente e l ora in cui è stata misurata spostare il deviatore P sulla posizione PROG lettura della temperatura ambiente MINIMA o MASSIMA 2 3 lettura dell ora in cui si è registrata la temperatura MINIMA o MASSIMA 4 TEMPERATURA AMBIENTE MINIMA E MASSIMA DEL GIORNO PRECEDENTE spostare il commutatore S sulla posizione economia per la temperatura MINIMA oppure sulla posizione ...

Page 5: ...he system OFF completely move the dip switch to LOW This selection shall be made when installing the deviceandbeforefittingthebatteries N B If at any time after installation this selection is to be changed Intellitherm shall be reset and reprogrammed 4 FITTING THE CHRONOTHERMOSTAT BODY ON THEBASE 5 FITTINGTHEBATTERIES Fit two high quality long life alkaline AA 1 5 V batteries respecting the specif...

Page 6: ...e STANDARD WEEKLY AUTOMATIC program with factory set operating times and temperatures ALWAYS SAVING this program keeps constantly the SAVING temperature set with the blue keys OFF this program keeps the system constantly off or with antifreeze protection according the setting made at the time of installation see previous page ALWAYS COMFORT this program keeps constantly the COMFORT temperature set...

Page 7: ...rarily the automatic program at any time without changing its setting in order to have constantly the required temperature comfort saving off for a period of time ranging from 1 to 240 hours Once the time set has elapsed Intellitherm will resume the automatic program To shorten or to cut out the JOLLY period before the set time press a key of different colour than the one corresponding to display ...

Page 8: ...er may verify the MINIMUM and MAXIMUM ambient temperature values reached on the day before and when these values were recorded move switch P to PROG position MINIMUM or MAXIMUM ambient temperature value 2 3 time when MINIMUM or MAXIMUM temperature values were recorded 4 MINIMUM AND MAXIMUM AMBIENT TEMPERATURE ON THE DAY BEFORE move switch S to position saving for MINIMUM temperature and to positio...

Page 9: ...75 vers le HAUT Par contre si l on veut que le système soit complètement ÉTEINT positionner le commutateur DIP vers le BAS Cette sélection doit se faire au moment de l installationetavantd insérerlespiles N B si postérieurement à l installation on souhaiterait changer la sélection Intellitherm devraêtreréinitialiséetreprogrammé 4 MONTAGE DU CORPS DU CHRONOTHERMOSTAT SUR LE SOCLE 5 INSERTIONDESPILE...

Page 10: ...ec horaires et températures préréglés en usine déplacer le commutateur S sur AUTO TOUJOURS ÉCONOMIE il maintient en permanence la température d ÉCONOMIE configurée avec les boutons bleus ÉTEINT il maintient en permanence le système éteint ou avec la protection antigel selon la sélection faite lors de l installation voir page précédente TOUJOURS CONFORT maintient constante la température de CONFORT...

Page 11: ...é Intellitherm reprendra le programme automatique Pour réduire ou exclure la période JOLLY avant le temps prévu appuyer sur un bouton d une couleur différente de celle de la couronne sur l écran commutateur S sur AUTO interrupteur P sur AUTO appuyer sur les boutons rouge bleu ou noir pour configurer le nombre d heures affiché sur l écran pendant lesquelles on veut exclure le programme automatique ...

Page 12: ... 1 CARACTÉRISTIQUES TECHNIQUES Indice de protection IP20 Conforme aux normes CEI EN 60730 1 et ses Degré de pollution 2 modifications Portée des contacts 8 5 A 250 V c a Alimentation sans connexions à la ligne électrique avec Micro déconnexion 1BU 2 piles alcalines AA 1 5 V Durée des piles environ 2 ans Contact en commutation libre de tension Contrôle automatique de l état de charge des piles Régl...

Page 13: ...o a cabo electricistas autorizados 9 FR INTRODUCTION ET REMPLACEMENT DES PILES SOULEVER LE COUVERCLE ET INTRODUIRE LES DEUX PILES DE 1 5 V DISTANCES DE FIXATION 1 FIXATIONMURALE Intellitherm C75 est fourni avec un socle adapté pour le montage sur des boîtiers encastrables ronds et à 3 modules oubienpourunmontagemural Monter le chronothermostat à 1 5 mètres de hauteur à partir du sol loin de cuisin...

Page 14: ...NAL ESTÁNDAR con horarios y temperaturas programados desde fábrica SIEMPRE AHORRO mantiene constante la temperatura de AHORRO establecida con las teclas celestes SIEMPRE CONFORT mantiene constantemente la temperatura de CONFORT establecida con las teclas rojas APAGADO mantiene constantemente el sistema apagado o con protección anticongelante de acuerdo a lo escogido durante la instalación ver la p...

Page 15: ...negro Para desplazar el cursor sin cambiar de color los sectores usar las teclas C S P D H P P S al finalizar las modificaciones desplazar el desviador P a la posición AUTO 6 7 UK CUSTOMIZING THE Intellitherm C75 PROGRAMMING Intellitherm C75 programming is extremely friendly the user shall just change the colours of the sectors on the ring coinciding with the time periods required i e red for time...

Page 16: ...75 es posible controlar las temperaturas MÍNIMA y MÁXIMA que se han alcanzado en el ambiente el día anterior y la hora en la que han sido medidas desplazar el desviador P a la posición PROG 2 lectura de la hora en la que se ha registrado la temperatura MÍNIMA o MÁXIMA 4 TEMPERATURA AMBIENTE MÍNIMA Y MÁXIMA DEL DÍA ANTERIOR desplazar el conmutador S a la posición ahorro para la temperatura MÍNIMA o...

Page 17: ...SCHALTET gewünscht wird wird der dip switch nach UNTEN gestellt Diese Auswahl muss bei der Installierung und vor demEinsetzenderBatterienausgeführtwerden Anmerkung Wenn die Auswahl nach der Installierung geändert werden soll muss Intellitherm zurückgestellt und erneut programmiertwerden 4 DAS CHRONOTHERMOSTAT GEHÄUSE AN DENSOCKELMONTIEREN 5 DIEBATTERIENEINSETZEN Die beiden alkalischen Batterien AA...

Page 18: ...te SPARTEMPERATUR konstant halten IMMER KOMFORT hält die mit den roten Tasten eingestellte KOMFORTEMPERATUR konstant bei ABGESCHALTET hält die Anlage ständig abgeschaltet oder mit einem Frostschutz je nach Auswahl während der Installierung siehe vorherige Seite DIE ANDEREN PROGRAMME DES Intellitherm C75 P I D H S mit den Tasten H die Uhrzeit einstellen 6 7 DIE UHRZEIT UND DEN TAG EINSTELLEN Diese ...

Page 19: ...Reduzierung oder Auschluss des JOLLY Zeitraums vor der vorgesehenen Zeit eine Taste drücken die eine andere Farbe als die Krone im Display aufweist Mschalter S in der Stellung AUTO Umschalter P in der Stellung AUTO 5 1 FUNKTION JOLLY 1 2 4 Die Tasten drücken um die Bereiche der Krone zu färben Bei jedem Druck einer der drei Tasten wird der Bereich gefärbt und der Cursor schreitet um eine halbe Stu...

Page 20: ...m Vortag erreicht hat sowie die Uhrzeit zu der sie gemessen wurde den Umschalter P in die Position PROG stellen Ablesen der MINDEST oder HÖCHSTUMGEBUNGSTEMPERATUR 2 3 Ablesen der Uhrzeit zu der die MINDEST oder HÖCHSTTEMPERATUR registriert wurde 4 MINDEST UND HÖCHSTUMGEBUNGSTEMPERATUR DES VORTAGS den Umschalter S in die Stellung Sparprogramm für die MINDESTEMPERATUR bringen oder in die Stellung Ko...

Reviews: