background image


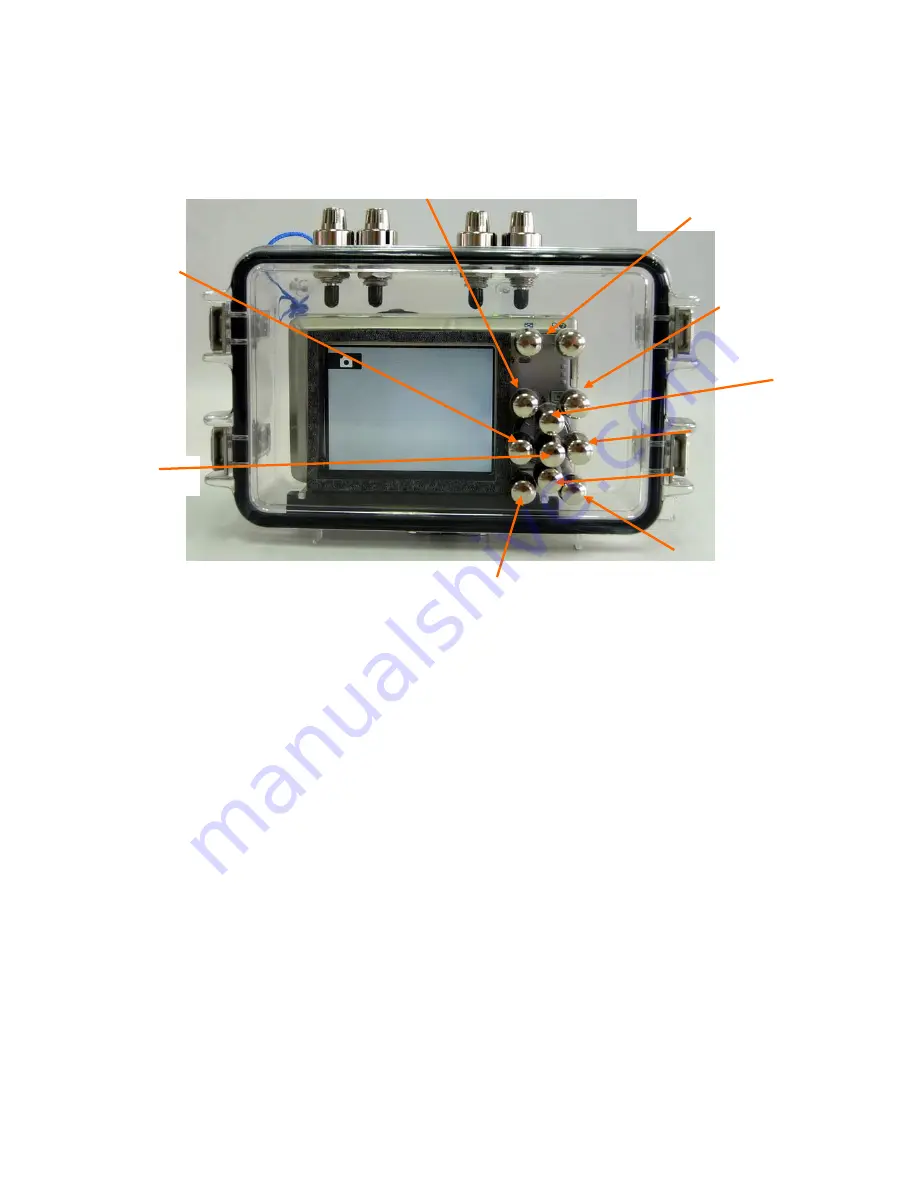
Back Side of Housing Buttons


Numbered description below refers to corresponding numbers on above graphic. 


7.  

Mode 


Press the Mode button during shooting to display the shooting mode selection menu (Auto mode, 

Scene mode, Setup mode, High sensitivity shooting mode, Movie mode or Voice recording mode), or 

during playback to display the playback mode selection menu (Playback mode, Audio playback 

mode, List by date mode, Calendar mode or Setup mode).  


Use the multi selector to choose the desired mode. 


Press the Playback button to switch between the mode selection menus for shooting mode and 

playback mode. 

8. Zoom In/Out 

7. Mode 

10. Flash Mode   

11. Exposure 

Compensation 

14. Self-Timer 

12. Macro Mode 

15. Delete 

16. Menu 

9. Playback 

13. OK button 

Summary of Contents for FS51

Page 1: ...Manual for the FS51 Housing For Nikon Coolpix S50 S50c S51 S51c S52 S52c Digital Cameras ...

Page 2: ...ING THE HOUSING 12 INSERTING CAMERA 12 CHECKING THE O RING 13 CLOSING THE HOUSING 13 VIEWING THE SUBJECT 15 TAKING THE PICTURE 15 CHOOSING IMAGE FILES 15 BATTERY LIFE 16 USING THE FLASH 17 ACCESSORY SLAVE FLASH 17 LENS ACCESSORIES 18 FANTASEA COOLPIX ACCESSORY SYSTEMS AND SETS 18 SHOOTING TECHNIQUES 19 EXPOSURE MODES PRE SET BEFORE CAMERA INSERTION 19 ZOOM CONTROL 19 MACRO FOCUS 19 QUICK REVIEW 19...

Page 3: ...h Portrait Mode Zoom In Out Menu Flash Exposure Compensation Timer Macro Playback and Delete and has a built in Flash Diffuser and an anti glare hood over the LCD screen FANTASEA FS51 USES The Fantasea FS51 housing is designed as an underwater outdoor camera housing It features double O rings on all controls and has a working depth of 200 feet 60 meters Underwater photographers can dive or snorkel...

Page 4: ...tance Once the camera has focused press the shutter release button the rest of the way down to release the shutter and take the picture 2 Power On Off To turn on the camera press the power switch The power on lamp green will turn on for a moment and the monitor will turn on To turn off the camera press the power switch again 2 Power On Off 1 Shutter Release 6 Buckles to Secure Housing 4 Removable ...

Page 5: ...n be used to create copies with enhanced brightness and contrast brightening dark portions of a picture Enhanced copies are stored as separate files o Select the desired picture from full frame or thumbnail playback mode and press the D Lighting button o Press the multi selector up or down arrows to choose OK and press the OK Button to confirm your selection 4 Removable Flash Diffuser The Flash Di...

Page 6: ...ovie mode or Voice recording mode or during playback to display the playback mode selection menu Playback mode Audio playback mode List by date mode Calendar mode or Setup mode Use the multi selector to choose the desired mode Press the Playback button to switch between the mode selection menus for shooting mode and playback mode 8 Zoom In Out 7 Mode 10 Flash Mode 11 Exposure Compensation 14 Self ...

Page 7: ...in on still images displayed in full frame playback When entering a menu press T to view a description of the currently selected menu option 10 Playback Press the Playback button to enter full frame playback Multi selector buttons may be used to view pictures Press Playback button again or press the shutter release halfway to return to shooting mode If the camera is turned off hold down the Playba...

Page 8: ...hree second timer for self portraits When using the self timer mount the camera on a tripod or rest it on a flat and stable surface Press the Self Timer button Press the multi selector up down arrows to choose 10 seconds or 3 seconds and press OK Frame the picture press the shutter release button half way to focus and then all the way down 16 Delete Press Delete to delete the picture currently dis...

Page 9: ... menu One touch portrait menu Movie menu Playback menu Calendar menu List by date menu Setup menu Note It is strongly recommended that you familiarize yourself with all the controls topside before using these controls while diving ...

Page 10: ... and viewing and a built in right angle optical lens shift VR Vibration Reduction 3x zoom lens to produce photos with clarity and true to life colors Extended light sensitivity as high as ISO 1600 prevents blurred shots when shooting in lower light or when capturing fast moving objects like underwater life The S50c S51c and S52c cameras are also equipped with Wi Fi capabilities allowing for wirele...

Page 11: ...ut also overcome the effects of camera shake to produce clearer and sharper images Whenever the power is switched on the image appears stabilized on the large LCD monitor until the shutter release button is pushed 3 0 inch LCD Monitor The bright large 3 0 inch LCD monitor features 230 000 dots of high resolution a wide vertical and horizontal viewing angle of 160 degrees and anti reflection coatin...

Page 12: ...is possible to put it in at an improper angle and hence it will be impossible to get a good seal or easy closure of the housing 4 After camera insertion be sure that the extended camera lens does not catch or bend the black rubber seat on the inside of the lens port It is vital that the lens does not disturb this rubber seat Notes 1 It is recommended to make some camera settings prior to inserting...

Page 13: ...l around the housing until it is all sitting in the groove and no part of it is sticking up or out of the groove You can then apply a slight layer of silicone if you have not done this yet Be sure it is completely seated in the channel for a proper seal Note Lubrication of an O ring does not improve the seal It only reduces the amount of friction on the O ring when it is being moved into sealing p...

Page 14: ...inning of descent take special care to look at the housing to make sure no bubbles are escaping from it and that no water is entering Generally if there is a problem with the seal you will discover it in the first seconds of the dive 6 After use when opening the housing it is important to hold it so the lens port is facing down This will prevent the camera from slipping out of the housing while be...

Page 15: ...ill activate the live viewing ability of the LCD and allow the camera to focus once in focus and ready to shoot a green light will appear on the LCD monitor and the camera is ready to take the picture Press down the shutter all the way to complete image capture You may notice a pre flash and slight delay in the shutter release This is to allow the camera to make its final focus and exposure calcul...

Page 16: ...during periods of non use It can then be automatically turned back on if you depress the shutter release control half way Please refer to the Coolpix instruction manual for details on how to make this adjustment setting It is always wise to have backup batteries in case you do run out of power The supplied battery can be recharged many times and offers an economical and environmentally friendly po...

Page 17: ... travel farther and more effectively in air as compared to in water there is normally not a need for an accessory flash to provide proper illumination for most subjects ACCESSORY SLAVE FLASH If you use the Coolpix built in flash as the master you can trigger a second slave flash to provide more artificial light when needed To do this you must use an accessory flash that has a slave feature built i...

Page 18: ... Ball Joint Arms and allows for secure attachment of the Lens Set 41 and Red Filter 41 For more information on these items see your local photo dealer or visit our website at www fantasea com FANTASEA COOLPIX ACCESSORY SYSTEMS AND SETS Fantasea offers a variety of sets for Coolpix and other housings These sets are made up of quality accessory products which will enhance and improve your underwater...

Page 19: ... can be accessed through the housing controls while underwater Please reference the Coolpix instruction manual for details on how to set these camera options and under what conditions the different choices would be used ZOOM CONTROL Zoom in for telephoto photos and larger subject size Zoom out for wide angle scenes It is generally not recommended to use the zoom underwater as it is preferable to g...

Page 20: ...y power If set for longer periods of time the LCD screen will heat up and that will produce condensation and fogging of the lens port Condensation on the lens port will have a negative impact on the quality of the images taken When you want to resume shooting pressing the shutter release half way will re activate the camera However if after the camera goes into standby a further period of three mi...

Page 21: ...the amount of lubrication required on the O ring is only enough to allow it to slip into place without friction so it does not twist or become dislodged More grease is not better and could in some cases have a negative affect if it is applied in large amounts to form a build up that could trap any debris or foreign matter 5 Be careful not to get greasy fingerprints or dirt on the lens port This wi...

Page 22: ...commended to take the first dive without the camera inside the housing You should check that the water tight seal has not been affected during transport and long periods of storage 12 It is likewise recommended to visually monitor the housing during every descent especially for the first 10 meters 33 ft If water is observed entering the housing or bubbles escaping from it the housing should be rot...

Reviews: