1
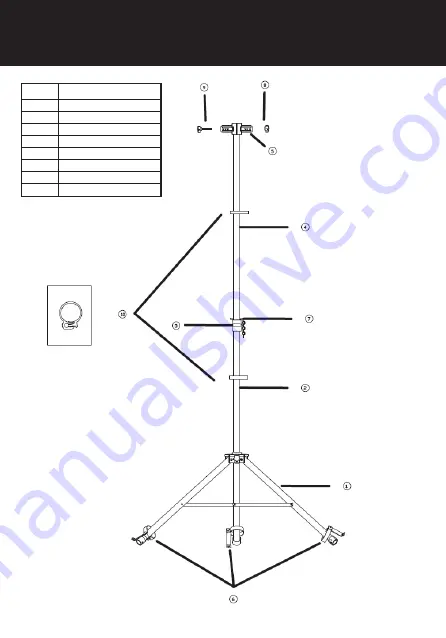
FOOT
2
LOWER TUBE
3
ADJUSTMENT HAND KNOB
4
TOP TUBE
5
L SHAPE BRACKET
6
FIX BRACKET & SCREWS
7
FIXED AXEL PIN
8+9
NUT
10
LEAD CLIP
4. ASSEMBLING & OPERATING INSTRUCTIONS
Page 1: ...CTION MANUAL MODEL CF2000 ELECTRIC PEDESTAL WALL CARBON FIBRE HEATER TO PREVENT SERIOUS INJURY READ UNDERSTAND ALL WARNINGS INSTRUCTIONS BEFORE USE PLEASE KEEP THIS DOCUMENT FOR YOUR RECORDS 1 YEAR WA...
Page 2: ...ake no warranty or representation for any particular purposes The information is offered in good faith and with the understanding that any use of the units or accessories in breach of the directions a...
Page 3: ...ONNECTED MUST COMPLY WITH LOCAL REGULATIONS A RESIDUAL CURRENT DEVICE RCD MUST BE INSTALLED UNPLUG THE APPLIANCE BEFORE PERFORMING ANY MAINTENANCE OPERATIONS ALWAYS CHECK THE POWER CABLE BEFORE USING...
Page 4: ......
Page 5: ...g protection devices Tilt Switch this will automatically turn the heater off if it is not in the appropriate operating position fallen over on its front or side Model CF2000 Heat Output 2000W 6824 28...
Page 6: ...3 GETTING TO KNOW YOUR HEATER 1 SWITCH 2 HEATING ELEMENT 3 BRACKET 4 CABLE 5 SAFETY BAR 6 COVER GRILLE 7 REMOTE...
Page 7: ...r level timer Push the button repeatedly to increase power level timer Set the time from 0H 24H when the timer ends the heater will stop automatically To cancel set the time to 0 hour Set the power le...
Page 8: ...o not alter the heater structure without the guidance of a licenced electrician Please note any modifications to unit will void warranty Position the heater so it stands upright is on a firm surface w...
Page 9: ...1 FOOT 2 LOWER TUBE 3 ADJUSTMENT HAND KNOB 4 TOP TUBE 5 L SHAPE BRACKET 6 FIX BRACKET SCREWS 7 FIXED AXEL PIN 8 9 NUT 10 LEAD CLIP 4 ASSEMBLING OPERATING INSTRUCTIONS...
Page 10: ...brackets to the back of the heater head 3 Loosen the knobs 5 4 Attached brackets to knob 5 Tighten adjustment knob and screws Wall Mounted Installation Install between a 0 to 60 angle Anything past th...
Page 11: ...r technical support team if you notice any deformation CLEANING Frequent and meticulous cleaning keeps your infrared heater running smoothly for many years Follow the procedures below to clean your he...
Page 12: ...he product will be in standby mode Step 3 Readjust the heating level by the remote control E2 ERROR TIP OVER FUNCTION Step 1 Make sure the installation angle of the heater is correct 2 Press PUSH BUTT...
Page 13: ...cannot be excluded under the Australian Consumer Law You are entitled to replacement or refund for a major failure and to compensation for other reasonably foreseeable loss or damage You are also enti...
Page 14: ...Fanmaster Pty Ltd 1 6 8 Yalgar Road Kirrawee NSW 2232 1300 900 345 sales fanmaster com au www fanmaster com au N11664 MADE IN CHINA...