7
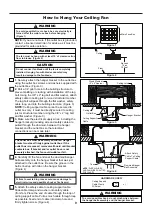
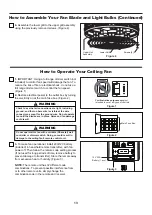
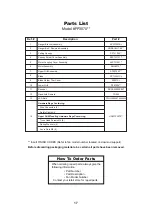
4.
Loosen the two set screws and locking nuts in the
downrod support of the motor assembly. Route the
black, white, blue wires and safety cable through
the downrod. (Figure 4)
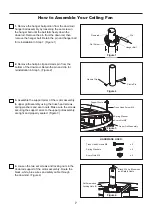
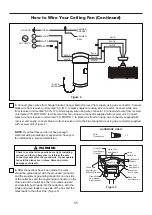
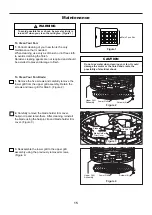
2.
Remove the hairpin clip and clevis pin from the
bottom of the downrod. Retain the pin and clip for
reinstallation in Step 5. (Figure 2)
Figure 2
How to Assemble Your Ceiling Fan
Hairpin Clip
Clevis Pin
Pin
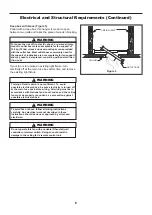
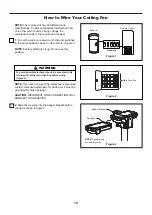
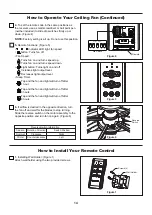
1.
Remove the hanger ball portion from the downrod/
hanger ball assembly by loosening the set screw in
the hanger ball until the ball falls freely down the
downrod. Remove the pin from the downrod, then
remove the hanger ball. Retain the pin and hanger ball
for reinstallation in Step 7. (Figure 1)
Figure 1
Downrod
Hanger Ball
Set Screw
Black, White, Blue wires
and Safety Cable
Set Screws and
Locking Nuts (2)
Figure 4
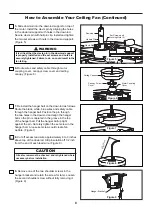
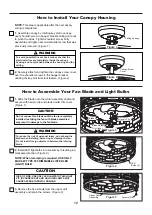
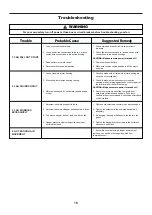
3.
Assemble the support arms of the motor assembly
to upper grill assembly using the truss head screws,
spring washers and acorn nuts. Make sure the screws
securing the support arms to the upper grill assembly
are tight and properly seated. (Figure 3)
Truss Head Screw M4
Support Arms
Spring Washer
Acorn Nut M4
Upper Grill Assembly
Figure 3
x 5
Truss Head Screws M4
x 5
Spring Washers
x 5
Acorn Nuts M4
HARDWARE USED:


