background image

7

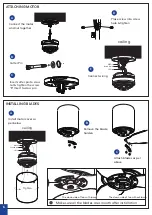
The down side of fan with lamp

The down side of fan without lamp

Make sure all the blades are smooth after installation

L oos en s crew as photo 
S crew o

ff

 as photo

S crew o

ff

L oosen

L oos en

Finish

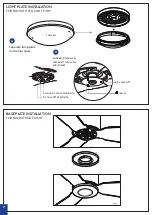
LIGHT PLATE INSTALLATION

FOR FAN WITH LED LIGHT ONLY

Seperate lamp plate 
and lamp shade

A

Loosen 2 screws & 
remove 1 screw as 
picvtured

B

BASE PLATE INSTALLATION

FOR FAN WITHOUT LIGHT

Summary of Contents for CFFCST2LWHSMR

Page 1: ...Studio DC DC Installation Manual...

Page 2: ...the wall or ceiling Please note that insufficient clearance distances might cause wobbling and the bigger this clearance is the better the airflow from your fan will be 8 DO NOT install this product o...

Page 3: ...hink batteries might have been swallowed or placed inside any part of the body seek immediate medical attention Call the Poisons Information Centre on 13 11 26 or go to a hospital emergency room Do no...

Page 4: ...om the blade tip to all edges of the roof or positions where could be exposed to water moisture or other dangerous external elements 4 Secure the hanging bracket to the ceiling joist or suitable struc...

Page 5: ...Switch E L N C 2 1 Power Supply Live Wire Brown Power Supply Neutral Wire Blue Ground Wire Yellow Green E L N L in L out Double pole disconnection switch or 2 pin plug Wall Switch Power Supply Live W...

Page 6: ...n the rubber nut with the bracket Use screws to fix the parts together Complete Use the bracket as a guide to mark required screw holes Drill Holes place expanding screws into the holes Place bracket...

Page 7: ...ert to cross pin C Place screw into screw hole tighten D Connect wiring E Install motor cover as per below A Remove the blade holders B Attach blades as per above C Ground wire N Wire L Wire ceiling T...

Page 8: ...w off as photo S crew off Loosen L oosen Finish LIGHT PLATE INSTALLATION FOR FAN WITH LED LIGHT ONLY Seperate lamp plate and lamp shade A Loosen 2 screws remove 1 screw as picvtured B BASE PLATE INSTA...

Page 9: ...ion Light Diffuser Installation Screw hole alignment scr ew Tighten Rotate into position and tighten the screw A Tighten screws B Insert wire into lamp plate C Align the lock points A Gently twist dif...

Page 10: ...NDER WARRANTY but a little care and maintenance can reduce or prevent this problem REMOTE CONTROL SETTINGS AND OPERATION FOR DC FANS NOTE The Hand Held Remote Control System is equipped with a learnin...

Page 11: ...more fans you should manually isolate power to Fan B while completing the pairing process on Fan A If power is not isolated to one of the fans when the power is restored at the fuse box then both rece...

Page 12: ...and wiring on premises Fan keeps beeping but will not start Loose wire connections or plugs to fan receiver Check wire connections and ensure plugs are positively connected Fan wobbles A Screws on do...

Page 13: ...Number Rated Voltage Motor Consumption Rated Light Power CFFCST2WHSMR 220 240Vac Max 45 W DC Motor N A CFFCST2LWHSMR 220 240Vac Max 45 W DC Motor Max 18W LED CFFCST2WHW 220 240Vac Max 45 W DC Motor N...

Page 14: ......

Reviews: