background image

15

IT

ALIANO

4

3

2

1

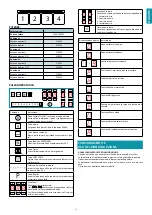
POTENZE:

Caratteristica

Potenza totale

3000-7400W

Posizione 1

Potenza nominale

2100W

Potenza booster

3000W

Posizione 2

Potenza nominale

2100W

Potenza booster (1/2)

3000W

Posizione 3

Potenza nominale

2100W

Potenza booster (1/2)

3000W

Posizione 4

Potenza nominale

2100W

Potenza booster

3000W

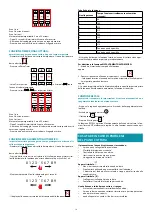
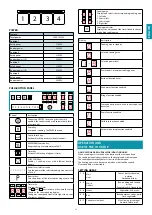
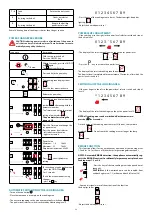
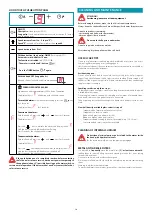
PULSANTIERA TOUCH

Comando

descrizione

Piano cottura ON/OFF. In caso non venga attivato 
nessun altro commando, il piano si spegne automati-
camente dopo pochi secondi

Tasto pausa.
Sospende la cottura. Vedere la funzione PAUSA

Tasto blocco comandi.
Blocco della tastiera per impedire comandi acciden-
tali

Tasto funzione KEEP WARM.
Mantiene la cottura ad una temperatura di 44°C

Tasto Timer.
Attiva l’impostazione di un timer generico

Tasto CHEF COOK.
Abilita 3 zone di cottura con potenze differenti di ri-
scaldamento. 

Selettore del livello di potenza
Imposta la potenza della zona di cottura selezionata 
in una scala da 0 a 9 

Tasto Booster.
Imposta la potenza della zona di cottura selezionata 
al massimo disponibile

Area Timer.
Visualizza il timer impostato.
I tasti 

 e 

 aumentano o diminuiscono il valore 

visualizzato sul corrispondente display.
Le cifre corrispondono da sinistra a destra: Ore, deci-
ne di minuti, minuti. 

1

2

4

3

Area zone cottura.
Visualizza e seleziona la zona cottura corrispondente:
1 Laterale sinistro
2 Centrale sinistro
3 Centrale destro
4 Laterale destro

Timer zona cottura.
Visualizza l’attivazione del timer legato alla zona di 
cottura corrispondente

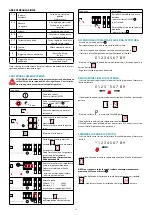
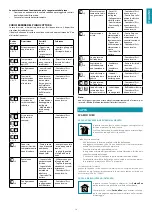
Visualizzazione display

descrizione

Zona cottura in stand-by

Zona cottura selezionata


-->


Livello di potenza selezionato

Power boost: massima potenza di cottura

Indicatore di calore residuo

Funzione Keep warm attiva

Funzione Bridge attiva

Pentola non presente sul piano cottura o non 
rilevata.

Funzione Pausa attiva

Funzione Blocco bambini attiva 

Funziona Riscaldamento automatico attiva

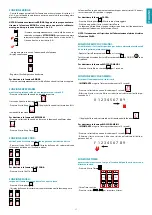
FUNZIONAMENTO E 
USO DEL PIANO INDUZIONE

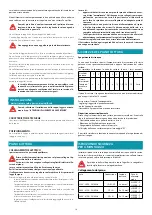
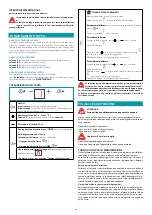
USARE SOLO PENTOLE PER PIANI INDUZIONE.

Quando si accende  una zona cottura il fondo della pentola si riscalda.
La zona cottura si riscalda solamente grazie al calore ceduto dalla pentola.
L'induzione rileva automaticamente le dimensioni della pentola.
La potenza di riscaldamento deve essere scelta in base a cosa si vuole cuci-
nare .
Qui sotto viene riportata una breve tabella:

Summary of Contents for Brera

Page 1: ...CTIONS BOOKLET Brera LIBRETTO ISTRUZIONI IT INSTRUCTIONS BOOKLET EN GEBRAUCHSANWEISUNG DE MODE D EMPLOI FR MANUAL DE INSTRUCCIONES ES RU INSTRUKCJA OBS UGI PL BRUGSANIVSNINGER DK HANDLEIDING NL OHJEKI...

Page 2: ...DE Lochabmessungen f r Einbau FR Mesures du trou pour encastrement ES Medidas del orificio para empotrado RU PL Wymiary otworu do zabudowy DK M l til bning for indbygning NL Maten gat voor inbouw FI A...

Page 3: ...3 241 394 197 650 250 51 350 400 416 A A 111 700 416 250 160 400 450 A A ISLAND WALL...

Page 4: ...910 900 900 min 710 max 910 900 519 min 97 495 867 495 867 495 IT Misure per l installazione EN Measurements for installation DE Masangaben fur die Installation FR Mesures pour l installation ES Medid...

Page 5: ...ade 1 Configuratie motor 2 FI Alustavat toimenpiteet Poista lasi ja laatikko 1 Moottorin konfiguraatio 2 ISLAND WALL IT Avanti tipico per basi a parete EN Forward typical for wall bases DE Vor typisch...

Page 6: ...ier lectrique 4 Visser les brides de fixation 5 ES Girar la placa de cocci n y fijarla a la campana con tornillos adicionales 3 Monte la caja el ctrica 4 Atornillar los soportes de apoyo 5 RU 3 4 5 PL...

Page 7: ...de la placa de cocci n 6 Conexiones del cable de control 7 RU 6 7 PL Pod czenie kabla zasilania p yty grzew czej 6 Pod czenie kabla uk adu stero wania 7 DK Tilslutning af kogepladens forsyningska bel...

Page 8: ...otte sur la base 10 10 8 9 2 2 m m 1 A B m i n 9 7 m m min 50 mm ES Distancias de seguridad 8 Operaciones preliminares Cortando la parte superior 9 Inserci n de la campana en la base 10 RU 8 9 10 PL O...

Page 9: ...nchements lectriques moteur et plan induction 12 ES Regular los soportes de apoyo 11 Conexiones el ctricas del motor y placa de inducci n 12 RU 11 12 PL Wyregulowa wsporniki 11 Po czenia elektryczne s...

Page 10: ...glowo zeolit owego opcjonalna 14 DK Installation af zeolit kulfilteret valgfrit 14 NL Installatie koolstof zeolietfilter optie 14 FI Hiili zeoliittisuodattimen asennus lis varuste 14 IT fortemente co...

Page 11: ...caj n de filtros y pesta a RU PL Wk adanie szuflady filtr w uchylnego frontu DK S t filterkassen og sk rm kanten tilbage igen NL Herpositionering lade filters en plaatje FI Suodatinlaatikon ja kannen...

Page 12: ...ruttore da qualsiasi responsabilit Pericolo di ustioni Usare il blocco dei comandi per impedire che per sone non autorizzate possano accendere l appa recchio da soli posizionare manici e maniglie di p...

Page 13: ...argo e perfettamente piano Il fondo magnetizzabile se un magnete aderisce su ogni punto del fondo della pentola L utilizzo di pentole con fondo irregolare puo ostacolare il rilevamento della pentola e...

Page 14: ...ilizzare mai contemporaneamente due pentole o padelle su un unica zona cottura o una zona cottura rettangolare o un area cottura PowerFlex Prima di procedere a qualsiasi operazione di pulizia o di man...

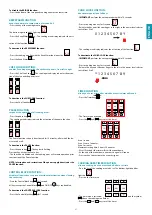
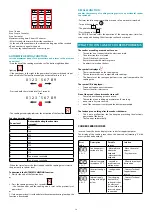
Page 15: ...zza il timer impostato I tasti e aumentano o diminuiscono il valore visualizzato sul corrispondente display Le cifre corrispondono da sinistra a destra Ore deci ne di minuti minuti 1 2 4 3 Area zone c...

Page 16: ...ire il valore a destra per aumentarlo Valore Potenza Minimo 1 4 2 8kW Massimo 3 7 7 4kW Incremento di regolazione 0 2kW Premere su per uscire dall impostazione del parametro Sequenza descrizione 2 sec...

Page 17: ...tura Premere il tasto pausa I display delle zone di cottura indicano l attivazione della funzione pausa La funzione Pausa pu essere mantenuta attiva per un massimo di 10 minuti successivamente il disp...

Page 18: ...Al termine del tempo la funzione termina e la zona di cottura viene ripor tata al livello di potenza impostato precedentemente Per disattivare la funzione RISCALDAMENTO AUTOMATICO 1 Attendere il termi...

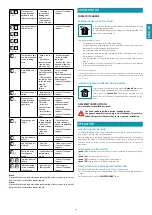
Page 19: ...to elettrico morsettiere Contattare l Assi stenza tecnica Contattare l Assi stenza tecnica 6 Alimentazione errata Tensione di alimentazione fuori soglia di funzionamento Frequenza della tensione di al...

Page 20: ...la con gurazione viene salvata Per disattivare l allarme A cappa spenta premere i tasti e per 5 secondi Il display visualizza Premere il tasto per disattivare l allarme il display visualizza con il pu...

Page 21: ...e riciclate Lo smaltimento corret to di questo prodotto contribuir a salvare preziose risorse ed evitare potenziali e etti negativi per la salute umana e per l ambiente che potrebbero essere cau sati...

Page 22: ...ability Danger of burns Use the control lock to avoid that unauthorised people can switch on the appliance by them selves place handles of frying pans and saucepans in a way that children cannot touch...

Page 23: ...ficiently wide and perfectly flat bottom are suitable for use on induction hobs The bottom is magnetic if a magnet sticks to every point on the bottom of the saucepan Using saucepans with uneven botto...

Page 24: ...speci cations located inside the cooker the power supply plug and cable do not come into contact with temper atures exceeding 70 C the power supply system is e ectively and properly connected to earth...

Page 25: ...minutes 1 2 4 3 Cooking area Displays and selects the corresponding cooking area 1 Left side 2 Central left 3 Central right 4 Right side Cooking area timer Displays the activation of the timer linked...

Page 26: ...itch is activated by illuminating level 0 0 1 2 3 4 5 6 7 8 9 Press the key of the cooking area to be set The bottom right hand dot lights up Adjust the desired power level POWER LEVEL ADJUSTMENT Slid...

Page 27: ...dental activation when cleaning the cooker top Press the Control block key for 1 second All keys except the Control block and ON OFF keys are disabled To deactivate the CONTROL BLOCK function Press th...

Page 28: ...se key The RECALL function resets the operation of the cooking areas timer fun ctions and quick heating Other functions will not be restored WHAT TO DO IN CASE OF COOKERS PROBLEMS The cooker or cookin...

Page 29: ...rough the exhaust pipe To this end the hood outlet tting must be connected via a pipe to an external output The outlet pipe must have a diameter not less than that of the hood tting a slight slope dow...

Page 30: ...c abrasive agents dusts or paste Do not wash the flaps in a dishwasher Do not use pointed or abrasive objects After cleaning dry the appliance with a soft cloth USEFUL CARE TIPS Clean your glasscerami...

Page 31: ...avoid potential negative e ects on personal health and the environment which may be caused by inappropriate disposal of waste You are kindly asked to contact your local authorities for further inform...

Page 32: ...itung von Speisen in Haushaltsk chen nicht in gewerblichen K chen erzeugt wird Jede andere Verwendung gilt als unsachgem kann Sch den an Personen Gegen st nden und Haustieren verursachen und enthebt d...

Page 33: ...lektrokabel der Vorrichtung mit dem hei en Glas oder einer hei en Pfanne bzw Topf in Ber hrung kommt Die Kochebene nicht zum Erw rmen von Konservendosen benutzen Die Induktionsebene in keiner Form abd...

Page 34: ...geben sind so besteht Brandgefahr Wenn das Ger t ber einen l ngeren Zeitraum nicht verwendet wird muss der Haupt schalter abgeschaltet werden Bei gleichzeitiger Verwendung anderer mit Gas oder anderen...

Page 35: ...N 5 x 1 5 mm H 05 VV F H 05 RR F 4 3 2 1 EISTUNGEN Eigenschaft Gesamtleistung 3000 7400W Position 1 Nennleistung 2100W Leistung Booster 3000W Position 2 Nennleistung 2100W Leistung Booster 1 2 3000W P...

Page 36: ...kung der Leistung bewirkt eine Einschr nkung der in den einzelnen Zonen einstellbaren Leistungsstufen Diese Einschr nkungen werden vom Ger t automatisch vorgenommen Reihenfolge Beschreibung Bei ausges...

Page 37: ...rrung und der ON OFF Taste sind gesperrt Ausschalten der Funktion TASTENSPERRUNG Taste zur Tastensperrung eine Sekunde lang dr cken LEISTUNGSSTUFENEINSTELLUNG Mit dem Finger auf dem Leistungsstufenreg...

Page 38: ...aste der einzustellenden Kochzone dr cken Der untere rechte Punkt leuchtet auf Auf den Timerbereich tippen Der Timerbereich wird bef higt Die Symbole und ber der Kochzone blinken Tasten und bet tigen...

Page 39: ...t Fehlercodes zur Unterst tzung des Repara turdienstes an Auf dem Display der Kochzone erscheint der Fehlercode abwechselnd mit E und anderen Symbolen und Zahlen Fehlerco des Beschreibung M gliche Ur...

Page 40: ...eine Minute vor Beginn des Kochvorgangs einschalten Dadurch wird ein Luftstrom erzeugt der den Rauch und die D mpfe zur Absaug che hin bef rdert Nach Abschluss des Kochvorgangs die Abzugshaube noch so...

Page 41: ...ter k nnen auch in der Sp lmaschine gereinigt werden F r die Montage und Demontage der Metallfett lter siehe die Montageanleitung KOHLE UND ZEOLITE FILTER OPTIONAL KACL 1006 Unter normalen Benutzungsb...

Page 42: ...s par l utilisateur ne doivent pas tre effectu s par des enfants sans surveillance Ne laisser jamais le plan de cuisson hors surveillance pendant qu il est en service L appareil est destin seulement e...

Page 43: ...r r chauffer les bo tes N appliquer aucun type de couverture au plan induction Les c bles lectriques ne doivent pas tre en contact avec le plan de cuisson Il est conseill de prot ger les mains de la c...

Page 44: ...nform ment aux modalit s et avec les produits indiqu s dans le pr sent manuel un risque d incendie est possible Couper l interrupteur g n ral si l appareil n est pas utilis pendant de longues p riodes...

Page 45: ...100W Puissance booster 3000W BO TIER DE COMMANDE Commande description Plan de cuisson ON OFF Si aucune autre commande n est activ e le plan s teint automatiquement apr s quelques secondes Touche pause...

Page 46: ...ion des niveaux de puissance qui peuvent tre d finis dans chaque zone Ces limitations sont g r es automatiquement par le disposi tif S quence description Avec le plan teint Appuyer sur le touche ON OF...

Page 47: ...ez simultan ment sur les touches des deux zones de cuisson ju mel es FONCTION KEEP WARM elle maintient les aliments chauds une temp rature d environ 44 C Appuyer sur la touche de la zone de cuisson r...

Page 48: ...sson clignote Appuyer sur les touches et pour r gler le Timer 1 2 3 Zone 1 heures Zone 2 dizaines de minutes Zone 3 minutes Temps maximum r glable 9 heures 59 minutes Apr s 5 secondes le Timer commenc...

Page 49: ...ure in terne sup rieure 85 C zones couvertes ou insuffisamment ventil es Permettre l limin ation de la chaleur interne 3 1 Configuration erron e erreur de configuration Contacter le sup port technique...

Page 50: ...n fonction jusqu l aspiration compl te de toutes les vapeurs et odeurs gr ce la fonction Timer il est possible de programmer l arr t automatique de la hotte au bout de 15 minutes de fonc tionnement QU...

Page 51: ...er Le lavage en lave vaisselle est permis Pour l extraction et l introduction des ltres m talliques anti graisse voir les ins tructions de montage FILTRES AU CHARBON ACTIF OPTIONNEL KACL 1006 En condi...

Page 52: ...ro uso es inapropiado puede provocar da os a personas cosas y anima les dom sticos y exime al fabricante de toda res ponsabilidad Peligro de quemaduras Utilice el bloqueo de los mandos para impedir qu...

Page 53: ...o agarraderas secas Utilice nicamente ollas y sartenes con una base lisa y magn tica adecuada para placas de inducci n Evite que el az car los materiales sint ticos o pel culas de aluminio entren en...

Page 54: ...roductos indicados en este manual esto puede conllevar un riesgo de incendio Desconecte el interruptor general si no va a usar el equipo durante un periodo de tiempo prolongado En caso de utilizar sim...

Page 55: ...0W Potencia booster 3000W Posici n 2 Potencia nominal 2100W Potencia booster 1 2 3000W Posici n 3 Potencia nominal 2100W Potencia booster 1 2 3000W Posici n 4 Potencia nominal 2100W Potenza booster 30...

Page 56: ...reducci n de la potencia conlleva una limitaci n de los niveles de potencia que se pueden ajustar en las zonas indivi duales Estas limitaciones se gestionan autom ticamente por el dispositivo Secuenci...

Page 57: ...ra deshabilitar la funci n BRIDGE Pulse los botones de las dos zonas de cocci n emparejadas al mismo tiem po FUNCI N KEEP WARM MANTENER CALIENTE mantiene los alimentos calientes a una temperatura de u...

Page 58: ...cci n parpadea Pulse las teclas y para ajustar el temporizador 1 2 3 Zona 1 horas Zona 2 decenas de minutos Zona 3 minutos Tiempo m ximo ajustable 9 horas 59 minutos Despu s de 5 segundos el temporiza...

Page 59: ...do Retire los objetos met licos Seque el agua 2 1 Temperatura interna superior a 85 C Zonas de ventilaci n cubiertas o insu ficientes Permita la disipa ci n del calor interno 3 1 Configuraci n incorre...

Page 60: ...ampana hasta que se aspiren todos los vapores y los olores con la funci n Temporizador es posible con gurar el apagado autom tico de la campana despu s de 15 minutos de funcionamiento QU VELOCIDAD SEL...

Page 61: ...ulte las instrucciones de montaje FILTROS CARB N Y ZEOLITA OPCIONAL KACL 1006 En condiciones de utilizaci n normal se aconseja regenerar el ltro carb n zeo lita cada 18 meses y de reemplazarlos despu...

Page 62: ...62 8...

Page 63: ...63 Falmec 120mm Bridge 230mm...

Page 64: ...64 BRIDGE 5 PowerFlex 1 5 70 C III...

Page 65: ...booster E2 220 240 50 60 1P N 2P 3 x 4 H 05 VV F H 05 RR F 380 415 50 60Hz 2P N 4 x 1 5 H 05 VV F H 05 RR F 380 415 50 60Hz 3P N 5 x 1 5 H 05 VV F H 05 RR F 4 3 2 1 3000 7400 1 2100 3000 2 2100 1 2 3...

Page 66: ...66 1 2 4 3 1 2 3 4 Powerboost Keep warm Bridge 1 2 2 3 3 4 4 5 6 7 7 8 9 P 3 sec 3 ON OFF 1 4 2 3 U0 1 4 2 8 3 7 7 4 0 2...

Page 67: ...4 5 6 7 8 9 0 1 2 3 4 5 6 7 8 9 Booster Booster 5 9 0 0 1 2 3 4 5 6 7 8 9 0 2 BRIDGE 1 2 3 4 BRIDGE BRIDGE 1 2 3 4 1 2 3 4 BRIDGE KEEP WARM 44 C Keep Warm KEEP WARM Keep Warm Keep Warm CHEF COOK 3 Ch...

Page 68: ...68 10 1 ON OFF 1 10 3 0 9 0 1 2 3 4 5 6 7 8 9 10 3 9 0 0 1 2 3 4 5 6 7 8 9 1 2 3 1 2 3 1 2 3 9 59 10 Premere sui tasti 1 2 3 1 2 3 9 59 5 1 8 0 1 2 3 4 5 6 7 8 9...

Page 69: ...69 3 0 1 2 3 4 5 6 7 8 9 3 sec 1 48 2 144 3 230 4 312 5 408 6 120 7 168 8 210 9 P 1 2 3 3 6 RECALL E E 0 3 2 1 85 C 3 1 4 2 4 7 2 0 2 2 3 5 3 6 2...

Page 70: ...70 3 8 4 5 LIN 6 7 8 9 800 3 4 4 x 10 5 Carbon Zeo Carbon Zeo 15 1 3 4 5 6 7 8 P 30 18 3 A 1 9 P P 9 P 1...

Page 71: ...71 TIMER 15 TIMER 4s 2000 5 2 5 3 5 3 5 T V F 1 KACL 1006 18 3 200 C 1 1...

Page 72: ...72 RAEE RAEE...

Page 73: ...przypad k w u ytkowania do cel w profesjonalnych Ka de inne u ycie jest niew a ciwe mo e spowodowa szko dy obra enia u ludzi zwierz t oraz w mieniu i zwalnia Producenta z jakiejkolwiek odpowiedzialno...

Page 74: ...i z p yt kuchenn Zaleca si aby chroni r ce przed wysok temperatur u ywaj c od powiednich apek do chwytania gor cych naczy U ywa wy cznie suchych r kawic lub apek U ywa tylko garnk w i patelni z g adk...

Page 75: ...apew ni odpowiedni wentylacj w pomieszczeniu w kt rym nast puje za sysanie dymu zgodnie z obowi zuj cymi normami MONTA cz zastrze ona wy cznie dla personelu wykwalifikowanego Przed zainstalowaniem oka...

Page 76: ...Moc funkcji booster 3000W Pozycja 2 Moc znamionowa 2100W Moc funkcji booster 1 2 3000W Pozycja 3 Moc znamionowa 2100W Moc funkcji booster 1 2 3000W Pozycja 4 Moc znamionowa 2100W Moc funkcji booster...

Page 77: ...kach gazowych PROCEDURA ZMIANY MOCY UWAGA zmniejszenie mocy powoduje ograniczenie poziom w mocy kt re mo na ustawi w poszczeg lnych obszarach Takie ograniczenia s automatycznie zarz dzane przez urz dz...

Page 78: ...otowania FUNKCJA KEEP WARM utrzymuje temperatur potraw na poziomie oko o 44 C Nacisn na przycisk ustawianego obszaru gotowania W prawym dolnym rogu wieci si kropka Wcisn przycisk Keep Warm Wy wietlacz...

Page 79: ...minut Obszar 3 minuty Maksymalny ustawiany czas 9 godzin i 59 minut Po 5 sekundach timer zacznie odlicza czas Po zako czeniu odliczania odpowiedni obszar gotowania zostanie wy czony i rozlegnie si syg...

Page 80: ...sokie lub zbyt niskie wewn trzne na pi cia zasilania Prze adowanie spowodowane wy adowaniami atmosferyczny mi awari insta lacji elektrycznej lub nieprawi d owym pr zy czeniem zasilania Skontaktowa si...

Page 81: ...atyczne wy czenie okapu po 15 minutach pracy JAK PR DKO WYBRA pr dko 1 3 zapewnia oczyszczone powietrze przy niskim poborze energii elektrycznej pr dko 4 5 normalne warunki u ytkowania pr dko 6 7 w pr...

Page 82: ...a a ca ko wicie wyschn Mycie w zmywarce do naczy jest dozwolone W celu uzyskania informacji o wyj ciu i w o eniu metalowych ltr w przeciw t uszczowych patrz instrukcja monta u FILTRY PRZECIWT USZCZOWE...

Page 83: ...at forhindre at uautoriserede personer kan t nde for kogepladen p egen h nd placerer h ndtag og rer p pander og gryder p en s dan m de at b rn ikke kan f fat i dem Sluk kogepladen efter brugen Placer...

Page 84: ...tr kke dem hen over kogepladens overflade Gryder og kogepladen skal v re helt rene f r de kommer i kontakt med hinanden Undg at f genstande til at falde ned p kogepladen Anvend kun gryder med magnetis...

Page 85: ...ing ingen genstande p de motoriserede vinger Kontroll r frituregryder under brug overophedet olie kan selvant nde Anvend aldrig emh tten uden fedt ltre af metal fedt og snavs da der ellers er risiko f...

Page 86: ...ika Effekt i alt 3000 7400W Position 1 Nominel effekt 2100W Effekt booster 3000W Position 2 Nominel effekt 2100W Effekt booster 1 2 3000W Position 3 Nominel effekt 2100W Effekt booster 1 2 3000W Posit...

Page 87: ...lade Tryk p tasten ON OFF 3 sec Tryk igen p tasten ON OFF inden for 3 sekunder Tasten begynder at blinke Tryk p pausetasten og hold den nede 1 4 2 3 Kogezones display viser Tryk p de fire kogezoner i...

Page 88: ...Aktivering af 3 kogezoner med tre forskellige effekter fra venstre mod h jre Tryk p tasten Chef Cook Kogezonens display viser aktivering af koge zonen og effektniveauet For deaktivering af funktionen...

Page 89: ...iveau Tryk p tasten for den kogezone der skal indstilles Der t ndes et punkt nederst til h jre Lad fingeren glide til h jre p effektniveauv lgeren og stop ved det ns kede niveau Funktionen kan kun akt...

Page 90: ...ilslutn ingen Kontakt Teknisk Service 4 7 Manglende kommunikation mellem trykk nappanelet og induktionsmodu lerne Kablet er beskadiget eller ikke tilkoblet Beskadiget in duktionsmodul Kontakt Teknisk...

Page 91: ...slukning af emh tten Langvarigt tryk Aktivering af den automatiske driftscyklus A p emh tten i henhold til pladernes e ekt Styrkefor gelse fra 1 til 9 op til P Styrke P Kun aktiv i f minutter og vende...

Page 92: ...mere grundig reng ring fjernes bakken til opsamling af olie se gur og vask den med varmt vand og opvaskemiddel Skyl den med omhu og vent med at montere den igen til den er helt t r BORTSKAFFELSE VED E...

Page 93: ...ng van de bedieningselemen ten om te verhinderen dat onbevoegden zelf het toestel kunnen aan zetten plaats de stelen en handgrepen van potten en pan nen zodanig dat kinderen er niet bij kunnen Schakel...

Page 94: ...nductie Enkel kookpotten met volledig magnetiseerbare voldoende dikke en per fect vlakke bodem zijn geschikt voor gebruik op inductieplaten De bodem is magnetiseerbaar als een magneet hecht op elk pun...

Page 95: ...De aansluiting moet in overeenstemming zijn met de wettelijke voorschri ften die van kracht zijn Voordat u de kookplaat op het elektriciteitsnet aansluit moet u controleren of de netspanning overeens...

Page 96: ...C Timer toets Activeert de instelling van een generische timer Toets CHEF COOK Schakelt 3 kookzones in met verschillende verwar mingsvermogens Keuzeschakelaar vermogensniveau Stelt het vermogen van de...

Page 97: ...vier zones met de klok mee Laat de pauze toets weer los Op het display van de kookzone verschijnt het symbool parameternummer De Timer zone geeft dehuidige parameterinstelling weer De parameter voor d...

Page 98: ...ay van de kookzones geeft de activering van de zone en het vermogensniveau aan Om de functie CHEF COOK uit te schakelen Druk op de toets Chef Cook PAUZE FUNCTIE annuleert de werking van alle kookzones...

Page 99: ...Druk op de toets van de in te stellen kookzone Het puntje rechtsonder licht op Schuif uw vinger naar rechts in de keuzeschakelaar voor het vermogens niveau en stop op het gewenste niveau De functie k...

Page 100: ...contact op met de technische dienst 4 7 Geen commu nicatie tussen toetsenpaneel en inductormodules Communi catiekabel beschadigd of losgekoppeld Inductormo dule bescha digd Neem contact op met de tec...

Page 101: ...odat deze na 15 minuten automatisch uitgaat WELKE SNELHEID MOET U KIEZEN snelheid 1 3 houdt met laag energieverbruik de lucht zuiver snelheid 4 5 normale gebruiksomstandigheden snelheid 6 7 bij aanwez...

Page 102: ...dige reiniging verwijder het olieopvangbakje zie afbeelding en was het met water en een afwasmiddel Spoel het zorgvuldig en wacht tot het goed droog is voordat u het terugplaatst WEGGOOIEN AAN HET EIN...

Page 103: ...nujen ja kattiloiden kahvat niin ett lapset eiv t p se koskemaan niihin Sammuta levyt k yt n j lkeen l aseta mit n metalliesineit levylle niiden ollessa p ll Tekninen turvallisuus Asennustoimet on ann...

Page 104: ...ruostumattomasta ter ksest valmistetut kattilat Ferriittiset ruostumattomasta ter ksest valmiste tut kattilat Kattilan pohjan mitat Keittoalue Minimimitta Yksitt inen 120mm Silta 230mm Induktioliedell...

Page 105: ...okkaasti ja oikein liitetty maadoitukseen vo imassa olevien m r ysten mukaisesti lieden liit nt n tarkoitettu pistoke on ulottuvilla Seuraavissa tapauksissa laitteiden kaapeleissa ei ole pistoketta k...

Page 106: ...ueen ajastin N ytt vastaavaan keittoalueeseen yhdistetyn aja stimen aktivoinnin N ytt ruudun n ytt kuvaus Keittoalue valmiustilassa Valittu keittoalue Valittu tehotaso Boost teho suurin l mmitysteho J...

Page 107: ...Alhaalla oikealla oleva piste syttyy S d haluttua tehotasoa S D TEHOTASOA Pyyhk ise sormeasi oikealle tehotason valitsimessa ja pys hdy halutulle tasolle 0 1 2 3 4 5 6 7 8 9 Valitun keittoalueen n yt...

Page 108: ...tettaessa Paina N pp inlukkoa yhden sekunnin ajan Kaikki n pp imet paitsi N pp inlukko ja ON OFF ovat poissa k yt st N PP INLUKKO toiminnon kytkemiseksi pois Paina N pp inlukkoa yhden sekunnin ajan LA...

Page 109: ...a Kytke liesitaso p lle Tauko n pp in vilkkuu Paina tauko n pp int RECALL toiminto palauttaa keittoalueiden toiminnan ajastintoiminnot ja pikal mmityksen Muita toimintoja ei palauteta MIT TEHD LIEDEN...

Page 110: ...N POISTO ULKOINEN POISTOTUULETIN IMU T ss versiossa savut ja h yryt poistetaan ulos poistoputken kautta T t varten tuulettimen poistoliit nt on yhdistett v putkella ulkoiseen ulosmenoon Ulosmenoputken...

Page 111: ...neessa l k yt ter vi tai hankaavia esineit Puhdistuksen j lkeen kuivaa laite pehme ll liinalla HY DYLLISI VINKKEJ HUOLTOA VARTEN Suosittelemme ett puhdistat keittotason s nn llisesti mieluiten jokaise...

Page 112: ...mahdolliset kielteiset vaikutukset ihmisten terveydelle ja ymp rist lle jotka voivat johtua j tteiden sopimattomasta h vitt misest Sinua pyydet n ottamaan yhteytt paikallisiin viranomaisiin saadakses...

Page 113: ...113 113 NOTE NOTES...

Page 114: ...114 114 NOTE NOTES...

Page 115: ...115 115 NOTE NOTES...

Page 116: ...169 Ed 01 2023 Codice Code Code Code C digo Matricola Serial number Seriennummer Num ro de s rie Matr cula Falmec S p A via dell Artigianato 42 z i 31029 Vittorio Veneto Treviso Italy info falmec com...

Reviews: