background image

USER GUIDE &  

INSTALLATION INSTRUCTIONS

Profe FX 90 Dual Fuel 

Australia

U111195 - 02

Summary of Contents for Professional + FX

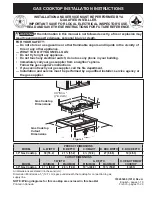
Page 1: ...USER GUIDE INSTALLATION INSTRUCTIONS Professional FX 90 Dual Fuel Australia U111195 02 ...

Page 2: ......

Page 3: ...afety requirements and regulations 23 Provision of ventilation 23 Location of cooker 23 Conversion 23 Positioning the cooker 25 Moving the cooker 26 Removing the oven door 26 Lowering the two rear rollers 26 Completing the move 26 Levelling 26 Fitting the stability bracket and chain 27 Fitting a stability bracket 27 Fitting the restraining chain 27 Gas connection 28 Pressure testing 28 Electrical ...

Page 4: ...ii ...

Page 5: ...ore reading the instruction booklet DO NOT place articles on or against this appliance DO NOT operate with panels covers or guards removed from this appliance The cooker should not be placed on a base This appliance is designed for domestic cooking only Use for any other purpose could invalidate any warranty or liability claim Before operating the ovens please refer to the oven shelf installation ...

Page 6: ... Make sure that the gas supply is turned on and that the cooker is wired in and switched on In your own interest and that of safety it is law that all gas appliances be installed by a qualified person s An appliance for use on LPG must not be installed in a room or internal space below ground level e g in a basement If You Smell Gas DO NOT turn electric switches on or off DO NOT smoke DO NOT use n...

Page 7: ...moking and greasy spills may catch on fire Use a deep fat thermometer whenever possible to prevent fat overheating beyond the smoking point n WARNING Unattended cooking on a hob with fat or oil can be dangerous and may result in fire n NEVER try to extinguish a fire with water but switch off the appliance and then cover the flame e g with a lid or a fire blanket NEVER leave a chip pan unattended A...

Page 8: ...r face is constructed with toughened safety glass Take care NOT to scratch the surface when cleaning the glass panel Accidental damage may cause the door glass panel to fracture Keep oven vent ducts unobstructed DO NOT use harsh abrasive cleaners or sharp metal scrapers to clean the oven door glass since they can scratch the surface which may result in shattering of the glass Make sure the shelves...

Page 9: ...s listed in this guide Clean with caution If a wet sponge or cloth is used to wipe spills on a hot surface be careful to avoid steam burns Some cleaners can produce noxious fumes if applied to a hot surface NEVER use paint solvents washing soda caustic cleaners biological powders bleach chlorine based bleach cleaners coarse abrasives or salt DO NOT mix different cleaning products they may react to...

Page 10: ...ts the flow of gas if the flame goes out When the igniter button is pressed in sparks will be made at every burner this is normal Do not attempt to disassemble or clean around any burner while another burner is on otherwise an electric shock could result To light a burner push in and turn the associated control knob to the high position as indicated by the large flame symbol Fig 2 2 The igniter sh...

Page 11: ...se the additional pan support trivet supplied Fig 2 8 DO NOT use cooking vessels on the hotplate that overlap the edges Wok burner The wok burner is designed to provide even heat over a large area It is ideal for large pans and stir frying Fig 2 9 For heating smaller pans the aforementioned hotplate burners may be more efficient You should wipe the enamel top surface of the cooker around the hotpl...

Page 12: ...In addition to convection elements around the fans it is fitted with extra heating elements in the top of the oven and under the oven base Take care to avoid touching the top elements when placing or removing items from the oven The multi function oven has 3 main cooking functions fan fan assisted and conventional cooking These functions should be used to complete most of your cooking The browning...

Page 13: ...the food from contamination Pieces of meat fish and poultry should be placed on a shelf over a tray to catch any drips Be sure to wash the shelf and tray after defrosting Defrost with the oven door closed Defrosting should not be carried out in a warm oven Large items such as whole chickens and meat roasts should not be defrosted in this way We recommend this be carried out in a refrigerator Make ...

Page 14: ... to scratch the inner glass door surface Scratches in the glass can cause stress and may cause the door to fail Removing the divider n Make sure the cooker is cool before attempting to remove the divider Fully open the door and remove the oven shelves When removing the divider tilt it slightly upwards and grip the underside to prevent the metal base making contact with the door glass Fig 2 16 and ...

Page 15: ...perature setting knob Fig 2 18 Turn the function selector control to a cooking function Fig 2 19 shows the control set for convectional oven cooking Turn the oven temperature knob to the temperature you need The oven heating light will glow until the oven has reached the temperature you selected It will then cycle on and off during cooking as the oven maintains the selected temperature Fig 2 20 Te...

Page 16: ...erse order making sure to push it fully back Oven light Press the button to turn on the oven lights Fig 2 29 If one of the oven lights fail turn off the cooker power supply before you change the bulb See the Troubleshooting section for details on how to change an oven light bulb Storage The bottom drawer is for storing oven trays and other cooking utensils The drawer can be removed completely for ...

Page 17: ... normal operation Note The cook symbol remains visible during normal operation OR NOTE If the alarm is not manually switched off it will stop after approximately 2 minutes When the Minute Minder is active the clock will not dim between the hours of 10 pm and 6 am The clock must be set to the time of day before the oven will work Alarm will sound when cooking has finished to cancel follow this step...

Page 18: ... set the time of day you want the oven to stop cooking Current time will be displayed along with the word AUTO Set the oven to the required cooking temperature and function Set the cook time Alarm will sound when cooking has finished to cancel follow this step In this example the oven will come on automatically at 16 00 and switch off at 17 00 Note The cook symbol will be visible once in operation...

Page 19: ...ing General oven tips The wire shelves should always be pushed firmly to the back of the oven Baking trays with food cooking on them should be placed level with the front edge of the oven s wire shelves Other containers should be placed centrally Keep all trays and containers away from the back of the oven as overbrowning of the food may occur When the oven is on do not leave the door open for lon...

Page 20: ...re 2 2 hours Up to 3 hours 80 90 minutes 15 25 minutes 10 15 minutes 20 30 minutes 30 40 minutes 20 30 minutes on a preheated tray 35 45 minutes 10 20 minutes according to size 20 40 minutes according to size 2 3 hours 45 60 minutes 40 45 minutes 2 to 3 hours 20 30 minutes Conventional Oven Temperature C Shelf Position 160 C 200 C 160 C 200 C 160 C 200 C 160 C 200 C 160 C 200 C 160 C 200 C 140 150...

Page 21: ...l gas the burners flames should be a bluish colour with at most a slight yellowish fringe On LP gas the flames may be softer The cooktop burner flames may have a slight yellowish tip If the flame burns with a long white tip you should call for service Cleaning for spills For spills and boil overs that occur while cooking turn off the burner as soon as possible and allow it to cool Do not clean unt...

Page 22: ...el n IMPORTANT Before cleaning the divider make sure to remove the silicon sealing strip from the front edge some oven cleaners can damage the seal Remove the strip by gently pulling both ends to release the hooks holding it in place Control panel and oven doors Avoid using any abrasive cleaners including cream cleaners For best results use liquid detergents The control panel and control knobs sho...

Page 23: ...l purpose cloth supermarket Sides and plinth Painted surface Hot soapy water soft cloth Splashback rear grille Enamel or stainless steel Hot soapy water soft cloth Cream cleaner with care if necessary Control panel Paint enamel or stainless steel Warm soapy water Do not use abrasive cleaners on lettering Control knobs handles trims Plastic chrome copper or lacquered brass Warm soapy water soft clo...

Page 24: ...s You do Service organisations will charge for their call outs if they are correcting work carried out by your original installer It is in your interest to track down your original installer Power failure In the event of a failure in the electrical supply remember to reset the clock to make sure that the timed oven continues to operate Poor performance In the unlikely event that after installation...

Page 25: ...0W 230V halogen lamp G9 Fig 7 1 Turn off the power at the circuit breaker Before removing the existing bulb turn off the power supply and make sure that the oven is cool Open the oven door and remove the oven shelves Remove the bulb cover by turning it a quarter turn counter clockwise It may be very stiff Fig 7 2 Pull the existing bulb to remove it When handling the replacement bulb avoid touching...

Page 26: ...data badge If You Have a Problem In the unlikely event that you have a problem with your appliance please refer to rest of this booklet especially the problem solving section first to check that you are using the appliance correctly If you are still having difficulty contact Customer Care on 1300 650 020 or email service andico com au Please Note For warranty information and how to request a remed...

Page 27: ...his appliance should not be used in marine craft caravans or mobile homes Provision of ventilation This appliance is not connected to a combustion products evacuation device Particular attention shall be given to the relevant requirements regarding ventilation The room containing the cooker should have an adequate air supply Install the cooker in a location to allow the complete combustion of gas ...

Page 28: ...river 6 Flat head screwdriver 7 4mm 3mm Allen keys 8 Spirit level 9 Pencil 10 Adjustable spanner 11 13mm spanner or socket wrench 12 Screws for fitting the restraining chain and stability bracket Pan supports Teppanyaki supplied ArtNo 311 0043 Griddle 09 Griddle optional Wok cradle ArtNo 000 0009 Wok ring cast Full capacity shelf Grill pan tray support ArtNo 326 0013 Full capacity shelf Falcon Art...

Page 29: ...hob of the cooking appliance and a cookerhood be less than 650mm or for an overhead exhaust fan 750mm 2 Side Clearances Measurements B C Where B measured from the periphery of the nearest burner to any vertical combustible surface or vertical combustible surface covered with toughened glass or sheet metal is less than 200mm the surface shall be protected to make sure that the combustible surface d...

Page 30: ...djust the height of the rear of the cooker first fit a 13mm spanner or socket wrench onto the hexagonal adjusting nut Fig 9 5 Rotate the nut clockwise to raise counter clockwise to lower Make 10 complete 360 turns clockwise Make sure you lower BOTH REAR ROLLERS Completing the move Unfold the rear edge of the pack base tray Grip the fascia panel and lift the front of the cooker slightly Carefully p...

Page 31: ... to give the smallest practicable clearance between the bracket and the engagement slot in the rear of the cooker Fit the bracket so that it engages as far as possible over the chassis of the cooker Fitting the restraining chain The restraining chain MUST be fitted The length of chain between the appliance and the wall fixing should prevent strain on the gas and electricity connections but still a...

Page 32: ... connect the threaded end of the hose into the gas inlet After completing the gas connection check the cooker is gas sound with a pressure test When checking for gas leaks do not use washing up liquid this can corrode Use a product specifically manufactured for leak detection Natural Gas The adjustable spring loaded gas pressure regulator is preset to give a nominal pressure of 1kPa on Natural gas...

Page 33: ...ure required by law and must be performed with particular care by a qualified technician who must also check that the electricity supply characteristics are correct The total electrical load of the appliance is approximately 3 6kW The cable size used should be suitable for this load and comply with all local requirements Access to the mains terminal is gained by removing the electrical terminal co...

Page 34: ...conds If when you let go of the control knob the burner goes out the safety device has not held in Wait one minute then try again this time holding the control pressed in for slightly longer Oven check Turn on the oven and check that it starts to heat up Check that the oven lights are working NOTE The oven light bulb is not included in the guarantee Turn off the oven Final fitting Fitting the plin...

Page 35: ...INSTALLATION Check the appliance is electrically safe and gas sound when you have finished 31 Removing the drawer Fitting the drawer ...

Page 36: ...e the 3 fixing screws on the underside of the control The control panel should drop down slightly It is held at each end by 2 holes in the top edge Fig 10 2 that locate on the tags on the inner panel Lift the control panel clear of the tags and pull the control panel forward Fig 10 3 Disconnect the wiring from the rear Lift the panel clear of the cooker Replace all parts in reverse order When repl...

Page 37: ...positions Unclip the generator from the cooker Fit the new generator and reconnect the leads Check for correct ignition Taking care not to damage the burner heads lift the hotplate clear of the cooker Reassemble in reverse order making sure that the leads are reconnected correctly Check the burner operation 2 To replace a hotplate control taps DISCONNECT FROM THE ELECTRICITY SUPPLY Remove the cont...

Page 38: ...ostat has failed To Change the Primary Thermostat Remove the control panel Fig 10 1 and hotplate Fig 10 4 Remove the oven shelves Undo the cooker rear cover screws and covers Track the route of the thermostat capillary from the rear of the control on the fascia to where it disappears into the oven By moving the capillary it will become obvious which of the 2 phials in the oven it is connected to F...

Page 39: ... element within the oven and carefully lift the element away Fig 10 8 Disconnect the leads and connect to the replacement element and re assemble parts in reverse order 6 Remove the oven bottom and top elements DISCONNECT FROM THE ELECTRICITY SUPPLY Bottom Element Pull the cooker forward to access the cover boxes at the rear of the cooker Remove the fixings that secure the cover and lift it clear ...

Page 40: ...se order 3 To replace an over door hinge Remove the door and door inner panel see 1 Removing the oven door 2 To replace a door inner glass panel Undo the screws securing the hinge in place Remove the hinge Replace the hinge and rebuild the door in reverse order 4 To remove the oven door seal Open the oven door The seal is held in place by small hooks to the cooker front At the corner pull the seal...

Page 41: ...48247 1 bk PROTECTFEED h4 P045216 1 b r NEON FEED HARNESS w4 P048249 1 g y WIREASSY GENERATOR EARTH h5 P040945 1 clear HTHARNESS w5 P049233 1 bk FEED WIRE Key The connections shown in the circuit diagram are for single phase The ratings are for 230V 50Hz Code Colour b Blue br Brown bk Black or Orange r Red v Violet w White y Yellow g y Green yellow gr Grey Code Description A1 Multi function oven m...

Page 42: ...ane 2 54 kPa Input Injector Input Injector Marking Size Ø Marking Size Ø Wok 75 15 2 MJ h 1 198 1 93mm 15 0 MJ h 1 111 1 07 mm Rapide Large 41 12 3 MJ h 1 165 1 65mm 12 0 MJ h 1 89 0 96mm Semi Rapide Medium 33 6 2 MJ h 1 115 1 15mm 6 2 MJ h 1 67 0 68mm Auxillary Small 25 3 7 MJ h 1 92 0 92mm 3 3 MJ h 1 45 0 50mm The valves in this cooker are fitted with adjustable bypass screws The cooker is suppl...

Page 43: ... of gas burners 5 Auxiliary Small Burner EE gas burner Semi Rapide Medium Burner EE gas burner 58 Semi Rapide Medium Burner EE gas burner 58 Rapide Large Burner EE gas burner 56 Rapide Large Burner EE gas burner Wok EE gas burner 54 Wok EE gas burner Hotplate EE gas hob 56 Information marked thus is not required with mixed fuel hobs ...

Page 44: ... kWh cycle 1 16 Energy consumption electricity forced air convection kWh cycle 1 03 Energy efficiency index conventional 112 8 Energy efficiency index forced air convection 93 9 Energy class A Additional Information The oven complies with EN 60350 1 Maximum output 230V 50Hz Full Divided Fan element 3 31 kW 1 65 kW Top element 3 49 kW 1 75 kW Browning element 2 11 kW 1 06 kW Bottom element 1 38 kW ...

Page 45: ...41 NOTE ...

Page 46: ...42 NOTE ...

Page 47: ...43 NOTE ...

Page 48: ...Clarence Street Royal Leamington Spa Warwickshire CV31 2AD England www falconworld com ...

Reviews: