Falcon Professional 90 Fuel User'S Manual And Installation Instructions Download Page 17

17

Australia

Troubleshooting

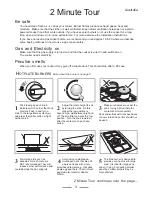
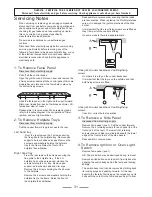
Steam is coming from the oven

When cooking foods with a high water content (e.g. oven chips) there may be some
steam visible at the rear grille. Take care when opening the oven door as there may be a
momentary puff of steam when the oven door is opened. Stand well back and allow any
steam to disperse.

The oven fan is noisy

The note of the oven fan may change as the oven heats up - this is perfectly normal.

What cleaning materials are recommended for the cooker?

See the ‘Cleaning’ section of the Easy Guide for a full list of recommended cleaning
materials. We do not recommend Mr. Muscle, as it contains chemicals that may damage
the surfaces of your cooker.

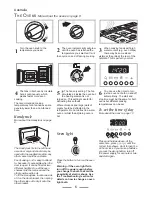
The knobs get hot when I use the oven or the grill, can I avoid this?

Yes, this is caused by heat rising from the oven or the grill, and heating them up. Don’t
leave the oven door open. Make sure that the grill pan is pushed right back to the ‘back
stop’ when grilling.

If there is an installation problem and I don’t get my original installer to come back to fix it who pays?

You do. Service organisations will charge for their call outs if they are correcting work
carried out by your original installer. It’s in your interest to track down your original
installer.

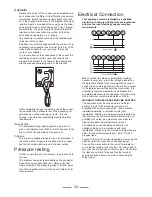
Current Operated Earth Leakage Breakers

Where the cooker installation is protected by a 30 milliamp sensitivity residual current
device (RCD), the combined use of your cooker and other domestic appliances may
occasionally cause nuisance tripping. In these instances the cooker circuit may need to
be protected by fitting 100mA device. This work should be carried out by a qualified
electrician.

Food is cooking too slowly, too quickly, or burning

Cooking times may differ from your previous oven. Check that you are using the
recommended temperatures and shelf positions. See page 12. The oven control settings
and cooking times are intended to be used only as a guide. Individual tastes may require
the temperature to be altered either way, to get the results you want. Try cooking at a
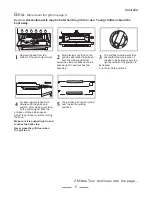
higher temperature setting. Is the oven roof in? Is it the right way round? Is it pushed
fully back? Is it resting on the liners?

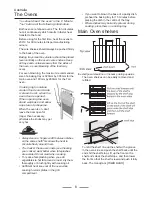
The oven is not cooking evenly

Do not use a tin or tray larger than the baking tray we supply (320mm x 305mm).
If you are cooking a large item, be prepared to turn it round during cooking.
If two shelves are used, check that space has been left for the heat to circulate. When
the baking tray is put into the oven, make sure it is placed centrally on the shelf.
Check that the door seal is not damaged and that the door catch adjusted so that the
door is held firmly against the seal.
NB the seal is intended to have a gap at the bottom of the door
A dish of water when placed on the shelf should be the same depth all over. (For
example, if it is deeper at the back, then the back of the cooker should be raised up or
the front lowered). If the cooker is not level arrange for your supplier to level it for you.

Summary of Contents for Professional 90 Fuel

Page 1: ...PROFESSIONAL 90 Dual Fuel Falcon 90 Dual Fuel Users Guide and Installation Instructions U1 237 01...

Page 2: ...ain oven Page 9 Tall oven shelves Page 9 Cooking using the timer Page 10 The clock Page 11 Oven cooking guide Page 12 Cleaning your cooker Page 13 Moving your cooker Page 16 Troubleshooting Page 17 Ge...

Page 3: ...g aids such as asbestos or mesh mats are NOT recommended They will reduce burner performance and could damage the pan supports 4 5 Avoid using unstable and misshapen pans that may tilt easily and pans...

Page 4: ...ts to suit 4 Don t put it crossways it will not fit properly and will be unstable Don t put it on the Wok burner it is not designed to fit the Wok burner pan support 2 3 The griddle fits a single pan...

Page 5: ...on the grill tray pan slide the grill pan onto the side supports just below the elements Make sure it is pushed right in and touches the backstop Remove the pan from the bottom of the grill compartme...

Page 6: ...tically The start and stop time must be the same for both ovens but different cooking temperatures can be set To set the time of day More about the clock on page 10 Press and hold as above At the same...

Page 7: ...edium low Potato cakes Eggs Fish cakes Experience will soon familiarise you with the correct setting to use for cooking After cooking allow the griddle to cool before cleaning Don t put it on the Wok...

Page 8: ...longer than necessary otherwise the knobs may get very hot Always leave a fingers width between dishes on the same shelf This allows the heat to circulate freely around them The Cook Clean oven liners...

Page 9: ...information The maximum weight which can be held by the Handyrack is 5 5kg 12lb It should only be used with the supplied meat tin which is designed to fit the Handyrack Any other vessel could be unst...

Page 10: ...ooking smaller quantities or placing in larger containers Very perishable foods such as pork or fish should be avoided if a long delay period is planned especially in hot weather Don t place warm food...

Page 11: ...is the period of time you want the oven to cook The stop time which is the time of day you want the oven to stop cooking You cannot set a start time directly this is set automatically by setting the...

Page 12: ...mins per 500g 20 25mins 190 C 15 20mins per 500g 15 20mins Turkey 150 C 20 25mins per 500g 20 25mins 200 C 15 20mins per 500g 15 20mins Stuffed Poultry Cook at 200 C or at 200 C for 20mins then 160 C...

Page 13: ...the oven cleaning section for how to remove the oven linings VEA is the Vitreous Enamel Association Look for aerosols with the VEA label The oven control settings and cooking times given in the table...

Page 14: ...area burner base underside of burner head Turn the head until the D matches the one on the burner base Turn the head over and place it on the burner base To fit the small inner burner find the larger...

Page 15: ...glazed but the inner two panels are fixed and should not be separated After cleaning carefully refit the outer door panel and replace the side fixing screws The Main Oven The oven has removable side...

Page 16: ...rip on the bottom of the control panel as you move the oven Lift the front of the cooker slightly and pull forward Do not move the oven by pulling the door handles or knobs Move the oven a bit at a ti...

Page 17: ...vice RCD the combined use of your cooker and other domestic appliances may occasionally cause nuisance tripping In these instances the cooker circuit may need to be protected by fitting 100mA device T...

Page 18: ...special bulb heat resistant to 300 C See the HELP leaflet for spares by mail order Open the oven door and remove the Handyrack if fitted and oven shelves Turn off the power supply Unscrew the bulb co...

Page 19: ...d Have the installer show you the location of the cooker control switch Mark it for easy reference Always allow the cooker to cool and then switch off at the mains and before cleaning or carrying out...

Page 20: ...ds or moisture on fresh foods can cause hot fat to bubble up and over the sides of the pan Carefully watch for spills or overheating of foods when frying at high or medium high temperatures Never try...

Page 21: ...ou have a problem with your appliance please refer to rest of this booklet especially the problem solving section first to check that you are using the appliance correctly If you are still having diff...

Page 22: ...fore you start your installation please complete the details BELOW If your customer has a problem relating to your installation they will be able to contact you easily Thank you Installer s Name Insta...

Page 23: ...e This appliance can be converted for use on Propane Warning Where this appliance is installed in marine craft or in caravans it shall not be used as a space heater This appliance is designed for dome...

Page 24: ...red if fitting the cooker on a stone or concrete floor 4 Steel tape measure 5 Cross head screwdriver 6 Flat head screwdriver 7 Spirit level 8 Pencil 9 Adjustable spanner 10 Screws for fitting stabilit...

Page 25: ...fire resistant material to the surface and covering with sheet metal with a minimum thickness of 0 4mm to a height C of not less than 150 mm above the hotplate should satisfy this requirement 3 Side c...

Page 26: ...ut as shown below Make 10 complete 360 turns clockwise This means turning and removing the levelling tool 20 times Make sure you lower BOTH REAR ROLLERS There are two adjusting nuts one for each rolle...

Page 27: ...When fitting a stability bracket read these instructions together with the leaflet supplied with the bracket 1 Place the cooker in its intended position and level the cooker 2 Draw a pencil line 100mm...

Page 28: ...s accessible on the connector block at the upper right hand rear Remove the test nipple screw and fit a pressure gauge to the test point See Technical data section at the back of this book for test pr...

Page 29: ...residual current device RCD the combined use of your cooker and other domestic appliances may occasionally cause nuisance tripping In these instances the cooker circuit may need to be protected by fit...

Page 30: ...t bulb is not included in the guarantee Customer care Please complete your details in the inside cover of this Guide Then replace this Installation Guide back in the Customer Care Pack in the correct...

Page 31: ...plate tray to the frame Raise the front of the hotplate then withdraw Right hand tray From the rear remove the screws securing the flue grille to the hotplate tray If the LH hotplate has not been remo...

Page 32: ...k fixing screws and remove the inner back Unclip the thermostat phial from the clips on the oven back From the top pull the thermostat capillary up and out Disconnect the leads and remove the thermost...

Page 33: ...door and remove Handyrack where fitted by springing one side out of the bracket on the door and sliding the other side free Support the door and remove the two screws securing the upper hinge and pac...

Page 34: ...ut left hand thread 2 brass washers fan blade and circlip Unscrew fan retaining nuts and washers 3 off each and lift the fan away from the rear of the cooker Fit new fan and reassemble in reverse orde...

Page 35: ...the fixing screws underneath the control panel NB some models have a plate under the facia held in place by the bottom fixing screws Slide the facia panel to the right and then pull forward Disconnec...

Page 36: ...5kW D Tall Oven Fan E Earth F Grill energy regulator G Left hand grill 1 05kW H Right hand grill 1 05kW I Oven thermostat J Switch K Neon M Oven Light Switch O Ignition Switch N Neutral P Clock Q Oven...

Page 37: ...37 Australia...

Page 38: ...Cooker Overall depth 648mm Space for fixing See Positioning of Cooker Minimum space above hotplate 650mm Connections Gas Electric Rp 1 2 at rear right hand side 220 240V 50Hz Standard burner Wok burne...

Page 39: ...39 Australia...

Page 40: ......

Reviews: