


1.1 MODEL NUMBERS, NETT WEIGHTS
and DIMENSIONS
1.2 SITING
The mobile trolleys are intended to transport hot, cooked
food from kitchen to serving area.
Store, load and unload unit on a level floor.
Operate unit in a well lit area. Position trolley close to a
suitable power supply in a manner that will not unduly put
strain upon cable, plug and/or power socket when
connected. This will facilitate easy and safe loading/
un-loading of food.
1.3 ELECTRICAL SUPPLY
The unit is suitable for 230V~ 50Hz single phase
operation only.
Mains power cable and plug is factory fitted.
The trolley relies solely on plug connection for electrical
earthing. As this is a mobile unit, no additional earth
provisions are available.
The unit has no ON/OFF switch. Elements/controls will
be energised whenever unit is connected to mains power.
A dummy socket has been provided in trolley side panel
for holding the cable and plug safely above ground and
away from castors when unit is not connected to mains
power supply.
1.4 ELECTRICAL RATINGS
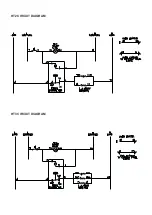
The HT2 heated trolley is rated at 0.92kW.
Data plate is located upon rear panel.
The HT3 heated trolley is rated at 1.38kW.
Data plate is located upon rear panel.
The plug is factory fitted with a 10A fuse.
SECTION 1 - INSTALLATION
UNLESS OTHERWISE STATED, PARTS WHICH HAVE
BEEN PROTECTED BY THE MANUFACTURER
ARE NOT TO BE ADJUSTED BY THE INSTALLER.
Model
Width
(mm)
Length
(mm)
Height
(mm)
Weight
(kg)
HT2 Trolley
700
1105
1200
150
HT3 Trolley
700
1505
1200
195
SECTION 2 -
ASSEMBLY and COMMISSIONING
2.1 ASSEMBLY
The trolley is supplied fully assembled.
Each food compartment is provided with a removable
1/1 gastronorm container rack.
Remove all packaging and dispose of waste material in a
responsible manner. Recycle or re-use if possible.
2.2 CONNECTION TO ELECTRICITY SUPPLY
Simply plug the unit into a 13A mains socket when in use.
2.3 COMMISSIONING
Ensure there is no visual damage to any part of the
trolley, including removable food container racks.
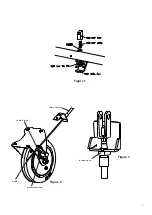
Check power cable is in good condition and cable arrest
at side panel entry is effective.
Check foot-operated doors open and close easily.
Check free movement of loading racks when chamber
door is fully opened.
Check brake operates smoothly. To move unit, press
hand levers together. It should not be possible to move
trolley when hand levers are released.
Power unit ON by plugging it into a 13A mains socket.
Power ON neon should illuminate and controller will
display chamber ambient temperature in °C.
‘Out1’
will
illuminate green.
There is no setting temperature adjustment available to
user. The controller has been pre-programmed at factory
for a thermostat setting of 85°C. Remove outer control
cover by undoing tamperproof screws. Press controller
‘set’
button to check that pre-set temperature is correct.
Press
‘set’
again to return to operational mode with
display of ambient chamber temperature. Replace outer
control cover with tamperproof screws provided.
Check that elements have energised and chamber starts
to heat.
A slight odour may be noticed when heating unit up for
the first time. This is normal, and should not persist in
subsequent use.
Unplug unit and place plug in dummy socket provided.
If any damage or fault is observed these must be rectified.
3