background image

20

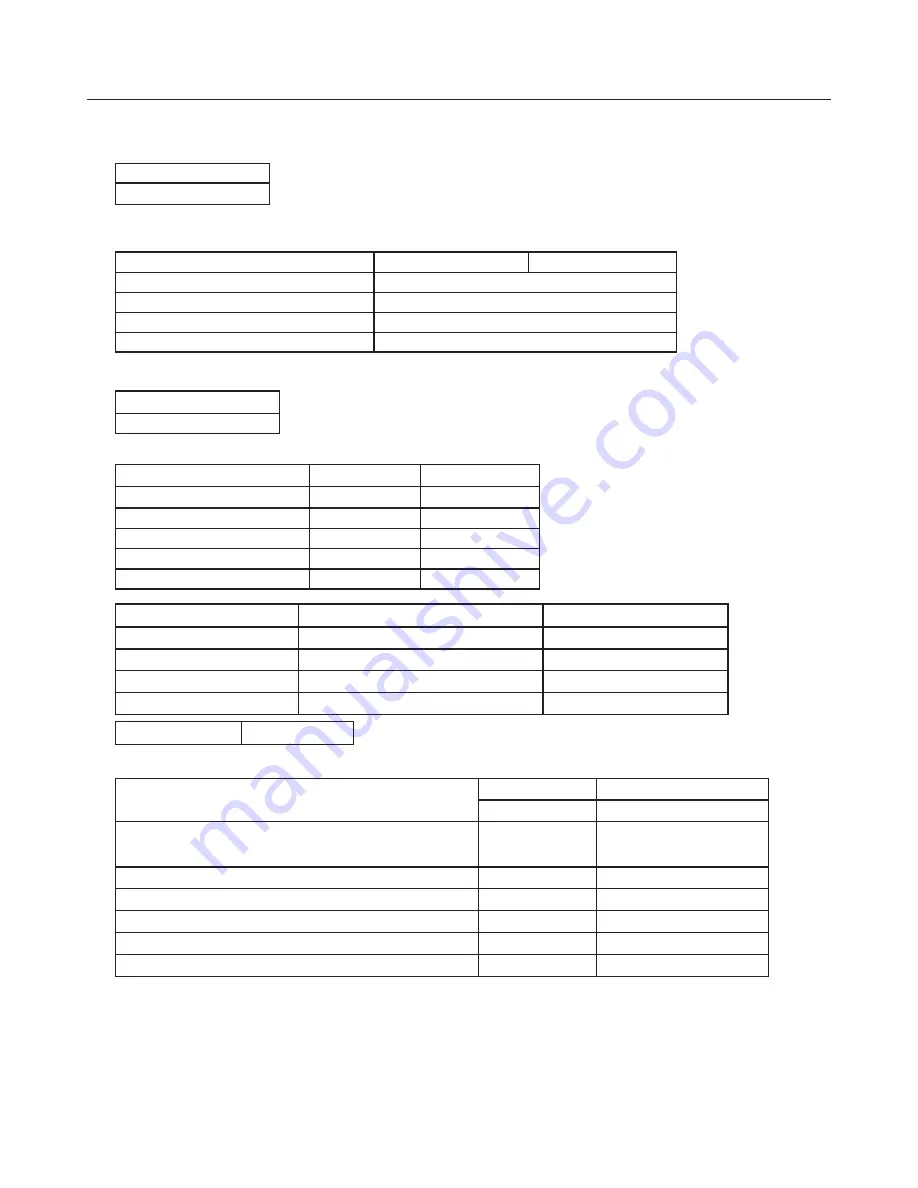
Technical Data

DATA BADGE LOCATION:  Cooker back, serial number repeater badge below oven door opening.
Country of Destination: GB/IE, FR, DE, NL, BE, SE

Electric
220 - 240V 50Hz 

(See appliance data badge for test pressures)

Dimensions

Overall height

minimum 915mm

maximum 942mm

Overall width

900mm  See ‘Positioning of Cooker’

Overall depth

660mm (600mm excluding handles)

Space for fixing

See ‘Positioning of Cooker’

Minimum space above hotplate

800mm

Connections

Electric

220 - 240V 50Hz

Ratings

Induction Hob

Non-Boost

Boost

Left hand front

1.40kW

1.80kW

Left hand back

1.85kW

2.50kW

Centre

2.30kW

3.20kW 

Right hand front 

1.80kW

2.50kW 

Right hand rear

1.80kW

2.50kW

Ovens

Left hand Multifunction Oven

Right hand Tall Oven

Fan element

2.50kW

2.5kW

Top element

1.20kW

Browning Element

1.15kW

Bottom element

1.00kW

Grill

2.30kW

Ovens

Main Oven

Tall Oven

Multifunction

Forced air convection

Energy efficiency class :

on a scale of A (more efficient) to G (less efficient)

B

B

Energy consumption based on standard load

0.95kWh

0.95kWh

Usable volume (litres)

62

53

Size

Medium

Medium

Time to cook standard load

41 minutes

49 minutes

Baking area

1400cm

2

790cm

2

Maximum total electrical load at 230V=16.55kW
Total Nominal Load for Induction Hob @ 230V=9.25kW

Summary of Contents for 900 DL Induction

Page 1: ...Falcon 900 DL Induction User s Guide Installation and Servicing Instructions Falcon 900 DL Unite D induction Mode d emploi Instructions d installation et d entretien U109911 03...

Page 2: ...2...

Page 3: ...ed and adjusted Safe and ef cient use requires that it be serviced regularly Frequency of service is dependent upon usage Only competent persons should be allowed to make adjustments Replacement parts...

Page 4: ...uids in the vicinity of this appliance Never leave the hotplate unattended at high heat settings Pans boiling over can cause smoking and greasy spills may catch on re Never wear loose tting or hanging...

Page 5: ...Page 6 The Hob Page 6 The Glide out Grill Page 8 The Ovens Page 9 Multifunction Oven Functions Page 10 Cleaning your cooker Page 12 Troubleshooting Page 15 Installation Moving Your Cooker Page 16 Serv...

Page 6: ...ons with the following symbols H Hot Hob Indicator P Power Boost Setting U Pan Recognition also known as Pan Missing A Automatic Heat up L Child Lock U Low Temperature Setting Induction Hob Control Di...

Page 7: ...and energy ef cient Never use a round bottomed wok even with a stand 3 Make sure that the base of the pan is clean and dry to prevent any residue burning onto the hob panel This also helps prevent sc...

Page 8: ...n the temperature of the pan rises rapidly and works to maintain a safe level of pan temperature It should not interfere with normal cooking PLEASE REMEMBER NOT TO LEAVE THE HOB UNATTENDED CARE SHOULD...

Page 9: ...ven The Multi function oven has two controls a function selector and a temperature setting knob Turn the function selector control to a cooking function Turn the oven temperature knob to the temperatu...

Page 10: ...element around it An even heat is produced throughout the oven allowing you to cook large amounts quickly Fan oven cooking is particularly suitable for baking on several shelves at one time and is a...

Page 11: ...p all trays and containers away from the sides of the oven as over browning of the food may occur NOTE Do not cover the base of your Multi function oven with cooking foil For even browning the maximum...

Page 12: ...prevent deposits becoming burnt on These can be dif cult to remove Allow unit to cool before commencing to clean it Hob We recommend that you use a cleaning product developed speci cally for ceramic s...

Page 13: ...soft cloth wrung out in clean hot soapy water After the cooking surface cools down and the heat indicator lights go off use the daily care procedure as outlined above Cleaning for burned on spills In...

Page 14: ...ooking below this temperature occasionally remove the shelf supports and wipe the panels with a lint free cloth and hot soapy water The panels should then be dried and the oven heated at 200 C for abo...

Page 15: ...that there is suf cient ventilation In extreme cases if you have allowed a cooking utensil to boil dry this error code may also be displayed If in doubt please consult your installer or a quali ed rep...

Page 16: ...e door is held rmly against the seal A dish of water when placed on the shelf should be the same depth all over For example if it is deeper at the back then the back of the cooker should be raised up...

Page 17: ...r discolours at temperatures less than 65 C above room temperature For safety reasons curtains must not be tted immediately behind the cooker We recommend a gap of 910mm between units to allow for mov...

Page 18: ...nce must be installed by a quali ed electrician to comply with the relevant regulations and also the local electricity supply company requirements WARNING THIS APPLIANCE MUST BE EARTHED Note The cooke...

Page 19: ...stable hinges To Adjust the Oven Door Angle The door bottom hinge can be adjusted to alter the angle of the door Loosen the bottom hinge xing screws and use the notch and a at bladed screwdriver to mo...

Page 20: ...Left hand front 1 40kW 1 80kW Left hand back 1 85kW 2 50kW Centre 2 30kW 3 20kW Right hand front 1 80kW 2 50kW Right hand rear 1 80kW 2 50kW Ovens Left hand Multifunction Oven Right hand Tall Oven Fan...

Page 21: ...B DISPLAY 1 2 5 3 4 Earth N 2 N 1 L 1 L 2 L 3 FALCON 900 INDUCTION UNIT E 5 4 3 2 1 KEY 1 2 5 3 4 Front Left Rear Left Rear Right Front Right Centre W BR W BR W BR W BR INTERFACE BOARD 1 2 5 3 4 W BR...

Page 22: ...n thermostat C Multi function front switch D RH oven thermostat E RH oven front switch F Grill front switch G Grill element H MF oven base element I MF oven top element outer J MF oven browning elemen...

Page 23: ...23...

Page 24: ...ler ce que l appareil soit install et r gl correctement Un entretien p riodique est n cessaire pour un fonctionnement s r et ef cace de l appareil La fr quence de l entretien d pend de l utilisation L...

Page 25: ...ructions Toutes les parties de la cuisini re deviennent chaudes lorsque celle ci est en marche et resteront chaudes m me lorsque la cuisson est termin e Au besoin utilisez des gants isolants secs l em...

Page 26: ...Table de cuisson Page 30 Gril coulissant Glide Out Page 33 Fours Page 34 Fonctions du four Multifonctions Page 34 Nettoyage de la cuisini re Page 37 D pannage Page 40 Installation D placement de la cu...

Page 27: ...ion l aide des symboles suivants H Indicateur de chaleur r siduelle P R glage Surpuissance U D tection de r cipient de cuisson dit aussi Absence de r cipient A Chauffage automatique L Verrouillage s c...

Page 28: ...1 Utilisez uniquement des r cipients appropri s pour les tables de cuisson induction Nous recommandons l emploi de r cipients en acier inoxydable en acier maill ou en fonte base maill e 2 Les r cipie...

Page 29: ...des d induction 2 et 4 simultan ment en sens antihorairependant 3 secondes environ jusqu l af chage de L sur l af chage des commandes de la table de cuisson pour tous les foyers Ceci sera SANS effet s...

Page 30: ...idi Placez les aliments sur la grille puis ins rez le support de la l chefrite dans l enceinte de gril V ri ez qu il est ins r fond R glez la chaleur l aide du bouton de commande NE FERMEZ JAMAIS LA P...

Page 31: ...llumera jusqu ce que le four atteigne la temp rature requise Il s allumera et s teindra pendant la cuisson Four haut droit Le ventilateur dans le four droit brasse l air chaud continuellement assurant...

Page 32: ...te un pr chauffage du four Four ventil mixte Cette fonction commande le ventilateur et brasse l air chauff par les l ments chauffants de la vo te et de la sole du four Cette fonction qui combine la cu...

Page 33: ...n d aliments haute teneur en eau frites surgel es par exemple un peu de vapeur peut tre visible la grille l arri re du chauffe plats Ceci est tout fait normal La cuisson d aliments haute teneur en eau...

Page 34: ...ssuie tout propre Si les aliments d vers s autres qu une substance sucr e se trouvent dans une zone chaude de la table de cuisson attendez que celleci ait enti rement refroidi pour nettoyer et suivez...

Page 35: ...t du four Pour replacer le support lat ral placez d abord la xation de la partie inf rieure du support dans la rainure du support de xation situ e dans le c t du four Placez ensuite les parties sup ri...

Page 36: ...x La cuisini re pr sente un d faut technique interne qui ne peut pas tre recti par l utilisateur Consultez votre installateur ou un r parateur quali Le fusible saute ou le disjoncteur diff rentiel est...

Page 37: ...ntre le joint Un r cipient d eau plac sur la grille doit avoir une profondeur uniforme S il est plus profond l arri re par exemple l arri re de la cuisini re doit tre lev ou l avant de la cuisini re a...

Page 38: ...aces adjacentes Ne placez pas la cuisini re sur un support largeur d ouverture de porte pr voir davantage d espace pour les poign es voir ci dessous Induction Le pourtour de la table de cuisson doit t...

Page 39: ...iante Par mesure de s curit ne placez pas de rideaux directement derri re la cuisini re Nous recommandons de laisser un espace de 910mm entre les unit s pour permettre le d placement de la cuisini re...

Page 40: ...s correctes pour votre type d alimentation lectrique V ri ez que les connecteurs sont mont s correctement et que les vis des bornes sont bien serr es Fixez le c ble d alimentation secteur l aide du se...

Page 41: ...41 Assistance Client le Veuillez indiquer au client comment faire fonctionner la cuisini re et lui remettre les pr sentes instructions Merci...

Page 42: ...s De Main gauche 1 85kW 2 50kW Centre 2 30kW 3 20kW Avant De Main droite 1 80kW 2 50kW Arri re De Main droite 1 80kW 2 50kW Fours Four multifunction de main gauche Four droit de ventilateur ventez l l...

Page 43: ...ise m re 1 2 5 3 4 N 2 N 1 L 1 L 2 L 3 FALCON 900 UNIT D INDUCTION E 5 4 3 2 1 KEY 1 2 5 3 4 gauche avant gauche arri re droite arri re droite avant centre W BR W BR W BR W BR INTERFACE BOARD 1 2 5 3...

Page 44: ...44 Connection shown in circuit diagram is for single phase Ratings are for 230V 50Hz N 5 N 4 N 6 N 6 L 1 L 3 L 1 N 6 R O P A B C D E R R T R R S U M S F S G L 2...

Page 45: ...ment de dessus de four de fonction paire externe J Multi four de fonction brunissant l l ment paire int rieure K Multi l ment de ventilateur de four de fonction L LIVE M Multi ventilateur de four de...

Page 46: ...46 ArtNo 000 0001 Aga address block...

Reviews: