background image

29

28

HELPFUL ADVICE.

Adding apps and content  
to your phone. 

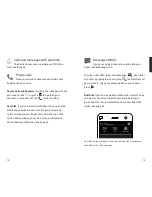
Your Fairphone acts just like a USB storage device. You 
don’t need to create any accounts or download programs 
to add content to your Fairphone. Simply connect it to 
your computer with your data cable, and drag and drop 
your pictures, music, apps and more into the appropriate 
folders (e.g. the folder called Music). To activate this 
option you will need to confirm “Turn on USB Storage” as 
shown in the images below. If you don’t see this image on 
your screen, please check your pull-down menu 
notifications. 

USB connect and disconnect


Apps and online services.


Besides the features specifically designed for 

Fairphone, we’ve tried to provide you with a very “clean” 
operating system.  
 
Purchase and download apps. You can visit the website of 
a specific app to download the app on your phone. Some 
apps are free and others must be purchased. 

You can also download applications that function as app 
markets: huge repositories of other apps. There are very 
well-known repositories and alternative options, as well. 
For more information, visit www.fairphone.com/support.

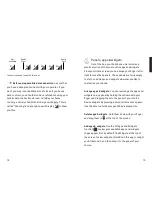
Battery-saving tips.


To save the life of your battery, disconnect from 

any service that you are not using. An overview of these 
services can be found in the Pull-down menu by tapping  

. Bluetooth, wireless and location services (like GPS) 

need a lot of power so you might want to disable them. 
You may also consider decreasing the time your screen is 
on. Select the Screen Timeout option, which can also be 
found in the Pull-down menu.

Summary of Contents for faiphone 2

Page 1: ...THIS IS YOUR USER GUIDE...

Page 2: ...8 Insert your SIM and charge your battery 8 Five panel functionality 10 Basic functions 12 Unlock screen Home panel 12 Quick Access 12 Calls messages with dual SIM 14 Camera 16 Web browser 17 Panels...

Page 3: ...ns i e GPS Wi Fi Airplane mode Silent Vibrate Bluetooth Alarm clock Time Battery charge remaining Signal strength of SIM 1 and 2 R H 11 30 Settings On off button Micro USB connector Volume up down Fro...

Page 4: ...rmally meet these specifications You can charge your phone either by connecting your data cable to your computer s USB port or by plugging a dedicated charger into a power outlet Find out more about w...

Page 5: ...tery back in You need a bit of power to watch something special Start your Fairphone Press and hold the on off button It s on the top of your phone Charge your phone Unless you ve ordered a charger it...

Page 6: ...apps Tap any icon to open the app Go to page 19 for more info Widgets can be used either as full panels or as parts of these panels To resize just press and hold using the circles on the edge of the w...

Page 7: ...the edges while in the lock screen you will see that you can press the button to add from a selected list of widgets Quick Access As the name implies Quick Access is the fastest way to get to commonl...

Page 8: ...pe your finger down from the top of the screen before making your call For more information about how Dual SIM works see page 22 15 Messages SMS Open your Quick Access menu and slide your finger to th...

Page 9: ...ownload another browser if you prefer Connect to Wi Fi This is what you normally use to access the internet at home work or from a cafe Go to System Settings p 23 Wi Fi and slide the lever to On If th...

Page 10: ...selection of the most useful apps and widgets From your Home screen you can swipe your finger left or right to reveal five panels These panels are fairly empty to start so add apps and widgets wherev...

Page 11: ...called Your Apps pre installed on the first panel to the right Here you can quickly see and access your top five recently used and most frequently used apps If you don t see any apps listed it s just...

Page 12: ...fer to use the other card open your Phone Message or People app and then open the Pull down menu Press and then to choose SIM 1 or 2 or set up the system to prompt you every time Both SIMs are always...

Page 13: ...o your Music Player app and play the song you want as your ringtone Press the settings button and press Set as a ringtone Wallpaper Mood Background Change your wallpaper If you would like to use a pic...

Page 14: ...nd select the name of your cloud service provider Work school private server If you use a server from your work school or another private service it usually works with an Exchange Account To set up yo...

Page 15: ...ne we ve tried to provide you with a very clean operating system Purchase and download apps You can visit the website of a specific app to download the app on your phone Some apps are free and others...

Page 16: ...e or slow down You can restore factory settings to regain that fresh out of the box feeling Restore factory settings Go to System Settings Backup Reset Factory Data Reset Carefully read the informatio...

Page 17: ...identical to the type originally included with your Fairphone If you need help finding the right battery visit our website Please dispose of your batteries properly using the services available in you...

Page 18: ...ort Regulations Protecting you the environment RoHS This is directive 2002 95 EC on the restriction of the use of certain hazardous substances in electrical and electronic equipment It was adopted in...

Page 19: ...ctronic Equipment WEEE is an EU directive that aims to reduce the impact of this type of waste and optimize its disposal collection reuse recycling and recovery in line with strict environmental and h...

Page 20: ...If you d like to return your Fairphone If you change your mind about your purchase you can return your Fairphone for refund within 14 calendar days of receiving it without giving any reason Please not...

Page 21: ...y Additionally in order to better understand your rights and our procedures please make sure to read the Terms and Conditions and the full warranty statements for the spare parts and the Fairphone on...

Page 22: ...er manuals to supplement this basic user guide Contribute 2010 ELECTROMAGNETIC COMPATIBILITY art 3 1 a EN 301 489 1 V1 9 2 EN 301 489 3 V1 4 1 EN 301 489 7 V1 3 1 EN 301 489 17 V2 1 1 EN 301 489 24 V1...

Reviews: