background image

For  users 


- 8 - 


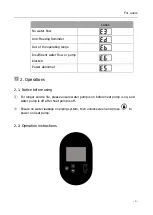
Auto 


Heating 


Cooling 


Heating capacity percentage 


Wifi connection 


Water inlet 


Water outlet 

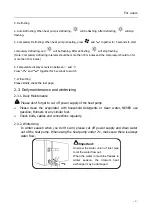
1.Power On: Press 

  for 3 seconds to light up screen, then press 

  to power on heat pump. 

 
2.Adjust Set Temperature: When screen is unlocked, press 

  or 

to display or adjust the set 

temperature. 

3. Mode Selection:    Press 

  to select mode. 

a.


Auto 

: adjustable temperature range 12~40


b.


Heating

: adjustable temperature range 18~40


c.


Cooling

: adjustable temperature range 12~30


4. Turbo/Smart/Silence mode selection: 


Smart mode as default will be activated when heat pump is on, and screen shows 


Press 

  to enter Silence mode, and screen shows 

(Suggestion: select Smart mode for initial heating) 
 

Attention:   
a. When use the Turbo mode, you should select it every time, the machine will not automatically enter 

the Turbo mode. 

b. During the Turbo mode, when the machine reaches the set temperature, it will automatically return to 

the smart mode. 


Summary of Contents for TurboSilence InverX IXCR36

Page 1: ...EN CZ DE HR...

Page 2: ......

Page 3: ...nsportation 12 2 Installation and maintenance 12 2 1 Notice before installation 12 2 2 Installation instruction 13 2 3 Trial after installation 16 2 4 Maintenance and winterizing 17 3 Trouble shooting...

Page 4: ...installed or removed by professionals and it is forbidden to dismantle and refit without permission b Don t put obstacles before the air inlet and outlet of the heat pump 2 Installation a This produc...

Page 5: ...oods c The unit must be far away from any source of fire d Storage place must be bright wide open and good ventilation ventilation equipment is required 4 Maintenance Notice a If maintenance or scrap...

Page 6: ...ng conditions and range ITEMS RANGE Operating range Air temp 15 43 Temp setting heating 18 40 cooling 12 30 The heat pump will have ideal performance in the operation range Air 15 25 1 3 Advantages of...

Page 7: ...at pump since the titanium heat exchanger inside the heat pump will be damaged 1 4 3 Don t put obstacles before the air inlet and outlet of the heat pump 1 4 4 Don t put anything into inlet or outlet...

Page 8: ...abnormal noises smells smokes and leakage of electricity switch off the main power immediately and contact your local dealer Don t try to repair the heat pump by yourselves 1 4 7 The main power switc...

Page 9: ...pump blocked Power abnormal 2 Operations 2 1 Notice before using For longer service life please ensure water pump is on before heat pump is on and water pump is off after heat pump is off Ensure no w...

Page 10: ...Adjust set temperature Note Button will be light all the time when power is on Screen lock a If no operation in 30 seconds screen will be locked b When HP is off screen will be dark and 0 will be dis...

Page 11: ...range 12 40 b Heating adjustable temperature range 18 40 c Cooling adjustable temperature range 12 30 4 Turbo Smart Silence mode selection Smart mode as default will be activated when heat pump is on...

Page 12: ...switch 7 Wifi setting Please kindly check the last page 2 3 Daily maintenance and winterizing 2 3 1 Daily Maintenance Please don t forget to cut off power supply of the heat pump Please clean the eva...

Page 13: ...O P at 50 speed 6 7 6 8 7 0 7 0 7 0 7 0 6 9 Performance Condition Air 35 C Water 28 C Humidity 80 Cooling capacity kW 5 8 6 7 8 2 12 0 14 0 14 0 16 5 Sound pressure at 1m dB A 38 6 46 9 42 0 47 7 42...

Page 14: ...For users 11 2 Related parameters are subject to adjustment periodically for technical improvement without further notice For details please refer to nameplate...

Page 15: ...allation and maintenance The heat pump must be installed by a professional team The users are not qualified to install by themselves otherwise the heat pump might be damaged and risky for users safety...

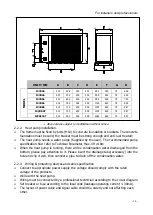
Page 16: ...installers and professionals 13 2 2 Installation instruction 2 2 1 Location and size The heat pump should be installed in a place with good ventilation MINIMUM DISTANCE Filter Water processor Water sw...

Page 17: ...t well then connect a pipe to drain off the condensation water 2 2 3 Wiring protecting devices and cable specification Connect to appropriate power supply the voltage should comply with the rated volt...

Page 18: ...bution Box Customer prepare Power Cord Swimming Pool Heat Pump Wiring Board Power Supply 400V 50Hz Breaker Distribution Box Customer prepare Power Cord Swimming Pool Heat Pump Wiring Board Power Suppl...

Page 19: ...e turning on the heat pump 2 3 1 Inspection before use Check installation of the whole heat pump and the pipe connections according to the pipe connecting drawing Check the electric wiring according t...

Page 20: ...ke sure there is always water flow 3 Trouble shooting for common faults FAILURE REASON SOLUTION Heat pump doesn t run No power Wait until the power recovers Power switch is off Switch on the power Fus...

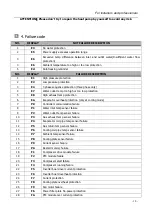
Page 21: ...A Evaporator overheat protection only at cooling mode 7 P0 Controller communication failure 8 P1 Water inlet temp sensor failure 9 P2 Water outlet temp sensor failure 10 P3 Gas exhaust temp sensor fai...

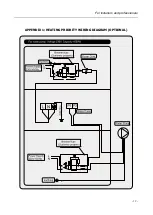
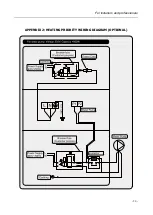
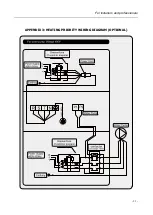
Page 22: ...For installers and professionals 19 APPENDIX 1 HEATING PRIORITY WIRING DIAGRAM OPTIONAL...

Page 23: ...For installers and professionals 20 APPENDIX 2 HEATING PRIORITY WIRING DIAGRAM OPTIONAL...

Page 24: ...For installers and professionals 21 APPENDIX 3 HEATING PRIORITY WIRING DIAGRAM OPTIONAL...

Page 25: ...ls 22 Parallel connection with filtration clock Note The installer should connect A parallel with B as above picture To start the water pump condition A or B is connected To stop the water pump both A...

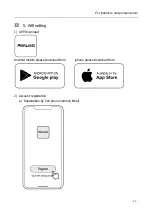
Page 26: ...For installers and professionals 23 5 Wifi setting 1 APP Download Android mobile please download from iphone please download from 2 Account registration a Registration by Cell phone number Email...

Page 27: ...For installers and professionals 24 b Cell phone number registration 3 Create family Please set family name and choose the room of device...

Page 28: ...lay on the screen once Wifi connection success c If connect fails please make sure your network name and password is correct And your router mobile phone and device are as close as possible d Wifi reb...

Page 29: ...rbo mode on display and then want to control HP by phone please press silent mode in APP first and then you can adjust Smart Silent mode in APP More share devices Indicate the status of Heating Coolin...

Page 30: ...essionals 27 6 Share devices to your family members After binding if your family members also want to control the device Please let your family members register the APP first and then the administrato...

Page 31: ...For installers and professionals 28 Then your family members can log in as below Notice 1 The weather forecast is just for reference...

Page 32: ...For installers and professionals 29 2 APP is subject to updating without notice...

Page 33: ...EN CZ DE HR...

Page 34: ...la n pokyny 13 2 3 Kontrola po instalaci 16 2 4 dr ba a zazimov n 17 3 Odstra ov n b n ch z vad 17 4 K d z vady 18 P loha 1 Sch ma elektrick ho zapojen priority oh evu voliteln 19 P loha 2 Sch ma elek...

Page 35: ...t a Tepeln erpadlomus b tinstalov nonebozlikvidov noodborn ky a je zak z nojednotkudemontovat a znovuinstalovatkone n mu ivatelem b P edp vodemaodvodemvzduchu z tepeln ho erpadlamus b tvoln m stovizn...

Page 36: ...konstantn rychlost bez n hl hozrychlen nebobrzd n aby nedo lo k po kozen zbo c Tepeln erpadlomus b tdostate n vzd lenoodmo n hozdrojepo ru d M stoskladov n mus b tdob ev tr n Vy adov no je odv tr vac...

Page 37: ...ovozn podm nky a rozsahy POLO KY ROZSAH Provozn rozsah Teplota vzduchu 15 C 43 C Nastaven teploty topen 18 C 40 C chlazen 12 C 30 C Tepeln erpadlo m ide ln v kon p i rozsahu teplot 15 C 25 C 1 3 V hod...

Page 38: ...e p i p em s ov n za vodn p pojku nebo tak dojde k po kozen titanov ho tepeln ho v m n ku uvnit tepeln ho erpadla 1 4 3 Neum s ujte p ek ky p ed vstup a v stup vzduchu tepeln ho erpadla 1 4 4 Nestrkej...

Page 39: ...P i jak chkoli neobvykl ch projevech nap klad nenorm ln m hluku z pachu kou i a elektrick m prob jen vypn te okam it s ov nap jen a obra te se na sv ho m stn ho prodejce Nepokou ejte se tepeln erpadlo...

Page 40: ...Nenorm ln v kon 2 Obsluha 2 1 Upozorn n p ed pou it m Pro zaji t n del ivotnosti pros m ujist te se e erpadlo je zapnut d ve ne se zapne tepeln erpadlo a z rove v okam iku kdy se vypne tepeln erpadlo...

Page 41: ...nebo Tich program Nahoru Dol Nastaven teploty Pozn mky Tla tko bude sv tit po celou dobu zapnut Uzam en obrazovky a Jestli e nenastane dn aktivita b hem 30ti vte in obrazovka se zamkne b Kdy je tepeln...

Page 42: ...12 40 b Topen nastaviteln teplota o rozsahu 18 40 c Chlazen nastaviteln teplota o rozsahu 12 30 4 V b r programu Turbo Smart Silence neto Tich Smart program je p ednastaven a bude aktivov n jakmile s...

Page 43: ...n WiFi Pros m laskav zkontrolujte posledn str nku 2 3 Denn dr ba a zazimov n 2 3 1 Denn dr ba Nezapome te pros m odpojit elektrick nap jen tepeln ho erpadla V parn k pros m vy ist te ist c mi prost ed...

Page 44: ...mpresoru kW Turbo re im 9 0 11 5 14 5 18 0 22 0 22 0 28 5 C O P Turbo re im 5 5 5 2 5 2 5 6 5 5 5 5 5 3 C O P 7 0 5 0 7 5 4 5 8 0 4 7 8 0 5 1 8 0 5 0 8 0 5 0 8 1 4 8 C O P p i 50 rychlosti 6 7 6 8 7 0...

Page 45: ...0 995 432 750 1125 429 952 1074 539 947 1074 539 947 1260 539 947 ist hmotnost kg 61 65 70 98 102 111 126 1 Uveden hodnoty jsou platn za ide ln ch podm nek baz n zakryt tepeln izola n m krytem filtra...

Page 46: ...rpadla 2 Instalace a dr ba erpadlo mus b t instalov no profesion ln m t mem U ivatel nejsou opr vn ni prov d t instalaci sami nebo p i tom m e doj t k po kozen tepeln ho erpadla a ohro en bezpe nosti...

Page 47: ...2 1 Um st n a rozm ry Aby se zabr nilo recirkulaci vzduchu m lo by b t tepeln erpadlo instalov no na m st s dobr m v tr n m nebo by m lo b t vyhrazeno dostate n m sto pro instalaci a dr bu Viz sch ma...

Page 48: ...oku zkondenzovan vody 2 2 3 Elektrick p ipojen a ochrann za zen a specifikace kabel P ipojte k odpov daj c mu elektrick mu nap jen nap t mus odpov dat jmenovit mu nap t za zen Tepeln erpadlo spr vn uz...

Page 49: ...30V 50Hz M stn rozvodn sk nen sou st balen Silov kabel Elektrick nap jen 400V 50Hz Jisti M stn rozvodn sk nen sou st balen Silov kabel Svorkovnice tepeln ho erpadla Elektrick nap jen 230V 50Hz Jisti B...

Page 50: ...v zkontrolujte v echny kabely 2 3 1 Kontrola p ed pou it m Instalaci cel ho tepeln ho erpadla a p ipojen potrub zkontrolujte podle sch matu p ipojen potrub Elektrick zapojen zkontrolujte podle sch mat...

Page 51: ...RAN N Tepeln erpadlo neb Chyb nap jen Po kejte a se obnov dod vka proudu Hlavn sp na je vypnut Zapn te nap jen Sp len pojistka Zkontrolujte a vym te pojistku Vyp na je vypnut Zkontrolujte a zapn te vy...

Page 52: ...pn teploty vody 9 P2 Z vada sn ma e v stupn teploty vody 10 P3 Z vada sn ma e v stupn teploty chladiva 11 P4 Z vada sn ma e teploty tepeln ho v m n ku z vada sn ma e teploty v parn ku v re imu chlazen...

Page 53: ...Pro instalat ry a profesion ly 19 P loha 1 Sch ma elektrick ho zapojen priority oh evu voliteln...

Page 54: ...Pro instalat ry a profesion ly 20 P loha 2 Sch ma elektrick ho zapojen priority oh evu voliteln...

Page 55: ...Pro instalat ry a profesion ly 21 P loha 3 Sch ma elektrick ho zapojen priority oh evu voliteln...

Page 56: ...m filtrace Pozn mka instalat r mus zapojit A paraleln s B podle v e uveden ho obr zku Pro zapnut ob hov ho erpadla je zapojen podm nka A nebo B Pro vypnut ob hov ho erpadla je nutno odpojit A i B A as...

Page 57: ...instalat ry a profesion ly 23 5 Nastaven WiFi 1 Sta en aplikace Android pro mobiln za zen si pros m st hn te z iphone si pros m st hn te z 2 Registrace tu a Registrace podle sla mobiln ho telefonu e m...

Page 58: ...Pro instalat ry a profesion ly 24 b Registrace sla mobiln ho telefonu 3 Vytvo te rodinu Zadejte pros m p jmen a vyberte m stnost za zen...

Page 59: ...e pokyn dokon ete vazbu Po sp n m p ipojen Wi Fi se na obrazovce zobraz c Pokud se p ipojen nezda zkontrolujte pros m spr vn s ov jm no a heslo V sm rova mobiln telefon a za zen jsou co nejbl e d Vrac...

Page 60: ...i funkci Turbo na displeji a chcete ovl dat tepeln erpadlo v aplikaci pros m nejd ve stiskn te tich re im v aplikaci a pot m ete nastavit inteligentn tich re im V ce sd let za zen Ozna te stav topen c...

Page 61: ...esion ly 27 6 Sd lejte za zen se sv mi rodinn mi p slu n ky Po v z n pokud va i lenov rodiny cht j tak ovl dat za zen Pros m nechte sv rodinn p slu n ky nejprve zaregistrovat aplikaci a pot m e admini...

Page 62: ...Pro instalat ry a profesion ly 28 Pot se va i rodinn p slu n ci mohou p ihl sit n e Ozn men 1 P edpov po as je pouze informativn 2 Aplikace podl h aktualizaci bez p edchoz ho upozorn n...

Page 63: ...Pro instalat ry a profesion ly EN CZ DE HR...

Page 64: ...chnische Spezifikationen 10 1 Transport 12 2 2 Installationsanweisung 13 2 3 Pr fung nach der Installation 16 2 4 Wartung und Vorbereitungen um die Anlage winterfest zu machen 17 3 Fehlerbehebung f r...

Page 65: ...chleuten installiert und oder entfernt werden Es ist verboten es ohne Erlaubnis zu demontieren oder umzubauen b Stellen Sie keine Hindernisse vor dem Luftein auslass der W rmepumpe auf 2 Installation...

Page 66: ...c Das Ger t muss sich fern von Feuerquellen befinden d Der Lagerort muss hell breit offen und gut bel ftet sein Bel ftungsger te sind erforderlich 4 Wartungshinweis a Wenn eine Wartung oder Reparatur...

Page 67: ...ch dem Auspacken ob Sie die folgenden Komponenten haben 1 2 Betriebsbedingungen und Bereich ELEMENTE BEREICH Betriebsbereich Lufttemp 15 43 Temperatureinstellungen Heizung 18 40 K hlen 12 30 Die W rme...

Page 68: ...et werden um das Poolwasser zu erw rmen Sie sollte nie dazu verwendet werden andere brennbare oder tr be Fl ssigkeit zu erw rmen 1 4 2 Heben Sie den Wasseranschluss nicht an wenn Sie die W rmepumpe be...

Page 69: ...en wie Verd nner Farbe und Kraftstoff um einen Brand zu vermeiden 1 4 6 Wenn ungew hnliche Umst nde auftreten z B Abnorme Ger usche Ger che Rauch und Stromverlust schalten Sie den Hauptschalter sofort...

Page 70: ...uhr blockiertes schmutziges Pumpensieb Strom nicht normal 2 Betrieb 2 1 Beachten Sie vor der Verwendung Um die Lebensdauer Ihres Ger tes zu verl ngern vergewissern Sie sich vor dem Anschalten der W rm...

Page 71: ...Auswahl Auto 12 40 Heizen 18 40 K hlfunktion 12 30 Speed Auswahl Smart Silence Modus Rauf Runter Eingestellte Temperatur anpassen Notiz Im Betriebszustand leuchtet die Taste durchgehend Bildschirm Sp...

Page 72: ...uf Wasseraustritt 1 Einschalten Dr cken Sie f r 3 Sekunden um den Bildschrim zu aktivieren Dr cken Sie dann um die W rmepumpe einzuschalten 2 Um die Zieltemperatur zu ver ndern m ssen Sie bei entsperr...

Page 73: ...cken Sie und zeitgleich f r 5 Sekunden um die obligatorische Abtaufunktion zu starten Wenn die W rmepumpe enteist blinkt Hinweis Die obligatorische Abtaufunktion sollte nur alle 30 Minuten genutzt wer...

Page 74: ...3 6 5 16 3 6 6 COP bei 50 Geschwindigkeit 12 0 11 5 11 5 11 6 11 5 11 5 11 4 Betriebsbedingung Luft 15 C Wasser 26 C Feuchtigkeit 70 Heizleistung kW in Smart modus 7 5 9 5 12 0 15 0 18 5 18 5 24 5 He...

Page 75: ...2 01 19 1 0 66 6 35 0 87 8 57 Empfohlener Wasserdurchfluss m3 h 3 4 4 6 6 5 8 5 8 10 10 12 10 12 12 18 Wasserrohr ein aus mm 50 Ma e L x B x H mm 893 432 650 939 432 650 995 432 750 1125 429 952 1074...

Page 76: ...ss von einem professionellen Team installiert werden Der Benutzer ist nicht qualifiziert sie selbst zu installieren da ansonsten die W rmepumpe besch digt werden kann und Sicherheitsrisiken f r den Nu...

Page 77: ...und H ndler 13 2 2 Installationsanweisung 2 2 1 Lage und Gr e Die W rmepumpe sollte an einem Ort mit einer guten Bel ftung installiert werden Mindestabstand R ckschlagventil Wasseraufbereitungsanl ag...

Page 78: ...efestigen Sie diese gut Schlie en Sie dann ein Rohr an um das Kondenswasser ableiten zu k nnen 2 2 3 Verkabelung Schutz der Ger te und Kabelspezifikation Schlie en Sie eine passende Stromquelle an Die...

Page 79: ...W rmepumpe Sicherung Verteilerkasten vom Kundenvorzubereiten Verteilerkasten vom Kunden vorzubereiten Verdrahtungsboard der Schwimmbad W rmepumpe Schutzschalter Stromversorgungskabel Stromversorgung...

Page 80: ...ahme berpr fen Sie die Installation der gesamten W rmepumpe und derRohrverbindungen nach der Rohranschlusszeichnung berpr fen Sie die elektrische Verkabelung gem dem elektrischen Schaltplan und dieErd...

Page 81: ...sung Wasserpumpe startet nicht Kein Strom Warten Sie bis der Strom eingeschaltet wird Hauptschalter ist aus Schalter an der Sicherung durchgebrannt berpr fen Sie ihn und wechseln Sie die Sicherung Sc...

Page 82: ...Fehler bei Controller Kommunikation 8 P1 Sensorfehler des Temp Sensors an Wassereinlass 9 P2 Sensorfehler des Temp Sensors an Wasserauslass 10 P3 Sensorfehler des Temp Sensors an Gasauslass 11 P4 Sen...

Page 83: ...F r Monteure und H ndler 19 Anhang 1 Schaltplan f r Heizpriorit tsfunktion Optional...

Page 84: ...F r Monteure und H ndler 20 Anhang 2 Schaltplan f r Heizpriorit tsfunktion Optional...

Page 85: ...F r Monteure und H ndler 21 Anhang 3 Schaltplan f r Heizpriorit tsfunktion Optional...

Page 86: ...abelung Wasserpumpe der W rmepumpe A Timer Wasserpumpe Hinweis Der Installateur sollte A parallel zu B wie oben Bild verbinden Um dieWasserpumpe zu starten ist Bedingung dass A oder B verbunden sind U...

Page 87: ...F r Monteure und H ndler 23 5 Wifi Einstellung 1 APP Download iPhone bitte Herunterladen von Android Mobile bitte Herunterladen von 2 Kontoregistrierung 1 Registrierung per Handynummer E Mail...

Page 88: ...F r Monteure und H ndler 24 2 Registrierung der Handynummer...

Page 89: ...e den Namen ein und w hlen Sie den Raum des Ger tes aus 4 APP Bindung Bitte stellen Sie sicher dass Ihr Handy mit Wifi verbunden ist 1 Wifi Verbindung Dr cken Sie 3 Sekunden lang nach Entsperren des B...

Page 90: ...korrekt sind Des Weiteren sollten Router Mobiltelefon und Ihr Ger t so nah wie m glich aneinander sein 4 Wifi Neuverbindung Wenn sich das Wifi Passwort oder die Netzwerkkonfiguration ndert 10 Sekunden...

Page 91: ...odus in APP einstellen 6 Geben Sie Ger te an Ihre Familienmitglieder weiter wenn Ihre Familienmitglieder auch das Ger t steuern wollen Bitte lassen Sie Ihre Familienmitglieder zuerst das APP registrie...

Page 92: ...F r Monteure und H ndler 28 Administrator wie folgt vorgehen Dann k nnen sich Ihre Familienmitglieder wie unten beschrieben anmelden...

Page 93: ...F r Monteure und H ndler 29 Hinweis 1 Die Wettervorhersage ist nur als Referenz gedacht 2 APP kann ohne Vorank ndigung aktualisiert werden...

Page 94: ...EN CZ DE HR...

Page 95: ...e 11 2 2 Upute za instalaciju 12 2 3 Provjera spajanja nakon instalacije 15 2 4 Odr avanje i zimsko razdoblje 16 3 Otklanjanje uobi ajenih gre aka 16 4 ifra gre ke 17 Prilog 1 Shema elektri nog spajan...

Page 96: ...lizbrinutikvalificirana osoba a krajnjikorisnik ne smijeizvoditidemonta uiliponovnoinstaliranjeure aja b Prostor ispredulaza i izlazazrakaiztoplinskepumpe mora biti slobodan Vi e u uputama 2 Instalaci...

Page 97: ...njailiko enjakakobi se izbjegloo te enjerobe c Toplinska mora mora biti dovoljnoudaljena od mogu egizvoravatre d Mjestoskladi tenja mora biti dobro prozra eno Potreban je ventilacijskiure aj 4 Napomen...

Page 98: ...Raspon Radni raspon Temperatura zraka 7 C 43 C Postavljanje temperature grijanje 18 C 40 C hla enje 12 C 35 C Toplinska pumpa idealnusnaguposti epri rasponu temperature zraka od 15 C 25 C 1 3 Prednost...

Page 99: ...je dr e i je za priklju ak vode jer e do i do o te enja izmjenjiva a topline od titanija unutar toplinske crpke 1 4 3 Ne odla ite predmete ispred otvora toplinske pumpe za ulaz i izlaz zraka 1 4 4 Ne...

Page 100: ...h okolnosti primjerice neuobi ajene buke mirisa dima iliproboja elektri ne izolacije ure aj odmah isklju ite s mre nog napajanja i obratite se prodava u Ne poku avajte sami popravljati toplinsku pumpu...

Page 101: ...ako biste produljili ivotni vijek va e t pumpe pobrinite se da pumpa za vodubude uklju ena prije nego to e biti uklju ena toplinska pumpa kao i da toplinska pumpa bude isklju ena prije nego e biti isk...

Page 102: ...ipka e biti osvjetljena svo vrijeme dok je napajanje uklju eno Zaklju avanje zaslona a Ako nema nikakve aktivnosti tijekom 30 sekundi zaslon se automatski zaklju ava b Kada je toplinska crpka isklju e...

Page 103: ...je temperatura je postavljena u rasponu od 18 40 c Hla enje temperatura je postavljena u rasponu od 12 30 4 Odabir programa Turbo Smart ili Silence Program Smartve je prethodno postavljen i aktivirat...

Page 104: ...i pripreme za zimsko razdoblje 2 3 1 Svakodnevno odr avanje Molimo ne zaboravite isklju iti elektri no napajanje toplinske crpke Molimo da ispariva istite sredstvom za i enje namijenjenim upotrebi u d...

Page 105: ...Razina akusti kog tlaka 1m dB A 38 6 46 9 42 0 47 7 42 9 50 8 40 8 51 2 43 3 51 9 43 3 51 9 42 5 51 7 Zvu ni tlak 50 kapaciteta pri 1m dB A 41 3 43 7 44 5 44 4 46 4 46 4 43 8 Razina akusti kog tlaka...

Page 106: ...odr avanje T pumputreba instalirati profesionalno obu eno osoblje Korisnici nisu ovla teni za instalaciju budu i da se toplinska crpka mo e o tetiti a postoji i rizik od ugro avanja sigurnosti korisni...

Page 107: ...ere i profesionalce 12 2 2 Upute za instalaciju 2 2 1 Polo aj i dimenzije Toplinska pumpatreba biti postavljena na mjestu s dobrom ventilacijom Minimalna udaljenost filter procesor za vodu ventil za p...

Page 108: ...odvod kondenzirane vode 2 2 3 Elektri ni priklju ak i za tita ure aja te specifikacija kabela Spojite na odgovaraju e elektri no napajanje napon treba odgovarati nazna enom naponu ure aja Toplinsku c...

Page 109: ...prema shemi elektri nog spajanja A Za elektri no napajanje 230V 50Hz Razvodna kutija nije dio opreme Kabel za napajanje Elektri no napajanje 400V 50Hz Mini prekida Razvodna kutija nije dio opreme Kabe...

Page 110: ...lirate sve kabele 2 3 1 Kontrola prije kori tenja Instalaciju itave t pumpe i priklju ke cijevi prekontrolirajte prema shemi priklju ka cijevi Elektri ne spojeve provjerite prema shemi elektri nog spa...

Page 111: ...nska crpka ne radi Gre ka u mre nom napajanju Sa ekajte dok zapo ne ponovna opskrba strujom Glavni prekida je isklju en Uklju ite mre no napajanje Osigura je pregorio Prekontrolirajte i zamijenite osi...

Page 112: ...mperaturu izlazne vode 10 P3 Gre ka na senzoru ulazne temperature rashladne teku ine 11 P4 Gre ka na senzoru za temperaturu izmjenjiva a topline Gre ka u senzoru za temperaturu ispariva a u re imu hla...

Page 113: ...Za instalatere i profesionalce 18 Prilog 1 Shema elektri nog spajanja grijanja priority na izbor...

Page 114: ...Za instalatere i profesionalce 19 Prilog 2 Shema elektri nog spajanja grijanja priority na izbor...

Page 115: ...Za instalatere i profesionalce 20 Prilog 3 Shema elektri nog spajanja grijanja priority na izbor...

Page 116: ...menska sklopka cirkulacijske pumpe za vodu B Uklju ivanje cirkulacijske crpke za vodu i toplinske crpke Napomena instalater treba priklju iti A paralelno s B prema gore navedenom prikazu Za uklju ivan...

Page 117: ...Version C12Xr32...
Reviews: