background image


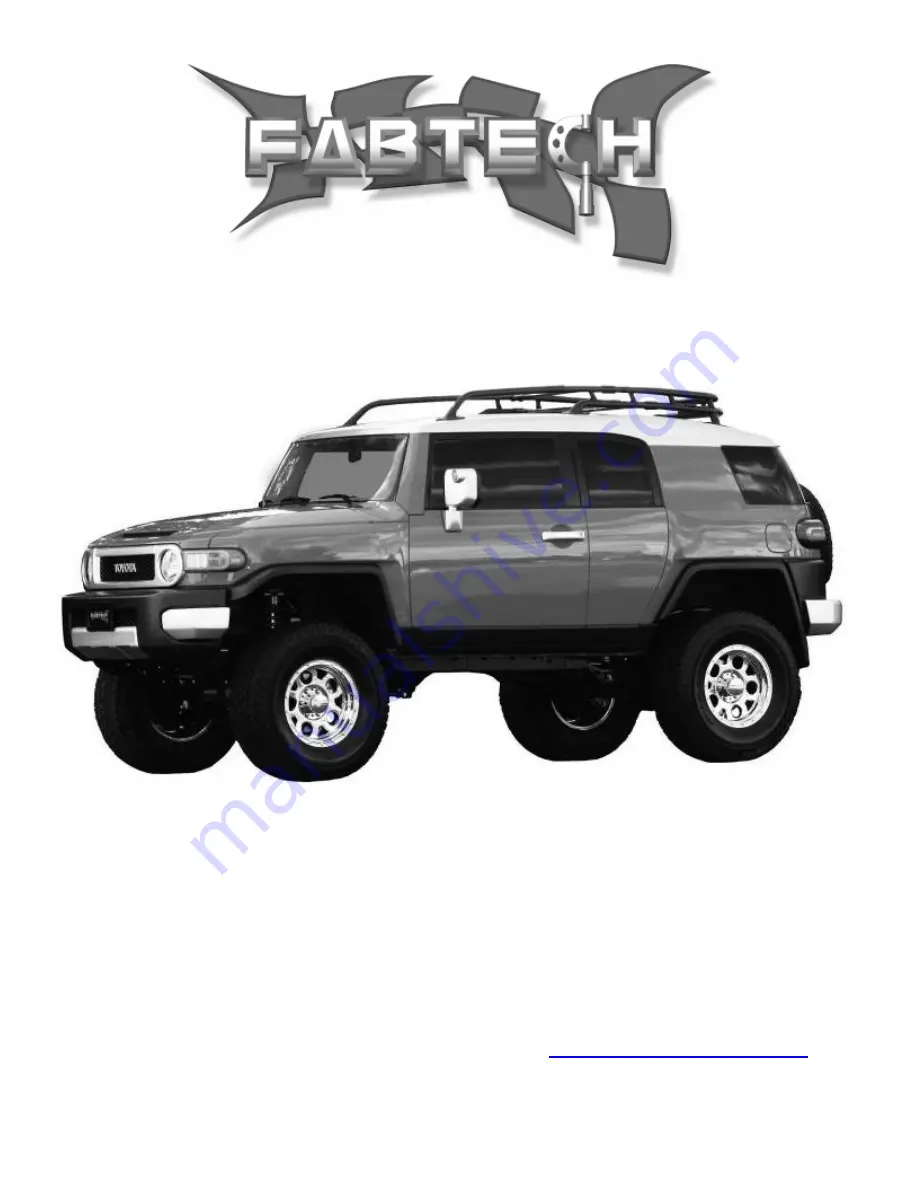
Installation Instructions 


6” Performance Suspension System 

2006-07 Toyota FJ Cruiser 2WD & 4WD 


FTS26016BK / FTS26017BK / FTS26018BK 


Fabtech Motorsports   4331 Eucalyptus Ave.  Chino, CA  91710 

Tech Line 909-597-7800      Fax 909-597-7185      Web 

www.fabtechmotorsports.com


Summary of Contents for FTS26016BK

Page 1: ...s 6 Performance Suspension System 2006 07 Toyota FJ Cruiser 2WD 4WD FTS26016BK FTS26017BK FTS26018BK Fabtech Motorsports 4331 Eucalyptus Ave Chino CA 91710 Tech Line 909 597 7800 Fax 909 597 7185 Web www fabtechmotorsports com ...

Page 2: ... FT70106 Sway Bar Drop Nut Tab Qu a Part Description 2 FT70105 Sway Bar End Link 2 FT70084BK Upper Link Arm D P 4 FT95023 1 2 Heim 2 FT70085BK Lower Link Arm D P 2 FT70102 Sway Bar Hat 2 FT70103 Mis Alignment Low Pro 1 FT70086BK Driver Coil Spacer 4 FT95020 or FT70159 Mis Alignment 1 FT70086BK Passenger Coil Spacer 2 FT70094 Body Mount Weld In Plate 1 FT70088BK Trac Bar Bracket 2 FT70061 Front Bra...

Page 3: ...ont Sway Bar Bracket 2 1 2 13 C Lock 2 3 8 SAE Flat Washer 4 1 2 SAE Flat Washer 2 3 8 Split Washer 4 3 8 16 x 1 1 4 Bolt Bump Stop Brkt 2 3 8 16 x 2 1 4 Bolt Sway Bar End Link btm 4 3 8 16 C Lock 2 3 8 16 x 3 Bolt Sway Bar End Link top 8 3 8 SAE Flat Washer 4 3 8 16 C Lock Nut 2 10mmx1 25 x 25mm Bolt 6 3 8 SAE Flat Washer 2 10mm Flat Washer 4 1 2 20 Jam Nut 2 3 8 16 Nyloc Bump Stop 6 3 8 16 x 1 1...

Page 4: ...PONENTS EXAMPLE CHROMING ZINC PLATING OR PAINTING CHANGING THE FINISH CAN CAUSE STRUCTURAL FATIGUE OF COMPONENTS THIS SUSPENSION SYSTEM WILL NOT WORK ON TRUCKS EQUIPPED WITH ELECTRONIC CONTROLLED SHOCK ABSORBERS IF INSTALLING THE OPTIONAL DIRT LOGIC COILOVER RECORD THE RIDE HEIGHT OF THE VEHICLE SO THAT THE PROPER RIDE HEIGHT CAN BE DONE WHEN COMPLETED YOU MUST RUN A 17X8 RIM OR LARGER WITH A 4 5 ...

Page 5: ...ts Discard skid plate and hardware these will not be reinstalled on the truck SEE PHOTO BELOW 3 Remove factory mud flaps off front of the vehicle and discard 4 Remove the nut from the tie rod ends Disconnect the tie rod ends from the steering knuckle by striking the knuckle with a large hammer to dislodge the tie rod end Use care as to not hit the threads on the tie rod end with the hammer as you ...

Page 6: ...mer next to the ball joint to dislodge the ball joint Use care not to hit the ball joint when removing Remove and save factory castle nut 9 Remove the castle nut and two bolts on each side connecting the lower ball joint assembly to the knuckle Save the Castle nut as you will reuse it Remove spindle assembly from truck Remove remaining portion by striking with a large hammer next to the ball joint...

Page 7: ...SE CARE WHEN REMOVING DIFFERENTIAL AS TO NOT DAMAGE THE C V Axles and 4WD VACUUM ACTUATOR ASSEMBLY SEE PHOTO ON NEXT PAGE 14 Locate the factory rear crossmember Mark the crossmember 3 from outside edge of the cam pocket adjustment hole inward On the top of the crossmember locate the bottom hole and measure down draw a line strait across the top of the crossmember and connect to the first line that...

Page 8: ... cross member Clean area to bare metal and weld in new plates Let plate cool and paint with a corrosive resistant paint or under coating SEE PHOTOS BELOW 17 Working from the driver s side mark the front frame section body mount 5 from the face of the frame and the back at 8 from the frame SEE PHOTOS BELOW AND ON NEXT PAGE ...

Page 9: ...er fitment of the plate Weld the plate in and paint after it has cooled SEE PHOTOS BELOW AND IN NEXT COLUMN Skip step nineteen for 2wd model trucks 19 Locate the front differential and remove the factory front mounts Discard the mounts and save the hardware Locate FT70053 Driver Diff mount FT70054 Pass Diff mount and FT70071 Bushing and Sleeve Kit Install the four bushings and the two larger I D s...

Page 10: ... SEE PHOTO BELOW Skip step twenty one on 2wd model trucks 21 Install the differential up onto the front crossmember with the supplied x 4 bolts and hardware Support the differential with a transmission jack Leave loose at this time SEE PHOTOS IN NEXT COLUMN 22 Locate the Fabtech rear crossmember FT70052 with the supplied 9 16 x5 bolts nuts and washers install the crossmember to the factory control...

Page 11: ... 26 Locate the factory shock assembly and hardware Locate the FT70055 Coil Spacers and supplied 3 8 C Lock nuts and Washers Position the spacer onto the top of the shock assembly so that the shortest side of the spacer is angled in towards the shock bucket on the vehicle and attach to the shock with the factory hardware This must also align with the bottom mounting point of the shock assembly to m...

Page 12: ...OTOS BELOW photo shows removal of hub with the backing plate already removed photo above is a completed 4wd knuckle and hub photos above show removal and installation of the 2wd dust shield 29 Support the lower arm with a floor jack and install the new assembled steering knuckle to the lower ball joint with the factory castle nut and supplied cotter pin Raise the jack enough to locate the knuckle ...

Page 13: ...carefully pull the hard brake line down 4 Locate FT70061 brake line drop bracket and attach the bracket to the frame with the factory hardware in the upside down J formation Attach factory bracket to the new bracket using the supplied 5 16 x 1 bolt nut and washers SEE PHOTO BELOW 32 Locate FT70063 FT70064 drv pass spindle brake line bracket Attach to the Fabtech knuckle using the supplied x bolts ...

Page 14: ... nut and supplied cotter pin torque the tie rod ends to 70 ft lbs SEE PHOTO BELOW AND IN NEXT COLUMN take note on position of adel clamps and line must be in the center of the spindle 34 Remove factory bump stop and discard Locate FT70056 drv 70057 pass bumpstop drop bracket Attach the top of the bracket to the factory bump stop position using the supplied 10mm x 30mm bolt and washer Attach the tw...

Page 15: ...sway bar to the new drop brackets with the supplied 3 8 hardware the sway bar will need to be mounted upside down from the factory position SEE PHOTO IN NEXT COLUMN Front of truck Driver side shown 37 Locate FT70105 Sway Bar End Link FT95023 Heims and supplied Jam Nuts Thread the jam nuts all the way onto the heims Insert an assembled heim into each end of the end links and leave loose Locate FT70...

Page 16: ... of the bracket Note Some vehicles require drilling out the top hole in the crossmember Some vehicles also do not have a pocket for the bracket to set inside of the crossmember requiring the use of the provided x 3 bolt instead of the 3 bolt and FT133 Sleeve Torque to 75ft lbs SEE PHOTOS BELOW AND ON NEXT PAGE FT133 Sleeve Crossmember with pocket FT95020 or FT70159 Mis Align ...

Page 17: ...nd Reroute lines as required for clearance Rear Suspension Instructions 41 Jack up the rear end of the vehicle and support the frame rails with jack stands Supporting the rear differential remove and discard the rear shocks save hardware 42 Disconnect the brake line brackets on the lower link arms upper link arm mount on the axle the mount at the top of the differential housing and the frame on th...

Page 18: ...ng kit Using an arbor press press the bushing and sleeves use supplied bushing lube into each end of the links and install the supplied zerk fittings SEE PHOTOS BELOW Brake line mount at the top of the differential housing 46 Remove the driver lower link and install an assembled Fabtech link with the gussets facing down using the stock hardware Repeat on the passenger lower link SEE PHOTOS ON NEXT...

Page 19: ...cer in position Mark the three holes in the spacer to the coil bucket and remove the spacer SEE PHOTOS BELOW Gussets facing down Factory bumpstop mount Mark new holes 49 Use a drill with a 3 8 bit and drill out the three holes in the bucket Install the spacer with the 3 8 hardware Leave loose Locate FT70093 Rear Bumpstop Bracket supplied 5 16 hardware and the factory bumpstop Mount the factory bum...

Page 20: ...ry rear coils and bumpstop Use a coil spring compressor and install the coils with the bumpstops inside onto the new spacer and the axle mount The bottom end of the coil spring must set against the stop on the axle mount for proper fitment and ride height SEE PHOTOS BELOW End of coil spring MUST be installed so it is flush with the stop on coil perch ...

Page 21: ...pplied x 1 bolt flat washer and split washer Torque the hardware to 75 lbs and the 9 16 to 95 lbs Locate and install the factory trac bar and hardware Torque to 75 lbs SEE PHOTOS BELOW AND IN NEXT COLUMN 53 Locate FT70089 Brake Line Bracket and the supplied 5 16 x hardware Position the new bracket onto the factory brake line bracket on the driver s side on the crossmember and attach with the facto...

Page 22: ...ry bracket to the new Fabtech bracket Bracket bent to align with line clamp 55 Attach the factory e brake cable bracket with the supplied 5 16 hardware to the mounts on the new lower links Torque to 15 lbs SEE PHOTO BELOW 56 Locate FT70090 Sway Bar End Links and FT50116 Bushing Kit Using an arbor press press an hourglass bushing and sleeve into the barrel end of the links Install a cup washer and ...

Page 23: ...rge washer and the C lock nut Tighten the lower bolt first and then the upper nut Only tighten enough to get the bushings to bulge SEE PHOTO BELOW 59 Recheck all bolts for proper torque Recheck brake hoses and lines for proper clearances 60 Check the fluid in the front differential Fill if needed with factory specification differential oil to factory capacity 61 Install tires and wheels and torque...

Page 24: ......

Page 25: ......

Page 26: ...operation of vehicles equipped with supplemental restraining systems air bag systems and should not be installed if the vehicle is equipped as so Fabtech makes every effort to ensure suspension product compatibility with all vehicles listed in the catalog but due to unknown auto manufacturer s production changes and or inconstancies by the auto manufacturer Fabtech cannot be responsible for 100 co...

Reviews: