


FRONT SUSPENSION INSTRUCTIONS:
1.
Disconnect the negative terminal on the battery. With the
Jeep on level ground set the emergency brake and block the
rear tires. Jack up the front end of the truck and support the
frame rails just behind the front bumper with jack stands.
NEVER WORK UNDER AN UNSUPPORTED
VEHICLE!
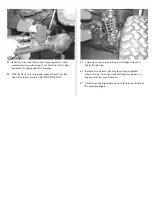
Remove the front tires. Support the front axle
with a floor jack just enough so that axle does not hang
freely.
2.
Working from both sides of the Jeep, remove the front
upper track bar nut and save. Pull the trac bar free from
factory mount.
3.
Remove the sway bar link ends from the sway bar and
lower axle mounts and discard.
4.
On 2003 models equipped with automatic transmissions,
you will need to remove the automatic transmission skid
plate and discard.
5.
Remove the front shocks and discard. Save factory lower
shock hardware, discard upper hardware.
6.
Remove the front drive shaft and save all hardware
. On
some 2003 & up models you will need to
shorten the front driveline 1 ¾”, check drive
shaft for proper clearance before driving.
On
1997-2002 models the stock driveline can be reinstalled
without modification.
7.
Remove front coil springs and discard, save the lower coil
spring retainer (if equipped) and hardware. Remove factory
upper bump stop and discard.
8.
Working from the driver side of the truck, locate the factory
lower link arm, remove and discard link and save factory
hardware.
9.
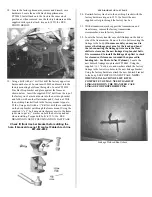
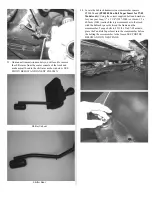
Locate the new Fabtech lower link arm FT50018. Install
one supplied grease fitting into each end of the Fabtech
Link arm. Using factory hardware install the new link arm
into factory frame mount, then attach to axle mount using
the factory alignment cam bolts. Leave loose.
NOTE:
MAKE SURE THE GUSSETS ON BOTH ENDS OF
THE LINK ARM ARE FACING DOWN.
SEE PHOTO
IN NEXT COLUMN.
10. If installing Fabtech’s optional upper link arm kit, install
front upper at this time. See instructions included in
Fabtech’s upper link arm kit.
Step 11 is to be performed on NON RUBICON
models only.
Rubicon models brake lines will remain in stock
location
.
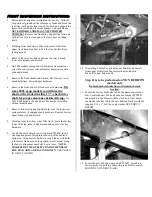
11. Locate the factory brake line tab on the frame and remove
bolt. Locate the new Fabtech brake line bracket FT50023
and attach it to the frame with the stock bolt. Now attach
the stock brake line tab to the new Fabtech bracket with the
supplied 5/16 x 1” bolt, nut, and washer. SEE PHOTO
BELOW.
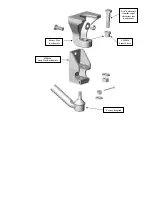
12. Locate the new Fabtech bump stop FT50027. Install into
factory pocket by pushing bump stop in until fully seated.
SEE PHOTO ON NEXT PAGE.


