Faber STILO DX/SP A90 Instruction Manual Download Page 3


EN 


3


RECOMMENDATIONS AND SUGGESTIONS


The Instructions for Use apply to several versions of this appliance. 
Accordingly, you may find descriptions of individual features that do not 
apply to your specific appliance. 

INSTALLATION 

• 

The manufacturer will not be held liable for any damages resulting from 
incorrect or improper installation. 

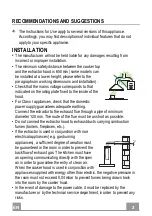
•  The minimum safety distance between the cooker top 

and the extractor hood is 650 mm (some models can 
be installed at a lower height, please refer to the 
paragraphs on working dimensions and installation). 

•  Check that the mains voltage corresponds to that 

indicated on the rating plate fixed to the inside of the 
hood. 

•  For Class I appliances, check that the domestic 

power supply guarantees adequate earthing. 

  Connect the extractor to the exhaust flue through a pipe of minimum 

diameter 120 mm. The route of the flue must be as short as possible.


•  Do not connect the extractor hood to exhaust ducts carrying combustion 

fumes (boilers, fireplaces, etc.). 

•  If the extractor is used in conjunction with non-

electrical appliances (e.g. gas burning 
appliances), a sufficient degree of aeration must 
be guaranteed in the room in order to prevent the 
backflow of exhaust gas. The kitchen must have 
an opening communicating directly with the open 
air in order to guarantee the entry of clean air.


When the cooker hood is used in conjunction with 
appliances supplied with energy other than electric, the negative pressure in 
the room must not exceed 0,04 mbar to prevent fumes being drawn back 
into the room by the cooker hood.


•  In the event of damage to the power cable, it must be replaced by the 

manufacturer or by the technical service department, in order to prevent any 
risks.  


Summary of Contents for STILO DX/SP A90

Page 1: ...Instruction Manual...

Page 2: ...2 2 INDEX RECOMMENDATIONS AND SUGGESTIONS 3 CHARACTERISTICS 6 INSTALLATION 8 USE 11 MAINTENANCE 12 14 17 19 22 23 EN RU...

Page 3: ...ect the extractor to the exhaust flue through a pipe of minimum diameter 120 mm The route of the flue must be as short as possible Do not connect the extractor hood to exhaust ducts carrying combustio...

Page 4: ...poses other than for which it has been designed Never leave high naked flames under the hood when it is in operation Adjust the flame intensity to direct it onto the bottom of the pan only making sure...

Page 5: ...more frequently for particularly heavy usage Clean the hood using a damp cloth and a neutral liquid detergent The symbol on the product or on its packaging indicates that this product may not be trea...

Page 6: ...Section 2 2 1 Lower Section 8 1 Directional Air outlet Grille 125 mm 9 1 Reducer Flange 150 120 mm Ref Q ty Installation Components 7 2 1 2 Upper Chimney Section Fixing Bracket 11 7 Wall Plugs 12a 7 S...

Page 7: ...EN 7 7 Dimensions SX DX min 730 max 1000 min 730 max 1000 Min 500mm Min 650mm Min 500mm Min 650mm...

Page 8: ...indicated at X mm under the first bracket X upper chimney height aligning its central point on the vertical reference line Draw the central points of the bracket holes Draw the reference point as indi...

Page 9: ...the choice of which is left to the installer To install a 120 mm air exhaust connection insert the reducer flange 9 on the hood body outlet Fix the pipe in position using sufficient pipe clamps not s...

Page 10: ...assembly Upper exhaust Chimney Slightly widen the two sides of the upper chimney and hook them behind the brackets 7 2 1 making sure that they are well seated Secure the sides to the brackets using t...

Page 11: ...the Motor on at Speed one Turns the Motor off T2 Speed On Turns the Motor on at Speed two T3 Speed Fixed When pressed briefly turns the Motor on at Speed three L Light Turns the Lighting System on an...

Page 12: ...to bend them Allow them to dry before refitting When refitting the filters make sure that the handle is visible on the outside Activated charcoal filter Recirculation version REPLACING THE ACTIVATED C...

Page 13: ...ion mm ILCOS Code 28 E14 220 240 104 x 35 HSGSB C UB 28 220 240 E14 20 G4 12 33 x 9 HSG C UB 20 12 G4 35 GU10 230 51 x 50 7 HAGS 35 230 GU10 51 40 50 GU10 230 51 x 50 7 HAGS 35 230 GU10 51 20 20 GU4 1...

Page 14: ...RU 1 4 14 650 I 120 0 04 2...

Page 15: ...RU 1 5 15 3 8...

Page 16: ...RU 1 6 16 2 4...

Page 17: ...RU 1 7 17 1 1 2 1 2 1 1 2 2 1 8 1 125 mm 9 1 150 120 7 2 1 2 11 7 12a 7 4 2 x 44 4 12c 6 2 9 x 6 5 12e 2 2 9 x 9 5 13 1 1 2 1 2 2 2 12c 12a 7 2 1 11 11 12a 12e 8 9 1 11 12a...

Page 18: ...RU 1 8 18 SX DX min 730 max 1000 min 730 max 1000 Min 500mm Min 650mm Min 500mm Min 650mm...

Page 19: ...RU 1 9 19 200 90 350 120 650 7 2 1 1 2 7 2 1 X X 116 970 Z Z 690 8 11 12a 4 2 x 44 4 2 12 4 2 x 44 4 5 6 Cappa Y Z 90 cm 200 565 120 cm 350 830 7 2 1 970 X 1 2 Y 116 650 min 116 Y 11 12a 690 Z...

Page 20: ...RU 2 0 20 2 Vr 12a 12 Vr 12 13 12a Vr 150 120 120 9 9 120 150 125 9 120 8 2 12e 2 9 x 9 5 9 125 8 12e...

Page 21: ...RU 2 1 21 3 7 2 1 4 12c 2 9 x 9 5 2 12c 2 9 x 9 5 2 1 2 2 7 2 1 12c 12c...

Page 22: ...RU 2 2 22 T2 T1 L T3 T1 T2 T3 L T1...

Page 23: ...RU 2 3 23 2 4...

Page 24: ...HAGS 35 230 GU10 51 40 50 GU10 230 51 x 50 7 HAGS 35 230 GU10 51 20 20 GU4 12 40 x 35 HRGS 20 12 GU4 35 30 20 GU5 3 12 46 x 51 HRGS 20 12 GU5 3 50 10 16 G13 95 720 x 26 FD 16 40 1B E G13 26 720 18 G1...

Page 25: ......

Page 26: ......

Page 27: ......

Page 28: ...436005061_ver3...

Reviews: