


28
Cleaning Exterior surfaces:
Please note, abrasives and scouring agents can scratch range hood finishes
and should not be used to clean finished surfaces.
Stainless Steel finish cleaning instructions:
Clean exterior surfaces with a commercially available stainless steel cleaner.
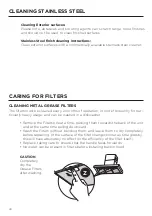
CLEANING STAINLESS STEEL
CARING FOR FILTERS
CLEANING METAL GREASE FILTERS
The filters must be cleaned every 2 months of operation, or more frequently for par-
ticularly heavy usage, and can be washed in a dishwasher.
• Remove the Filters one at a time, pushing them towards the back of the unit
and at the same time pulling downward.
• Wash the Filters without bending them, and leave them to dry completely
before replacing. (If the surface of the filter changes colour as time goes by,
this will have absolutely no effect on the efficiency of the filter itself.)
• Replace, taking care to ensure that the handle faces forwards.
•
No water can be present in filters before installing back in hood.
CAUTION
:
Completely
dry the
Grease Filters
after washing.
Z
Summary of Contents for STIL24SSV2
Page 6: ...6 RANGE HOOD DIMENSIONS DRAFT 27 AP 24 30 36 48...
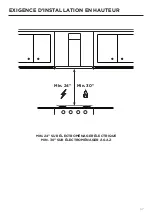
Page 7: ...7 INSTALLATION HEIGHT REQUIREMENTS MIN 24 OVER ELECTRIC MIN 30 OVER GAS Min 24 Min 30...
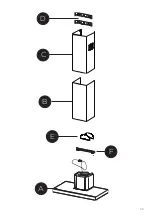
Page 9: ...9 B A F C D E...
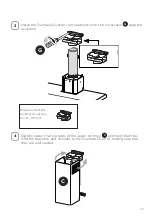
Page 16: ...16 8 Tighten the 2 screws H as shown H Phillips Screwdriver...
Page 17: ...17 CHOOSING VENTING METHOD VENTED RECIRCULATING Go to Pg 18 Go to Pg 22...
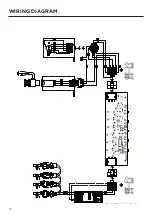
Page 30: ...30 WIRING DIAGRAM...
Page 36: ...36 DIMENSIONS DE LA HOTTE DRAFT 27 AP 24 30 36 48...
Page 39: ...39 B A F C D E...
Page 46: ...46 8 Serrez les 2 vis H comme illustr H Tournevis Phillips...
Page 47: ...47 CHOISIR LA M THODE D A RATION A RATION RECIRCULATION Allez la page 48 Allez la page 52...
Page 60: ...60 SCH MA DE C BLAGE...
Page 66: ...66 DIMENSIONES DE LA CAMPANA EXTRACTORA DRAFT 27 AP 24 30 36 48...
Page 69: ...69 B A F C D E...
Page 76: ...76 8 Apriete los 2 tornillos AL como se muestra AL Destornillador Phillips...
Page 90: ...90 DIAGRAMA DE CABLEADO...


