


13
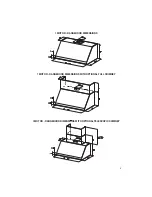
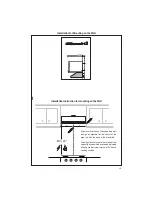
Rear Ducted Installation for 2 motor Rangehood
The Electrical Connector must be
UHPRYHG¿UVWEHIRUHFRQYHUWLQJWKH
hood to Rear Ducting mode.
The Electrical Connector is always
on the left of left Motor Group.
For a rear ducting installation the
PRWRUQHHGVWREHXQVHFXUHGE\¿UVW
removing the 16 screws as shown.
2QFHWKHVFUHZVDUHUHPRYHG
extract the blower from the body
of the Hood and position it so the
transition opening is facing to the
UHDUZDOOIURPWKHEDFNUHPRYHDQG
URWDWHGHJUHHVWRWKHOHIWDQG
WKHQÀLSLWEDFNGHJUHHVDVVKRZQ
LQWKHGLDJUDP
Once the blower is in place re-install
the 16 screws to fasten the motor to
the Hood body.
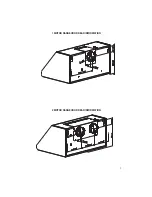
'LVFRQQHFWWKH(OHFWULFDO&RQQHFWRU
one from the left motor goup and
RQHIURPWKHULJKWPRWRU*USRXSE\
depressing the tabs with your hand and
also using light force on one tab with a
ÀDWKHDGVFUHZGULYHU
Reconnect the Connector to the
blower.
Attention:
The longhest cable with
connector is always for Left motor
*URXSDQGWKHVKRUWHVWFDEOHZLWK
connector is always for Right motor
Group.
Reconnect the Electrical Connector
on the left of left Motor Group.
Summary of Contents for MAESTRALE MAES3618SS1200-B
Page 7: ...7 2 MOTOR RANGEHOOD REAR INFORMATION 1 MOTOR RANGEHOOD REAR INFORMATION...
Page 11: ...11 Ducted Venting Options Installation Horizontal Vertical 6 6 Rear 6 Ducting Methods...
Page 22: ...22 Wiring Diagram...
Page 29: ...29 INFORMATIONS ARRI RE HOTTE 2 MOTEURS INFORMATIONS ARRI RE HOTTE 1 MOTEUR...
Page 44: ...44 Sch ma de c blage...
Page 46: ...46...
Page 47: ...47...
Page 48: ...B B...


