background image

6

MAIN PARTS

Components

Ref. 

Qty. 

Product Components

Hood Body, complete with: Con- 


trols, Light, Filters, Blower.

2 1 Frame

Recirculation Vent Grill

10 

Damper ø 5 7/8"

Ref. 

Qty. 

Installation Components

12a 

10 

Screws (for hood installation)

12e 

Screws 1/8"x3/8" (for Recircula 


tion Vent Grill mounting)

12f 

Screws 1/8"x1/4" (for frame  

  mounting)


Qty. Documentation


Instruction Manual

H

I

H

I

H

I

Available Accessories

Parts needed

-  6" Round Metal ductwork .


Direct Connect Wiring Box sku # WIREBOX

Liner 30" Stainless #LINE30ST (Use only with INLX28SSV)

Liner 36" Stainless #LINE36ST (Use only with INLX28SSV)

Activated Charcoal Filter sku #; FILTER1

Long Lasting Activated Charcoal Filter sku# FILTER1LL

Remote Control Accessory - REMCTRL2

Created by 

-

Denomination

-

Lang 

EN

Sheet 

1/1

Modif.by 


Approved by 

Approval date 

Doc. status 

Drawing N.

NEW_DRAWING_BOX

Rev

01

Summary of Contents for Inca Lux INLX21SSV

Page 1: ...INLX21SSV INLX28SSV INLX35SSV INCA LUX Installation Instructions Use and Care Information Instructions d installation Utilisez et d entretien Instrucciones de instalaci n Informaci n de uso y cuidado...

Page 2: ...with your back to an exit Based on Kitchen Firesafety Tips published by NFPA WARNING TO REDUCE THE RISK OF FIRE OR ELECTRIC SHOCK do not use this fan with any solid state speed control device WARNING...

Page 3: ...DO NOT terminate the ductwork in an attic or other enclosed space DO NOT use 4 laundry type wall caps Flexible type ductwork is not recommended DO NOT obstruct the flow of combustion and ventilation a...

Page 4: ...or grounding circuit could result in electrical shock Check with a qualified electrician if you are in doubt as to whether the rangehood is properly grounded Failure to follow electrical requirements...

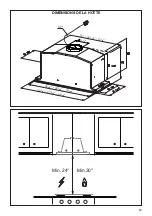
Page 5: ...5 RANGEHOOD DIMENSIONS Min 24 Min 30 47...

Page 6: ...ircula tion Vent Grill mounting 12f 6 Screws 1 8 x1 4 for frame mounting Qty Documentation 1 Instruction Manual H I H I H I Available Accessories Parts needed 6 Round Metal ductwork Direct Connect Wir...

Page 7: ...d screwdriver and pull off 2 NextdisconnecttheElectricalgroundcable green thatisattachedwithnutsandscrewintheuppercav ity of the insert Unscrew and remove the electrical groundnutsandwashersusinga7mms...

Page 8: ...nap into place Fasten using the 10 screws 12a provided Lock in position by tightening the screws Vf from underneath the hood Open the suction panel by turning the specific knob Disconnect the panel fr...

Page 9: ...rk to the Roof or Wall Cap and then attach ductwork For Non Ducted Recirculation venting route the ductwork to a location above the hood where the discharge is vented back into the room Use the includ...

Page 10: ...d WARNING Improper grounding can result in a risk of electric shock Consult a qualified electrician if the grounding instructions are not completely understood or if doubt exists as to whether the app...

Page 11: ...11 1 2 Replace the grease filters removed previously I 5 Close the filter panel cover by pushing it back into place until the latch mechanism has secured it H I 6...

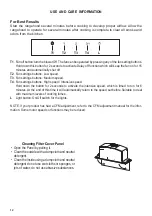
Page 12: ...ower Off The fan can be operated by pressing any of the fan setting buttons Hold down this button for 2 seconds to activate Delay off function which will keep the fan on for 15 minutes and automatical...

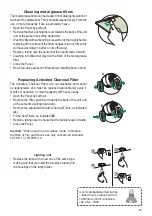
Page 13: ...e and cannot be regenerated and must be replaced approximately every 4 months of operation or more frequently with heavy usage Open the Panel by pulling it Remove the Filter pushing it towards the bac...

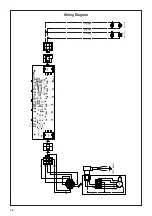
Page 14: ...14 Wiring Diagram 991 0530 011 H90 503 D00004494_00 120V 60Hz...

Page 15: ...om accident alteration misuse abuse fire flood acts of God improper installation installation not in accordance with electrical or plumbing codes or Faber documentation or use of products not approved...

Page 16: ...nevoiedesortiesetrouvederri revouspendantquevous teignezlesflammes D apr sleguide KitchenFiresafetyTips publi parlaNFPAaux tats Unis AVERTISSEMENT POURR DUIRELERISQUED INCENDIEOUDECHOC LECTRIQUE n uti...

Page 17: ...autre endroit ferm N UTILISEZ PAS un clapet de s cheuse mural de 4 po Il n est pas recommand d utiliser des conduits flexibles N ENTRAVEZ PAS le flux de l air de combustion et de ventilation Le non r...

Page 18: ...sible dans le circuit neutre ou de mise la terre peut entra ner un choc lectrique Consultez un lectricien qualifi si vous n tes pas certain de la mise la terre de la hotte Le non respect des exigences...

Page 19: ...19 DIMENSIONS DE LA HOTTE Min 24 Min 30 47...

Page 20: ...ent de recirculation 12f 6 Vis 1 8 x1 4 pour montage du b ti Qt Documentation 1 Mode d emploi H I H I H I Accessoires disponibles Pi ces requises Conduit m tallique 6 circulaire No d article Bo tier d...

Page 21: ...ui est fix l aide d crous et de vis dans la cavit sup rieure de la hotte encastrable D vissez et retirez les crous et rondelles de la mise la terre lectrique l aide d une petite cl de 7 mm et d un tou...

Page 22: ...12a provided Lock in position by tightening the screws Vf from underneath the hood Open the suction panel by turning the specific knob Disconnect the panel from the hood canopy by sliding the fixing...

Page 23: ...nt au dessus de la hotte o l air vacu est retourn dans la pi ce Utilisez la grille d vent de recirculation pour couvrir l ouverture Fixez la grille l aide des 2 vis fournies dans la trousse d installa...

Page 24: ...inad quate peut entra ner un choc lectrique Consultezun lectricienqualifi sivousnecomprenezpas parfaitement les instructions de mise la terre ou si vous avez des doutes quant la mise la terre de l app...

Page 25: ...25 1 2 I 5 H I 6 Replacez les filtres graisse enlev s pr c demment Fermez le panneau de protection du filtre en le poussant en place jusqu ce que le m canisme de verrouillage se d clenche...

Page 26: ...tilateur peut tre allum en ap puyant sur l un ou l autre des boutons de r glage Tenez ce bouton enfonc pendant 2 secondes pour activer la fonction de d sactivation retard e qui teindra automatiquement...

Page 27: ...pas lavables et ne peuvent tre r g n r s Ils doivent tre remplac s environ tous les 4 mois d utilisation ou plus souvent en cas d utilisation intensive Ouvrez le panneau en le tirant Retirez le filtr...

Page 28: ...28 Sch ma de c blage 991 0530 011 H90 503 D00004494_00 120V 60Hz...

Page 29: ...es d coulant d un accident d une modification de l utilisation incorrecte ou abusive d un incendie d une inondation d un cas de force majeure d une installation inad quate d une installation non confo...

Page 30: ...REDUCIRELRIESGODEDESCARGAEL CTRICAOINCENDIO nouse este ventilador con ning n dispositivo de control de velocidad de estado ADVERTENCIA PARA REDUCIR EL RIESGO DE INCENDIOS DESCARGAS EL CTRICAS O LESION...

Page 31: ...s espacios angostos o garajes TODAS LAS ABERTURAS DE LA PARED Y EL PISO DONDE EST INSTALADA LA CAMPA NA SE DEBEN SELLAR Esta campana requiere al menos 24 de espacio libreentre la parte inferior de la...

Page 32: ...tierra podr a provocar una descarga el ctrica Consulte con un electricista calificado si tiene dudas acerca de si la campana est correctamente conectada a tierra El incumplimiento de los requisitos el...

Page 33: ...33 DIMENSIONES DE LA CAMPANA Min 24 Min 30 47...

Page 34: ...e mando remoto inah mbrico REMCTRL 2 PARTES PRINCIPALES Componentes Ref Cdad Componentes del producto 1 1 Cuerpodelacampana completode Contro les Luces Filtros Ventilador 2 1 Marco 8 1 Rejilladeventil...

Page 35: ...cteelcabledetierrael ctrico verde que est conectado con las tuercas y atornille en la cavidad superior de la inserci n Desatornille y quite lastuercasyarandelasel ctricasdeconexi natierra con una llav...

Page 36: ...Lock in position by tightening the screws Vf from underneath the hood Open the suction panel by turning the specific knob Disconnect the panel from the hood canopy by sliding the fixing pin lever Rem...

Page 37: ...techo o a la tapa de pared y luego conecte los conductos Para la ventilaci n de recirculaci n sin conducto dirija la tuber a a una ubicaci n por encima de la campana donde la des carga se ventila de...

Page 38: ...TENCIA unaconexi natierraincorrectapuedeprovocar un riesgo de descarga el ctrica Consulteaunelectricistacalificadosilasinstruccionesdecone xi n a tierra no se comprenden completamente o si existe una...

Page 39: ...39 1 2 Reemplace los filtros de grasa met licos retirados previamente I 5 Cierre la tapa del panel del filtro empuj ndolo hacia atr s hasta que el mecanismo de seguro lo asegure H I 6...

Page 40: ...tones de ajuste del ventilador Mantengapresionadoestebot ndurante2segundosparaactivarlafunci ndelayoff desactivaci n retardada que mantendr el ventilador encendido durante 15 minutos y se apagar autom...

Page 41: ...l Aseg resedeeliminartodaelaguaycualquierotrol quidoantesde volverainstalarlosfiltrosdespu sdelalimpieza Reemplazo del filtro de carb n activado Los filtros de carb n activado no son lavables y no pue...

Page 42: ...42 Diagrama de cableado 991 0530 011 H90 503 D00004494_00 120V 60Hz...

Page 43: ...r est n garantizados contra cualquier defecto de materiales o mano de obra para el comprador original por un per odo de 1 a o a partir de la fecha de compra original requiere prueba de compra Esta gar...

Page 44: ...991 0554 366_03 181123 D00005321_02...

Reviews: