


EN
9
9
L
T1
T2
T3
T4
S1
L
S1
T1
T2
T3
T4
L
T3
S1
T2
T1
T4
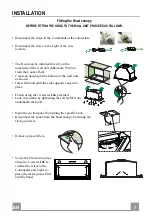
USE
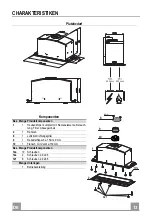
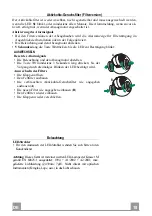
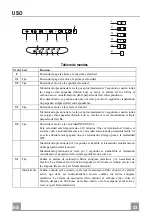
Control panel
Button
Led
Function
L
-
Turns the lights on/off at maximum strength.
T1
Fixed Turns
the
motor
on/off at speed one.
T2
Fixed
Turns the Motor on at speed two.
Press and hold the button for approximately 3 seconds, with all the loads turned
off (Motor and Lights), to turn the Activated Charcoal Filter alarm on. The
relevant LED flashes twice to confirm.
To turn the alarm off, press the button again and hold for at least 3 seconds. The
relevant LED flashes once.
T3
Fixed
Turns the Motor on at speed three.
Press and hold the button for approximately 3 seconds, with all the loads turned
off (Motor and Lights), to perform a reset of Filter saturation alarm. The LED
S1
flashes three times.
T4
Fixed
Turns the Motor on at INTENSIVE Speed.
This speed is timed to run for 10 minutes. At the end of this time, the system
returns automatically to the speed that was set before. If it is activated with the
motor turned off, the hood will switch to OFF at the end of the time.
Press and hold for 3 seconds to enable the remote control, indicated by the LED
flashing twice.
Press and hold for 3 seconds to disable the remote control, indicated by the LED
flashing just once.
S1
Fixed
Signals the Metal Grease Filter saturation alarm, indicating that it is necessary to
wash the filters. The alarm is triggered after the Hood has been in operation for
100 working hours. (Reset see the parag. Maintenance)
Flashing When this is activated, it signals the Activated Charcoal Filter saturation alarm,
indicating that the filter must be changed; the Metal Grease Filters must also be
washed. The Activated Charcoal Filter saturation alarm comes
into operation after the Hood has been working for 200 hours. (Activation and
Reset see the parag. Maintenance)
Summary of Contents for Inca LUX 2.0 EV8 X A70
Page 33: ...RU 3 33 650 I 120 0 04 2...
Page 35: ...RU 3 35 530 10 12a Vf 6 12f 0 260 13 495 675...
Page 38: ...RU 3 38 1 5 LR03 AAA S1 2 T3 3...
Page 39: ...RU 3 39 S1 4 5 T2 T3 3 A B A B 1M EN 60825 1 1994 A1 2002 A2 2001 439nm 7...
Page 40: ...GR 4 40 650 mm I 120mm 0 04 mBar 2...
Page 42: ...GR 4 42 E 530 mm 10 12a Vf 6 12f 0 260 13 495 675...
Page 43: ...GR 4 43 150 120mm 10 120mm 9 10 120 150 10 10 9 125 9 120 8 2 12e 2 9 x 9 5 9 125 8 12e 3 mm...
Page 45: ...GR 4 45 1 5 V LR03 AAA Led S1 2 T3 3 Led...
Page 46: ...GR 4 46 led S1 4 5 T2 Led T3 3 Led A B A B LED 1M EN 60825 1 1994 A1 2002 A2 2001 439nm 7 W...
Page 68: ...SA 6 68 650 a 120 0 04 2...
Page 70: ...SA 7 70 530 10 12a Vf 6 12 f 6 0 260 13 495 675...
Page 71: ...SA 7 71 150 120 150 10 120 120 9 120 150 10 10 9 120 9 120 8 12 e 2 9 x 9 5 9 125 8 12e 3...
Page 73: ...SA 7 73 1 5 LR AAA S1 2 T3 3...
Page 74: ...SA 7 74 S1 4 5 T2 T3 3 3 A B A B LED 1M EN 60825 1 1994 A 1 2002 A 2 2001 439nm 7 W...
Page 96: ...BL 9 96 650mm I 120mm 0 04mbar 2...
Page 98: ...BL 9 98 0 260 13 495 675 530 mm 10 12a Vf 6 12f...
Page 100: ...L T1 T2 T3 T4 S1 L S1 T1 T2 T3 T4 L T3 S1 T2 T1 T4 L T1 T2 3 3 T3 3 S1 3 T4 10 3 3 S1 100 200...
Page 101: ...BL 1 101 1 5 V LR03 AAA S1 2 T3 3...
Page 102: ...BL 1 102 S1 4 T2 5 T3 3 B A B 1M EN 60825 1 1994 A1 2002 A2 2001 439nm 7 W...
Page 103: ......
Page 104: ...991 0343 947_05...


