


EN
1
8
18
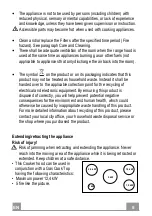
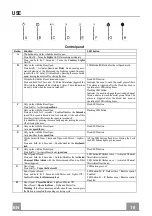
USE
Control panel
Button Function
LED button
A
The button only works when the door is open.
Press Briefly = Turns the
Lights
On/Off at maximum intensity.
Press and hold for 2 Seconds = Turns the
Courtesy Lights
On/Off.
B
Only works with the Door Open.
Press briefly = Activates/Deactivates
Delay
mode, causing auto-
matic shutdown of the Motor and the Lighting system from any
speed with a 30’ delay. It is disabled by pressing the same button
again, turning the motor off or closing the door.
LED Button
B
+ Button for the set Speed are lit.
Works both with the Door Closed and Open.
Press and hold for 2 Seconds = With the filter alarm triggered the
Filter Alarm is
Reset
, all leds flashing 3 times. These indications
are only visible when the motor is turned off.
Fixed LED button:
Indicates the need to wash the metal grease filters.
The alarm is triggered after the Hood has been in
operation for 100 working hours.
Flashing LED button:
Indicates the need to change the activated charcoal
filters, and also to wash the metal grease filters. The
alarm is triggered after the Hood has been in
operation for 200 working hours.
C
Only works with the Door Open.
Press briefly = Activates
speed four
.
Fixed LED button
Only works with the Door Open.
Press and hold for 2 seconds = Enables/Disables the
Intensive
speed. This speed is timed to run for 6 minutes. At the end of this
time the system will return to the speed set previously.
It is disabled by pressing the same button again, turning the motor
off or closing the door.
Flashing LED button
D
Only works with the Door Open.
Activates
speed three
.
Fixed LED button
E
Only works with the Door Open
Activates/Deactivates
speed two
.
Fixed LED button
Works both with Door Closed and Open with Motor + Lights =
Off.
Press and hold for 4 Seconds = Enables/disables the
Keyboard
lock
.
All the LED buttons flash twice. During the Lock
the LED buttons light up in sequence.
F
Only works with the Door Open.
Press briefly = Activates/Deactivates
speed one
.
Fixed LED button
Door Open or Closed
Press and hold for 2 Seconds = Enables/Disables the
Activated
Charcoal Filter Alarm
with the Motor turned off and no Filter
Alarm triggered.
LED button
B
flashes twice = Activated Charcoal
filter Alarm Activated
LED button
B
flashes once = Activated Charcoal
filter Alarm Deactivated
G
Door Open
Press briefly =
Turns the Motor off
LED button goes out
Door Open or Closed
Press and hold for 2 Seconds with Motor and Lights Off =
Enables/Disables the
Remote control
.
LED button
G
+
F
flashes twice = Remote control
Enabled
LED button
G
+
F
flashes once = Remote control
Disabled
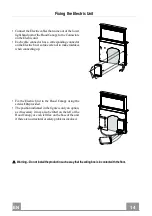
H
Door Open =
Closes the Door
+ Lights and Motor Off
Door Closed =
Opens the Door
+ Lights and Motor On.
Warning
: If the Door remains partially open for any reason, press
the Button to complete the opening or closing cycle.
Summary of Contents for FABULA EVO+WH A90
Page 1: ...Instructions Manual Manuel d Instructions Bedienungsanleitung Manual de instrucciones...
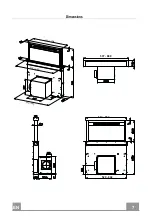
Page 7: ...EN 7 7 Dimensions 512 794 520 802 537 880 537 880 512 794 520 802...
Page 26: ...FR 2 6 26 Encombrement 512 794 520 802 537 880 537 880 512 794 520 802...
Page 45: ...DE 4 5 45 Platzbedarf 512 794 520 802 537 880 537 880 512 794 520 802...
Page 64: ...ES 6 4 64 Dimensiones 512 794 520 802 537 880 537 880 512 794 520 802...
Page 79: ...GR 7 9 79 650 mm 120 mm...
Page 80: ...GR 8 0 80 0 04 mbar 8...
Page 81: ...GR 8 1 81 12 4kW 5 2 6 kW 5 kW 1 9 kW 1 9 kW 1 kW...
Page 82: ...GR 8 2 82 1 1 2 1 3 1 4 1 7 1 2 7 2 2 7 3 2 12a 16 3 5 x 9 5 12b 6 M4 x 8 12c 6 4 x 15 1...
Page 83: ...GR 8 3 83 512 794 520 802 537 880 537 880 512 794 520 802...
Page 84: ...GR 8 4 84 109 812 3 cm 5 cm...
Page 85: ...GR 8 5 85 7 2 12a 7 2 12a A A 7 2 12a 2 12c 12c 7 2...
Page 86: ...GR 8 6 86 7 2 12a 7 2 12a 7 2 12a A 2 12c 12c 7 2...
Page 87: ...GR 8 7 87 7 1 12a 7 2 2 12c 12a 12c 12a 7 1 12a 7 1...
Page 88: ...GR 8 8 88 7 3 12b 12c 7 3 12b 7 3 12b 7 3 12c 12c 12b...
Page 89: ...GR 8 9 89 1 90 90 4 2 12a 12b...
Page 90: ...GR 9 0 90 12a...
Page 91: ...GR 9 1 91 o150 120 mm o120 mm 9 150 9 120 120 150 mm 120 mm 9 8 2 12e 2 9 x 9 5 3 mm...
Page 92: ...GR 9 2 92...
Page 93: ...GR 9 3 93 2...
Page 95: ...GR 9 5 95 3 V CR2032 2 Off 2 Delay Delay...
Page 96: ...GR 9 6 96 Comfort Panel ComfortPanel comfortpanel 2 2 Comfort Panel ComfortPanel...
Page 97: ...GR 9 7 97 4 5 F 2 2 Led 1 Led 2 comfort panel comfort panel...
Page 98: ...RU 9 8 98 650 I 120...
Page 99: ...RU 9 9 99 0 04 8...
Page 100: ...RU 1 0 100 12 4 5 2 6 kW 5 kW 1 9 kW 1 9 kW 1 kW...
Page 101: ...RU 1 0 101 1 1 2 1 3 1 4 1 7 1 2 7 2 2 7 3 2 12a 16 3 5 x 9 5 12b 6 M4 x 8 12c 6 4 x 15 1...
Page 102: ...RU 1 0 102 512 794 520 802 537 880 537 880 512 794 520 802...
Page 103: ...RU 1 0 103 109 812 3 5...
Page 104: ...RU 1 0 104 7 2 12a 7 2 12a A A 7 2 12a 2 12c 12c 7 2...
Page 105: ...RU 1 0 105 7 2 12a 7 2 12a 7 2 12a A 2 12c 12c 7 2...
Page 106: ...RU 1 0 106 7 1 12a 7 2 2 12c 12a 12c 12a 7 1 12a 7 1...
Page 107: ...RU 1 0 107 7 3 12b 12c 7 3 12b 7 3 12b 7 3 12c 12c 12b...
Page 108: ...RU 1 0 108 1 90 4 2 12a 12b...
Page 109: ...RU 1 0 109 12a...
Page 110: ...RU 1 1 110 150 120 120 9 150 9 120 120 150 120 9 8 2 12e 2 9 x 9 5 3...
Page 111: ...RU 1 1 111...
Page 112: ...RU 1 1 112 2...
Page 113: ...RU 1 1 113 A 2 B 30 B 2 3 100 200 C 2 6 D E 4 2 F 2 2 B 1 B G 2 2 G F 1 G F H...
Page 114: ...RU 1 1 114 3 CR2032 2 2...
Page 115: ...RU 1 1 115 B 2 B 2...
Page 116: ...B 4 5 F 2 2 B 1 B B 2 RU 116...
Page 117: ......
Page 118: ......
Page 119: ......