


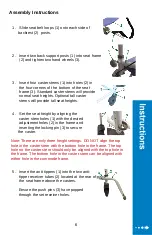
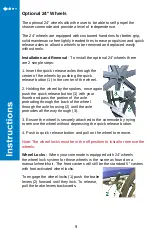


Wheel Lock Installation for 24” Wheels
When the optional 24” wheels are ordered with your commode the push to lock
hand brakes will need to be installed to the side frame seat rail.
The wheel lock assemblies are clamped to the seat rail (1) using a double
clamp that simultaneously tightens onto the seat rail and wheel lock mounting
bar.
1) Position the double clamp (2) onto the seat
rail and wheel lock mounting bar (3) and tighten
loosely so that the assembly will hold together
but can still be adjusted.
2) Position the knurled brake bar (4)
horizontally in front of the tire and slide the
entire assembly along the seat rail as needed
until the distance from the front of the wheel
lock mounting bar to the front of the seat rail is
approximately 8.5 cm (3 3/8”).
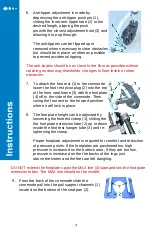
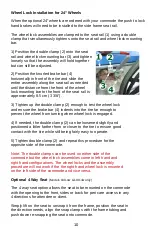
3) Tighten up the double clamp (2) enough to test the wheel lock
and ensure the brake bar (4) indents into the tire far enough to
prevent the wheel from turning when wheel lock is engaged.
4) If needed, the double clamp (2) can be loosened slightly and
positioned a littler farther from or closer to the tire to ensure good
contact with the tire while still being fairly easy to operate.
5) Tighten double clamp (2) and repeat this procedure for the
opposite side of the commode.
Note: The double clamps can be used on either side of the
commode but the wheel lock assemblies come in left hand and
right hand configurations. The wheel locks and the assembly
procedure will not work if the the right hand wheel lock is mounted
on the left side of the commode and vice versa.
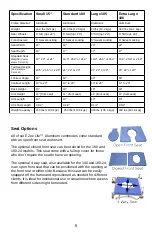
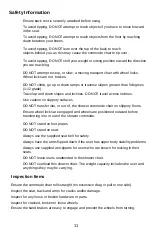
Optional 4 Way Seat
(Models 180-4w & 190-4w only)
The 4 way seat option allows the seat to be mounted on the commode
with the opening to the front, sides or back for peri care access in any
4 directions for attendee or client.
Simply lift on the seat to unsnap it from the frame, position the seat in
the direction needs, align the snap clamps with the frame tubing and
push down re-snapping the seat onto commode.
10