background image


ShareLink 200 N • Using the Embedded Web Pages

24

Configuring ShareLink 200 N Settings

To access the ShareLink 200 N admin (configuration) pages:

1. 

Click the 

Configure

 button on the top right hand corner of the landing page (see 

figure 15

1

, page 20). The 

Login

 page opens.

2. 

Enter the password and click 

Login

. The default password is “

configure”.


NOTE:

  The factory configured password for all accounts has been set to the device 

serial number (passwords are case sensitive). Performing a reset sets this password 
to “

configure

” (see 

Reset to Default


on page 34 for reset instructions).

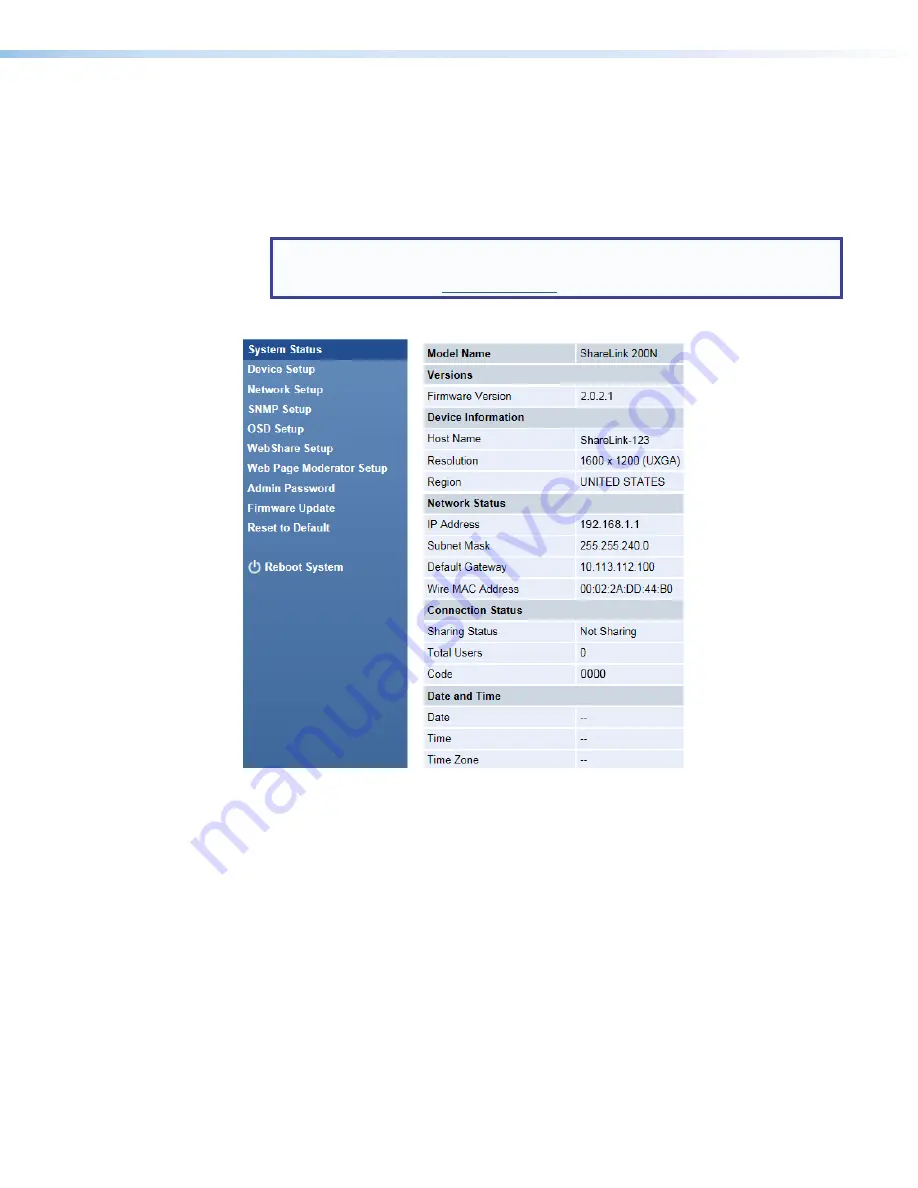
After login, the admin page opens:

Figure 19. 

ShareLink 200 N Admin Pages

• 

System Status

 — This is the default page. It displays basic information about the 

ShareLink 200 N model, network status, connection status, and date and time.

• 

Device Setup

 — Use this page to adjust the ShareLink 200 N output resolution, login 

code, date and time, and to reboot settings (see 

Device Setup

 on the page 26).

• 

Network Setup

 — Use this page to adjust network settings for the ShareLink 200 

N, such as hostname, domain name, IP


settings, and DHCP settings (see 

Network 

Setup

 on page 27).

• 

SNMP Setup

 — Use this page to enable or disable SNMP service, and to configure 

settings for managing the ShareLink 200 N via SNMP (see 

SNMP Setup

 on page 28).

• 

OSD Setup

 — Use this page to customize standby screen image or reset it to default, 

and to choose which device information to display on the standby screen (see 

OSD 

Setup

 on page 29).

• 

WebShare Setup

 — Use this page to set the auto refresh interval and the Access 

Password Code for WebShare (see 

WebShare Setup

 on page 31).

PRELIMINARY

Summary of Contents for ShareLink 200 N

Page 1: ...User Guide ShareLink 200 N Wireless Collaboration Systems Collaboration Gateway Network Version 68 2775 01 Rev Bx 12 19 PRELIMINARY ...

Page 2: ...portantes qui se trouvent dans la documentation fournie avec le matériel Pour en savoir plus sur les règles de sécurité la conformité à la réglementation la compatibilité EMI EMF l accessibilité et autres sujets connexes lisez les informations de sécurité et de conformité Extron réf 68 290 01 sur le site Extron www extron com Istruzioni di sicurezza Italiano AVVERTENZA Il simbolo se usato sul prod...

Page 3: ...r Extron Electronics see the current list of trademarks on the Terms of Use page at www extron com Registered Trademarks Extron Cable Cubby ControlScript CrossPoint DTP eBUS EDID Manager EDID Minder Flat Field FlexOS Glitch Free Global Configurator Global Scripter GlobalViewer Hideaway HyperLane IP Intercom IP Link Key Minder LinkLicense LockIt MediaLink MediaPort NetPA PlenumVault PoleVault Power...

Page 4: ...this equipment in a residential area is likely to cause interference This interference must be corrected at the expense of the user NOTE For more information on safety guidelines regulatory compliances EMI EMF compatibility accessibility and related topics see the Extron Safety and Regulatory Compliance Guide on the Extron website Conventions Used in this Guide Notifications The following notifica...

Page 5: ...e 14 Presenting the Computer Screen 14 Operation Using a Mobile Device 15 Downloading the Extron ShareLink App 15 Connecting to the ShareLink 200 N 15 Using the ShareLink App 16 Making Annotations 18 Using iOS Mirroring for Mobile Devices 19 Using the Embedded Web Pages 20 Opening the Embedded Web Pages 20 Watching a Presentation WebShare 21 Moderating a Presentation 22 Moderating through the Mode...

Page 6: ...PRELIMINARY ...

Page 7: ...d network connection It is designed to use an existing wireless network for simplified integration into the facility s IT infrastructure Users connect to the room s wireless access point WAP through a Wi Fi connection to access the ShareLink 200 N This network only version provides the same user experience as the wireless model ShareLink 200 N AUDIO OUT LAN PoE VGA OUT HDMI OUT USB 3 POWER 5V 2 3A...

Page 8: ...ion video playback from laptops Enables a Windows or macOS computer to send full motion video with audio to the display for a smooth viewing experience Supports display of documents graphics images and videos directly from a USB flash drive Enables content presentation without requiring a laptop or computer WebShareTM technology enables attendees to view slide images on personal devices via a Web ...

Page 9: ...put Optional Connect a 3 5 mm audio output cable between this female audio jack and the audio input of a display or audio amplifier B RJ 45 connector Use an ethernet cable to connect a network switch hub router or PC to this female RJ 45 connector C VGA output Optional Connect a VGA display device into this female 15 pin HD connector D HDMI output Connect an HDMI display device into this female HD...

Page 10: ...nstallation doit toujours être en accord avec les mesures qui s applique au National Electrical Code ANSI NFPA 70 article 725 et au Canadian Electrical Code partie 1 section 16 La source d alimentation ne devra pas être fixée de façon permanente à une structure de bâtiment ou à une structure similaire Suitable for use in environmental air space in accordance with Section 300 22 C of the National E...

Page 11: ...evice if necessary To reset the ShareLink 200 N 1 Disconnect power from the device 2 Press the reset button using a small tool such as a paperclip 3 While pressing the reset button apply power to the device and hold the reset button down for at least 10 seconds After 10 seconds the reset process begins PRELIMINARY ...

Page 12: ...Whiteboard icon Click to use the display as a whiteboard This feature allows the presenter to draw on a blank screen using a mouse or touchscreen see Using the Whiteboard Feature on page 9 5 USB Player icon Click to access the USB Player This feature allows the presenter to access photos videos audio files and documents directly from the connected USB flash drive see Using the USB Player on page 1...

Page 13: ... see figure 2 C and D on page 3 b Connect the touchscreen to the USB port on the front panel of the ShareLink see figure 3 B on page 4 2 Press the calibration icon twice on the standby screen see figure 4 2 on the previous page The calibration screen opens Figure 5 Calibration Screen 3 Press the four red dots that appear on the corners of the screen Each dot turns green after it has been pressed T...

Page 14: ...owing screen appears Figure 6 Screen Resize Tool To adjust the screen size 1 Click or press the and buttons to adjust the screen horizontally and vertically The four red dots on the corners indicate the size of the screen 2 Press the OK button to return to the standby screen NOTE The standby screen see figure 4 on page 6 is not resized Only the Whiteboard screen see figure 7 on the next page and a...

Page 15: ...mode Click this button to switch between the two pen modes Default mode allows the user to draw without erasing previous strokes One stroke mode allows the user to draw only one stroke at a time the previous annotation is cleared when a new stroke is made 4 Pen color and size Select pen color red green or blue and pen size 5 Eraser Erase selected parts within drawing 6 Delete Delete entire drawing...

Page 16: ...e USB Player icon on the standby screen see figure 4 5 on page 6 The USB Player screen opens Figure 8 USB Player Screen Home icon Return to standby screen Photo Enter photo viewer Video Enter video player Music Enter music player Office Viewer Enter Office Viewer to view Microsoft Office documents Setup Enter Setup page NOTE The following file formats are supported Image JPG BMP PNG GIF Video MP4 ...

Page 17: ...with 64 MB VRAM or better Connecting a Computer to the ShareLink 200 N There are two ways to connect a computer to the ShareLink 200 N wirelessly through an external WAP or wired through a network device Connecting through an External WAP 1 Ensure that the external WAP and the ShareLink 200 N are wired to the same network 2 Ensure that the ShareLink 200 N is powered on and that wireless network ca...

Page 18: ... device either through an external WAP or through a physical network connection The computer and the ShareLink 200 N must be on the same network 2 Launch your web browser and enter the ShareLink IP address see figure 4 6 on page 6 in the browser The ShareLink 200 N landing page opens as shown below Figure 9 ShareLink 200 N Landing Page 3 Click Windows 2 or Mac 4 depending on your operating system ...

Page 19: ... see figure 9 2 or Install Pro software for Mac see figure 9 4 depending on your operating system to launch the software installer on your computer 4 Follow the instructions on the web browser to run the the executable software installer file 5 Follow the steps on the installation wizard to install the software Downloading the software from the Extron website 1 On the Extron website go to the Down...

Page 20: ...ze button click Î Î to show the info panel which lists the connected receivers 2 Grid view Click this button for presentations that feature multiple content sources to change how the computer screen is presented on the display top left top right bottom left bottom right or full screen 3 Play Click to start presenting your computer screen A Pause and Stop button become available to pause the presen...

Page 21: ... the Google PlayTM app store on your Android device or the App StoreSM on your iOS device 2 Search for Extron ShareLink 3 Install the app on your mobile device Connecting to the ShareLink 200 N Follow these steps to connect your mobile device to the ShareLink 200 N using the app 1 Ensure that the ShareLink 200 N is powered and connected to the network 2 Open the Wi Fi networks list on your mobile ...

Page 22: ... Home Screen 1 Screen Mirroring Android only Select this option to share the device screen Only video is shared no audio To start presenting the device screen press the Play button To stop presenting return to this screen and press the Stop button NOTE For all functions After pressing Play If prompted to select a ShareLink device as shown on the right select your device hostname and enter the code...

Page 23: ... on the display full screen top left top right bottom left or bottom right 3 Photos Select this option to present photos stored on the device Browse to the desired photo and press the Play button to present it 4 Camera Select this option to present the device camera Press the Play button to present the camera live on the display The following options appear at the bottom of the screen Take picture...

Page 24: ... appears at the bottom of the screen 1 1 2 2 3 3 4 4 5 5 6 6 7 7 1 Close Close the annotations menu 2 Save Save the current image with annotations 3 Delete Delete annotations 4 Eraser Erase annotations manually 5 Size Select pen or highlighter size 6 Color Select pen or highlighter color 7 Annotation tool Select a different annotation tool Options include highlighter or one stroke highlighter whic...

Page 25: ...necting to the ShareLink 200 N on page 15 3 Tap the AirPlay Mirroring icon on the iOS device The discovered receivers list appears as shown below 4 Select your ShareLink 200 N receiver from the discovered receivers list 5 If prompted for a password enter the ShareLink login code and press OK The device screen is immediately mirrored onto the display To stop presenting the device screen select Turn...

Page 26: ...Presentation Configuring ShareLink 200 N Settings Opening the Embedded Web Pages To access the embedded web pages enter the ShareLink IP address shown on the standby screen into the web browser The landing page opens Figure 15 ShareLink 200 N Landing Page 1 Configure Click to access the Admin pages and configure presentation settings see Configuring ShareLink 200 N Settings on page 24 2 Windows Cl...

Page 27: ...nected to an Ethernet network or bridged to a router for best performance Audience members must follow these steps to watch a presentation 1 Open a web browser on the mobile device or computer and connect to the IP address of the ShareLink 200 N 2 On the landing page click Watch Presentation The presentation page see figure 36 opens in the web browser 3 Click the 1 1 button 4 to watch the presenta...

Page 28: ... accounts has been set to the device serial number passwords are case sensitive Performing a reset sets this password to moderate see Reset to Default on page 34 for reset instructions After login the following page opens Figure 18 Moderator Page 1 Enable Web Page Moderator Control 2 Connected User column see the next page 3 Share Control column see the next page 4 IP Address column see the next p...

Page 29: ... button to stop sharing content Choose where on the screen to display the presentation full screen top left top right bottom left or bottom right Click the drop down menu and select where to display the presentation Share to Full Screen is selected by default 4 IP Address This column shows the IP address of each connected user device Moderating through an Extron ShareLink Driver You can moderate p...

Page 30: ... information about the ShareLink 200 N model network status connection status and date and time Device Setup Use this page to adjust the ShareLink 200 N output resolution login code date and time and to reboot settings see Device Setup on the page 26 Network Setup Use this page to adjust network settings for the ShareLink 200 N such as hostname domain name IP settings and DHCP settings see Network...

Page 31: ...n Password Use this page to change the Admin password see Admin Password on page 32 Firmware Update Use this page to update the ShareLink 200 N firmware see Firmware Update on page 33 Reset to Default Use this page to reset the ShareLink 200 N to its factory default settings see Reset to Default on page 34 Reboot System Use this page to reboot the ShareLink 200 N see Reboot System on page 34 PRELI...

Page 32: ...ronization to specify the time server or choose Disable to disable this feature NOTE SNTP NTP Simple Network Time Protocol Network Tie Protocol is used for synchronizing the clocks of computer systems over networks Server if SNTP NTP Server Synchronization is enabled Enter the NTP server address into this field NOTES If the NTP server address is in the form of a URL a DNS server address is require...

Page 33: ...P address IP Address Enter an IP address Subnet Mask Enter the corresponding subnet mask Default Gateway Enter the corresponding gateway address DNS Server Enter the corresponding DNS server address 3 DHCP Server Setup panel Auto default setting If a DHCP server is available on the network the ShareLink uses an IP address assigned by the server If a DHCP server is not available on the network the ...

Page 34: ...ad write access to the network management system Community Default value is set to public Write Community Default value is set to private 3 SNMP V3 panel User Name Configure the user name of the person in charge of managing the ShareLink through SNMP Auth Password MD5 Configure the Auth password NOTE The default password is Authadmin To change the password enter a new password and click Apply Priv...

Page 35: ...utput Sync After Click the drop down menu and select the timeout period The video outputs are disabled after the specified timeout period if there is no activity on the ShareLink Enable Output Sync on Select one of these two options for re enabling the video outputs Connected user With this option users must open the ShareLink software and enter the IP address and login code in order to enable the...

Page 36: ...of the standby screen When this option is set to off these items are hidden Show Device Info at Login When this option is set to On the IP address hostname and login code are overlaid on top of the shared content for 30 seconds Every time a new user connects to the ShareLink this Device Info reappears for 30 seconds Select Off to disable this feature as well as the Show Receiver Info option on the...

Page 37: ...users 2 Access Password Control panel Use this panel to disable or configure the WebShare access password this is the password required when connecting to the ShareLink 200 N through WebShare Disable Select to disable the password This allows users to connect to the ShareLink 200 N through WebShare without a password Use the same password as Code Select this option to make the WebShare access pass...

Page 38: ...ord in the Confirm New Password field 3 Click Apply to activate the new moderator control password You may also enable or disable Web Page Moderator Access by clicking the Enable or Disable radio buttons Admin Password Figure 26 Admin Password The Admin password is used to access the Configuration pages Use this screen to change the Admin password as follows NOTE The factory configured password fo...

Page 39: ...file NOTE This option does not export the custom standby image if one has been loaded on the standby screen Import Import the system configuration file to the ShareLink 2 Firmware Update Use this section to update the ShareLink firmware Follow these instructions to update the firmware 1 Download latest firmware file from the Extron website see Downloading ShareLink 200 N Firmware on page 37 2 Clic...

Page 40: ...fault Click Apply to restore factory default settings You can also restore factory default settings using the reset button on the bottom of the ShareLink 200 N see Bottom Panel Features on page 5 Reboot System Figure 29 Reboot System Click Reboot to reboot the ShareLink 200 N PRELIMINARY ...

Page 41: ...ure the bracket to the wall using the four supplied bracket screws Be sure to install the bracket with the large keyhole facing upward as shown below 2 Tighten the two small mounting screws on the bottom panel of the ShareLink 200 N as shown below 3 Insert the screwheads into the wall mount bracket Ensure that the ShareLink 200 N receiver sits securely on the bracket e S h a r e L i n k 2 0 0 N US...

Page 42: ...to uneven mechanical loading Circuit overloading Connect the equipment to the supply circuit and consider the effect that circuit overloading might have on overcurrent protection and supply wiring Consider the equipment nameplate ratings when addressing this concern Reliable earthing grounding Maintain reliable grounding of rack mounted equipment Pay particular attention to supply connections othe...

Page 43: ...the section for the ShareLink 200 N firmware 1 1 2 2 Figure 33 Firmware Download Center 3 Ensure the available firmware version is a later version than the current one on the device and click the Download link 2 NOTE The firmware release notes provide details about the changes between different firmware versions The file can be downloaded from the same page as the firmware 4 Submit any required in...

Page 44: ...ata 1047 1048 1049 UDP Inbound Discover Optional These ports are used for discovery of the gateway If closed the discovery process could be impacted 1688 TCP Both DLNA Required This port is used for audio data 2869 49152 49153 TCP Both DLNA Required These ports are used for streaming video data to the ShareLink 200 N 1900 50000 65000 UDP Both DLNA Required These ports are used for streaming video ...

Page 45: ...rica 3rd Floor South Tower 160 Jan Smuts Avenue Rosebank 2196 South Africa This Limited Warranty does not apply if the fault has been caused by misuse improper handling care electrical or mechanical abuse abnormal operating conditions or if modifications were made to the product that were not authorized by Extron NOTE If a product is defective please call Extron and ask for an Application Engineer...

Reviews: