background image

Operation, cont’d

PIP 422 and PIP 444 Picture-in-Picture Processors • Operation

3-2

Operation

Front Panel Features

INPUTS

1

1

2

PICTURE CONTROLS

FREEZE

WINDOW

PRESETS

1

2

2

PRESET

ENTER

WINDOW

SELECT

DETAIL

POSITION

SIZE

ZOOM

MENU

NEXT

COL/TINT BRT/CONT

SWAP

PIP 422

PICTURE-IN-PICTURE PROCESSOR

ADJUST

3

8

9

7

2

1

5

6

4

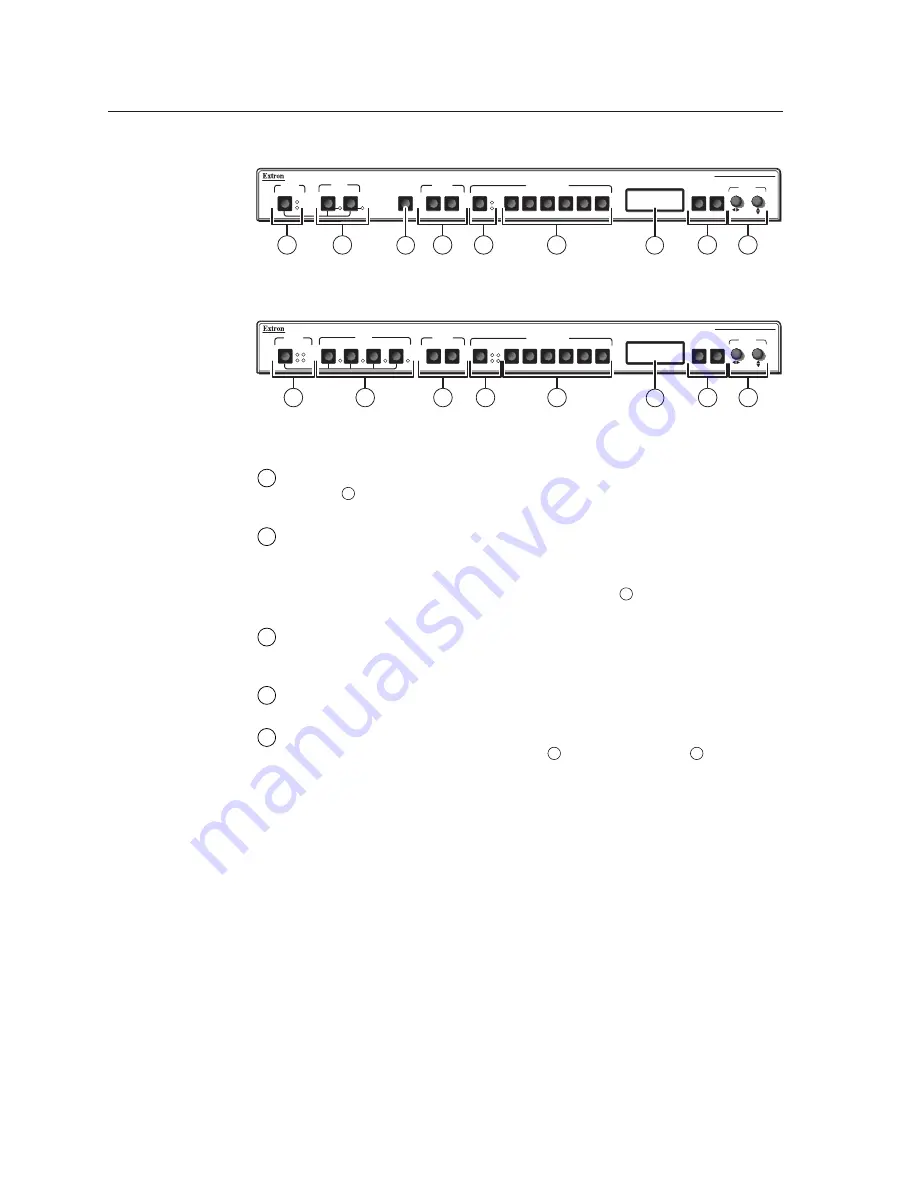
Figure 3-1 — PIP 422 front panel features

INPUTS

1

1

2

3

4

PICTURE CONTROLS

FREEZE

WINDOW

PRESETS

1

2

3

4

2

3

PRESET

ENTER

WINDOW

SELECT

DETAIL

POSITION

SIZE

ZOOM

MENU

NEXT

COL/TINT BRT/CONT

4

PIP 444

PICTURE-IN-PICTURE PROCESSOR

ADJUST

7

8

9

2

1

5

6

4

Figure 3-2 — PIP 444 front panel features

1

Freeze button and LEDs — 

Simultaneously press this button and an input

button (

2

) to freeze that input’s window in the displayed image.

The Freeze LED for the input lights.  Repeat to unfreeze the window.

2

Input selector buttons — 

Press these buttons to enable or disable the inputs

for display.  The LEDs next to the buttons light to indicate the inputs are
enabled.

These buttons are also used with the Freeze button (

1

) to toggle the freeze

function for a specific input on or off.

3

Swap button (PIP 422 only) — 

Press the Swap button to exchange all

window sizing, positioning, and priority settings.  Press the SWAP button
again to return the windows to their previous settings.

4

Window preset buttons — 

Press these buttons to save or recall a preset.  See

“Window Presets” later in this chapter for more information.

5

Window Select button and LEDs — 

Press this button to select a window to

adjust using the picture control buttons (

6

) and Adjust knobs (

9

) or using

the Input Configuration submenu.  The lit LED indicates which window is
selected.

im Vertrieb von

            CAMBOARD Electronics

www.camboard.de

Tel. 07131 911201
Fax 07131 911203

[email protected]

Summary of Contents for Network Device PIP 444

Page 1: ...PIP 422 and PIP 444 Picture in Picture Video Processors 68 828 01 Rev B 02 07 im Vertrieb von CAMBOARD Electronics www camboard de Tel 07131 911201 Fax 07131 911203 ce info camboard de ...

Page 2: ...ngsanleitungen genau durchlesen und verstehen Aufbewahren der Anleitungen Die Hinweise zur elektrischen Sicherheit des Produktes sollten Sie aufbewahren damit Sie im Bedarfsfall darauf zurückgreifen können Befolgen der Warnhinweise Befolgen Sie alle Warnhinweise und Anleitungen auf dem Gerät oder in der Benutzerdokumentation Keine Zusatzgeräte Verwenden Sie keine Werkzeuge oder Zusatzgeräte die ni...

Page 3: ...d Loop through Input Buffered Loop through Input Buffered Loop through 3 4 Step 5 Output connectors Connect a component video S video and or composite video display device to the rear panel Output BNC connectors 5 The component video S video and composite video outputs are all active simultaneously so multiple displays can be connected Step 6 PIP 444 only Genlock connectors In put connector If des...

Page 4: ... input 6 PIP 444 Press Menu Menu Menu Menu Menu 4 times Next to return the default display cycle PIP 422 Press Menu Menu Menu Menu 3 times Next to return the default display cycle Configure the output 1 Press Menu until the LCD reads Output Config 2 Press Next 3 Rotate either Adjust knob to select the output format NTSC or PAL 4 PIP 444 Press Menu Menu Menu Menu 3 times Next to return to the defau...

Page 5: ... overview 3 5 Input Configuration menu 3 6 Output Configuration menu 3 7 Advanced Configuration menu 3 8 Border Color submenu 3 8 Background Color submenu 3 8 Window Effect submenu 3 9 Window Priority submenu 3 9 Temperature submenu 3 9 Genlock Configuration menu PIP 444 only 3 9 Exit menu 3 10 Picture Controls 3 10 Auto center the image 3 13 Window Presets 3 13 Recall a preset 3 14 Save the curre...

Page 6: ...Windows 4 10 Installing the software 4 10 Starting the control program 4 11 Tool bar 4 13 Open and Save buttons 4 13 Data trace button 4 13 Upgrade firmware button 4 13 Check for software updates button 4 15 Graphic area 4 15 Controls area 4 16 Control tab 4 16 Preset tab 4 17 Picture tab 4 18 Advanced tab 4 19 Using the help system 4 19 Appendix Specifications and Part Numbers A 1 Specifications ...

Page 7: ... 444 Picture in Picture Processors 1 Chapter One Introduction About the Picture in Picture Processors Features im Vertrieb von CAMBOARD Electronics www camboard de Tel 07131 911201 Fax 07131 911203 ce info camboard de ...

Page 8: ...ch window Window presets The processor has 10 PIP 422 or 20 PIP 444 factory presets that the user can change to set custom presets The presets save sizing positioning priority text and color information for the windows Window effects These effects enable or disable inputs using either a cut wipe or dissolve effect Swap function PIP 422 only A press of a button swaps exchanges configuration setting...

Page 9: ...Processors 2 Chapter Two Installation Mounting the Processor Rear Panel Connections Setting Up Genlock and Vertical Interval Switching im Vertrieb von CAMBOARD Electronics www camboard de Tel 07131 911201 Fax 07131 911203 ce info camboard de ...

Page 10: ...ow Installation of the equipment in a rack should be such that the amount of air flow required for safe operation of the equipment is not compromised 3 Mechanical loading Mounting of the equipment in the rack should be such that a hazardous condition is not achieved due to uneven mechanical loading 4 Circuit overloading Consideration should be given to the connection of the equipment to the supply...

Page 11: ...2 Attach the table wall mounting brackets to the processor with the eight provided 8 machine screws figure 2 1 3 Hold the processor with the attached brackets against the underside of the table or other furniture or against the wall Mark the location of the screw holes of the bracket on the mounting surface 4 Drill 3 32 2 mm diameter pilot holes 1 4 6 4 mm deep in the mounting surface at the marke...

Page 12: ...gure 2 2 Figure 2 2 Through desk mounting a PIP 4 Hold the processor with the attached brackets against the underside of the table or other furniture Mark the location of the screw holes of the bracket on the mounting surface 5 Drill 3 32 2 mm diameter pilot holes 1 4 6 3 mm deep in the mounting surface at the marked screw locations 6 Insert four 8 wood screws through the bracket and into the four...

Page 13: ...er cord into this connector 2 Input top connectors Connect up to two PIP 422 or four PIP 444 component video S video or composite video input devices to these BNC connectors Figure 2 5 shows how to connect the various video formats R Y Component Video Input S Video Y VID B Y C 1 I N P U T S R Y Y VID B Y C 1 Composite Video I N P U T S R Y Y VID B Y C 1 I N P U T S Buffered Loop through Input Buff...

Page 14: ...eo outputs are all active simultaneously so multiple displays can be connected 5 Genlock connectors PIP 444 only In put connector Connect an external black burst signal to this BNC connector for genlocking the video signal in broadcast or other sync critical applications Out put connector Connect any downstream equipment that requires genlocking to this BNC connector to route the black burst signa...

Page 15: ...output with a genlock signal follow these steps 1 Power up and turn on all the devices that will use the genlock signal The devices must be on for at least 15 to 20 minutes before proceeding with any adjustments 2 Connect the active timing source signal to the Genlock In connector on the rear panel 3 Connect the video input devices to the PIP as described previously in this chapter 4 Connect the o...

Page 16: ...sync output signal bottom displayed on a waveform monitor to check for alignment When the phases are aligned the wave peaks on the bottom waveform should line up with those in the reference signal above it With this method there is no way to know if the signals are 180º out of phase A delayed sweep on a time based scope would allow a more accurate display of the input and output signal phase relat...

Page 17: ... of a view of a vectorscope during adjustment of the color subcarrier phase SC H The subcarrier phase should be aligned to 0º indicated in the figure by the triangle 0 10 20 30 40 50 60 70 80 90 100 110 120 130 140 150 160 170 180 190 200 210 220 230 240 250 260 270 280 290 300 310 320 330 340 350 40 40 A1 A2 A3 B1 B2 B3 Figure 2 9 Vectorscope screen during color subcarrier phase adjustment im Ver...

Page 18: ...Installation cont d PIP 422 and PIP 444 Picture in Picture Processors Installation 2 10 im Vertrieb von CAMBOARD Electronics www camboard de Tel 07131 911201 Fax 07131 911203 ce info camboard de ...

Page 19: ...apter Three Operation Front Panel Features Power on Indications Menu System Picture Controls Window Presets Additional Functions Optimizing the Image im Vertrieb von CAMBOARD Electronics www camboard de Tel 07131 911201 Fax 07131 911203 ce info camboard de ...

Page 20: ...input lights Repeat to unfreeze the window 2 Input selector buttons Press these buttons to enable or disable the inputs for display The LEDs next to the buttons light to indicate the inputs are enabled These buttons are also used with the Freeze button 1 to toggle the freeze function for a specific input on or off 3 Swap button PIP 422 only Press the Swap button to exchange all window sizing posit...

Page 21: ... control button The Size button selects the window display size adjustment and toggles between the window and image adjustments See Picture Controls in this chapter Zoom control button The Size button selects the window zoom in out adjustment and toggles between the window and image adjustments See Picture Controls in this chapter 7 LCD display This 12 x 2 LCD displays configuration menus and stat...

Page 22: ...ower up self test sequence leaves all of the LEDs with the exception of the selected inputs LED s off and the LCD displaying the default display cycle The selected inputs and their size and position on the display the picture adjustments and other current settings are saved in nonvolatile memory When power is applied the latest configuration is retrieved On figure 3 3 and all other flowcharts in t...

Page 23: ...ng input configuration causes the current input s number and format type to be displayed on the LCD Adjust and Adjust knobs When in a submenu rotate the Adjust knob and Adjust knob to scroll through the submenu options and select a setting Refer to the flowcharts in this chapter and to specific sections for explanations on knob adjustments If you press the Menu button while a main menu or a submen...

Page 24: ... Next To exit menu press NEXT 1 2 3 4 Menu NOTE The PIP returns to the last active main menu or submenu when you press Menu Genlock Config PIP 444 only Figure 3 5 Input Configuration menu flowchart The Input Configuration menu consists of one submenu that allows you to select the type of video signal that each of the four inputs will pass You can configure each input to accept Video composite vide...

Page 25: ...ress NEXT Output Std NTSC Video types NTSC default NTSC 0 IRE PAL Menu NOTE The PIP returns to the last active main menu or submenu when you press Menu Genlock Config PIP 444 only Figure 3 6 Output Configuration menu flowchart The Output Configuration menu consists of one submenu that allows you to select a video standard for the output signal Rotate either Adjust knob to choose between NTSC NTSC ...

Page 26: ...ft the selected input appears in front to right the selected input appears in back Select input 1 2 3 4 Window transition effect Cut Wipe Dissolve Next Background Black Next Next Next Front Back Next Default Cycle Input Config Menu Menu Output Config Menu Advanced Config Menu Menu Menu Next To exit menu press NEXT NOTE The PIP returns to the last active main menu or submenu when you press Menu Gen...

Page 27: ...e PIP in degrees Fahrenheit and Celsius The Temperature submenu is available only on newer models Genlock Configuration menu PIP 444 only Figure 3 8 is a flowchart that shows an overview of the Genlock Configuration menu the submenus and the available settings 20 sec 20 sec Next Horizontal phase Subcarrier phase Align the output horizontal phase with the reference signal horizontal phase Align the...

Page 28: ...ter Position Size or Zoom the corresponding picture adjustment menu for the selected window appears in the LCD figure 3 10 For Position Size and Zoom press the button again and the corresponding image adjustment menu for the image within the window appears In either screen adjustments can then be made by rotating the Adjust knob or Adjust knob Picture control settings are stored in nonvolatile mem...

Page 29: ...ustment Push the Detail button to toggle between the detail adjustment and the anti aliasing adjustment Image size image position and image zoom adjustments are relative to the currently selected window s size and position settings 1 WINDOW SELECT NOTE 60 606 607 01 FW ver n nn Extron Inc PIP 444 422 Default Figure 3 10 Picture controls flowchart Adjust an image as follows figure 3 10 1 Press the ...

Page 30: ...ed window up and down Image Position Observe the display and turn the Adjust knob to move the image side to side in the selected window Turn the Adjust knob to move the image up and down in the selected window Size Push the Size button to toggle between the size adjustment for the selected window and for the image within the window Window Size Observe the display and turn the Adjust knob to stretc...

Page 31: ... of the windows borders and background The PIP 444 has 20 preset slots Both processors come with default window presets saved in these slots figure 3 11 and figure 3 12 You can replace the default presets with your own settings by following the save procedure that follows the figures Window 1 1 2 Window 2 Window 2 Window 1 3 Window 2 Window 1 4 Window 2 Window 1 5 6 Window 2 Window 2 Window 1 Wind...

Page 32: ...3 Input 3 Input 3 Input 3 Input 3 Input 3 Input 4 Input 4 Input 4 Input 4 Input 4 Input 4 Input 4 Input 4 Input 4 Input 2 Input 3 Figure 3 12 PIP 444 default window presets Recall a preset 1 Press the Preset button The Recall menu appears on the LCD 2 Turn either Adjust knob to select the preset you want to recall 3 Press the Enter button Save the current window settings as a preset 1 Press and ho...

Page 33: ...ccidental changes to the PIP 444 s settings you can lock the front panel picture control and Menu and Next buttons The input freeze and preset recall functions are still active when the front panel is locked To toggle the front panel lock on and off press and hold the Color Tint and Zoom buttons simultaneously for 2 seconds figure 3 14 Alternatively you can use the appropriate SIS command see chap...

Page 34: ...0 19200 38400 and 115200 baud rates and support either RS 232 or RS 422 serial communication protocol The settings of these variables can be viewed and changed from the front panel View and configure the switcher s serial communications settings as follows 1 To enter Serial Port Configuration mode simultaneously press and hold the Freeze button and Preset button while you apply power to the proces...

Page 35: ...default is 64 c Brightness Press the Brightness Contrast button and then rotate the Adjust knob to increase or decrease the window brightness from 50 to 127 the default is 64 d Contrast Press the Brightness Contrast button and then rotate the Adjust knob to increase or decrease the window contrast from 38 to 107 the default is 68 e Detail filter Press the Detail button and then rotate either Adjus...

Page 36: ...within the selected window o Automatic image positioning within the window Press and hold the Size and Position buttons for approximately half a second to automatically center the image within the currently selected window Release the buttons The auto center function does not work if the image size is set extremely small relative to the window size p Zoom Press the Zoom button and then rotate the ...

Page 37: ...cture in Picture Processors 4 Chapter Four Remote Control Simple Instruction Set Control Control Software for Windows im Vertrieb von CAMBOARD Electronics www camboard de Tel 07131 911201 Fax 07131 911203 ce info camboard de ...

Page 38: ...Signal ground Not used Receive data Transmit data Not used 5 1 9 6 RS 232 422 Figure 4 1 RS 232 RS 422 pinout Simple Instruction Set Control Host to PIP communications The PIP 444 and PIP 422 accept SIS Simple Instruction Set commands through the RS 232 RS 422 port SIS commands consist of one or more characters per command field They do not require any special characters to begin or end the comman...

Page 39: ...onse fields An ASCII to hexadecimal HEX conversion table is provided below Symbol definitions are provided below Command and response examples are shown throughout the command response table ASCII to HEX Conversion Table Space Lower case characters are acceptable in the command field in all cases except where the command is preceded by the Esc character im Vertrieb von CAMBOARD Electronics www cam...

Page 40: ...CII characters 32 126 X16 Controller firmware version listed to two decimal places i e x xx Invalid not loaded x xx Currently active firmware X17 Firmware partition 1 Factory microcontroller firmware 2 Factory FPGAfirmware 3 Updated microcontroller firmware 4 Updated FPGAfirmware X18 Input standard automatically detected 0 Unknown 3 SECAM 1 NTSC 4 YUV 50 2 PAL 5 YUV 60 X19 Firmware build number 4 ...

Page 41: ...ment color up X1 C Col X1 X5 Select the next higher color value Decrement color down X1 C Col X1 X5 Select the next lower color value View color value X1 C X5 View the current setting Tint Specific tint value X1 X5 T Tin X1 X5 Set the tint value to X5 Increment tint up X1 T Tin X1 X5 Select the next higher tint value Decrement tint down X1 T Tin X1 X5 Select the next lower tint value View tint val...

Page 42: ...ning enter a minus sign before the X10 value Entry of a positive sign is optional but not required if no sign is included in the SIS command the PIP assumes a positive value The PIP returns a negative sign in its response when the value is negative but does not return a positive sign Specific shift value X8 X1 X10 Vph X8 X1 X10 Set the vertical centering value to X10 Example 1 2 323 Vph1 2 323 Set...

Page 43: ...ail filter Specific detail filter value X1 X13 d Dhz X1 X13 Select detail level X13 Increment filter value up X1 d Dhz X1 X13 Select next higher detail level Decrement filter value down X1 d Dhz X1 X13 Select next lower detail level View filter value X1 d X13 Show detail level Window priority Set window priority X1 p1 X1 p2 X1 p3 X1 p4 Pri X1 p1 X1 p2 X1 p3 X1 p4 Set priority of all input windows ...

Page 44: ...r firmware version All firmware 0Q X16 X16 X16 X16 Show the firmware versions for all partitions Specific firmware X17 Q X16 Show the firmware version for partition X17 View build number Q X16 X19 Show the firmware build number Request part number Request part number N 60 607 606 01 Show the PIP s part number Request information View all inputs video standards I X18 X18 X18 X18 Display each input ...

Page 45: ...g X24 Set background color to X24 Example 2 3 Bkg2 Set background color to cyan View background color 3 X24 Show background color Border color Set border color X25 4 Bdr X25 Set border color to X25 Example 3 4 Bdr3 Set border color to green View border color 4 X25 Show border color Window insertion effect type Set effect type X26 5 Eff X26 Select insertion effect type Example 2 5 Eff2 Set insertio...

Page 46: ...oftware as follows For full functionality install both of the following programs The PIP 422 444 Control Program The Firmware Loader 1 Insert the CD ROM into the drive The installation program should start automatically If it does not self start run Launch exe from the CD The Extron software CD window appears figure 4 2 Figure 4 2 Software CD window Window anti aliasing filter Set anti aliasing fi...

Page 47: ...d Extron Electronics PIP 422 444 The four installed icons are PIP 422 444 PIP 422 444 Help Check for PIP 422 444 Update Uninstall PIP 422 444 Starting the control program To run the software 1 Click Start Programs Extron Electronics PIP 422 444 PIP 422 444 The Communication Connection Settings window appears figure 4 4 Figure 4 4 Communication Connection Settings window 2 Select the comm port that...

Page 48: ...rts up next time check box The PIP 422 444 program window appears figure 4 5 Figure 4 5 PIP 422 444 program window The program window is divided into three areas a tool bar on the top of the window a graphic area on the right side of the window and a controls area on the left side of the window im Vertrieb von CAMBOARD Electronics www camboard de Tel 07131 911201 Fax 07131 911203 ce info camboard ...

Page 49: ...e Data trace button The data trace button calls the trace log window figure 4 7 which shows the serial communications in ASCII and Hex between the controller and the PIP Reference to this window can be helpful when writing your own control scripts Figure 4 7 Trace log window Upgrade firmware button The firmware upgrade utility provides a way to replace the firmware that is coded on the processor s...

Page 50: ... file extension pkg Any other file extension is not a firmware upgrade for your PIP 4c Click Upload The File Loader reports This process could take several minutes Please wait and then displays a scroll bar that shows the status of the upload 4c When the Firmware Loader reports Transfer complete click Exit If the firmware loader utility exits before the status bar has progressed completely across ...

Page 51: ...ag it to resize the window To move a window click in the desired window and drag it to the new location To retain the aspect ratio when resizing select the Lock Aspect Ratio checkbox If you have dragged a window so far out of the picture that you have lost it click View Expanded View to show the entire horizontal and vertical video stream Right click any window area to bring up the image area for ...

Page 52: ...ted and the window does not appear in the graphic area Freeze Window Select and deselect an input to freeze or unfreeze that input s window in the displayed image A button appears red when selected that input is frozen and appears gray when deselected the input video is in motion Window Priorities Select a window button and click the Front and Back buttons to reorder the window priorities The high...

Page 53: ... s settings are applied to the output image Save To save a preset select the desired preset using the drop box and click the Save button All of the current settings are saved for later use at the specified preset location Reset To reset an individual preset select the desired preset using the drop box and click the Reset button All of the settings for the selected preset are reset to the factory d...

Page 54: ... For both Position and Size the left adjustment is horizontal and the right adjustment is vertical The and buttons resize the window while maintaining the aspect ratio Size and position adjustments are updated live in the graphic area Image controls The image controls allow you to precisely set the position and size of the image withing the window selected by the Window Select drop box For both Po...

Page 55: ...ou insert in a window The text style solid or translucent The Window Text area allows you to select one of the windows using the Select Window drop box and then enter or erase text in the window The Reset Unit button restores the factory defaults Using the help system For information about program features you can access the help program in any of the following ways From the Extron Electronics gro...

Page 56: ...Remote Control cont d PIP 422 and PIP 444 Picture in Picture Processors Remote Control 4 20 im Vertrieb von CAMBOARD Electronics www camboard de Tel 07131 911201 Fax 07131 911203 ce info camboard de ...

Page 57: ...P 444 Picture in Picture Processors A Appendix A Specifications and Part Numbers Specifications Part Numbers im Vertrieb von CAMBOARD Electronics www camboard de Tel 07131 911201 Fax 07131 911203 ce info camboard de ...

Page 58: ...al frequency NTSC 3 58 NTSC 4 43 PAL SECAM Resolution range NTSC 3 58 NTSC 4 43 PAL SECAM Return loss 30 dB 5 MHz DC offset min max 0 3 V to 1 3 V External sync genlock 0 3 V to 1 0 Vp p Video processing Encoder 10 bit digital Digital sampling 24 bit 8 bits per color 80 MHz standard Colors 16 8 million Anti aliasing filtering 5 levels 0 off 1 2 3 auto which uses 0 3 Detail filtering 16 levels 0 7 ...

Page 59: ...on Set SIS General Power 100 VAC to 240 VAC 50 60 Hz 10 watts internal autoswitchable Temperature humidity Storage 40 to 158 F 40 to 70 C 10 to 90 noncondensing Operating 32 to 122 F 0 to 50 C 10 to 90 noncondensing Rack mount Yes with included brackets Enclosure type Metal Enclosure dimensions 1 75 H x 17 5 W x 8 5 D 1U high full rack wide 4 4 cm H x 44 4 cm W x 21 6 cm D Depth excludes connector...

Page 60: ...rackets 70 077 03 IEC power cord Rubber feet self adhesive 4 User s manual Label holder self adhesive Extron Software Products CD disk B Accessories These items may be ordered separately Accessories Part number MBD 149 Under desk mounting kit 70 077 03 SVHSF BNCM 1 adapter 26 541 02 SVHSM BNCM 1 adapter 26 353 02 SVHSM BNCM 3 adapter 26 353 03 SVHSM BNCM 6 adapter 26 353 04 SVHSM BNCF 8 adapter 26...

Page 61: ...Electronics Beeldschermweg 6C 1001 East Ball Road 3821 AH Amersfoort Anaheim CA 92805 USA The Netherlands Asia Japan Extron Electronics Asia Extron Electronics Japan 135 Joo Seng Road 04 01 Kyodo Building PM Industrial Bldg 16 Ichibancho Singapore 368363 Chiyoda ku Tokyo 102 0082 Japan This Limited Warranty does not apply if the fault has been caused by misuse improper handling care electrical or ...

Page 62: ...33 453 4050 Extron Electronics Japan Kyodo Building 16 Ichibancho Chiyoda ku Tokyo 102 0082 Japan 81 3 3511 7655 FAX 81 3 3511 7656 Extron Electronics Asia 135 Joo Seng Rd 04 01 PM Industrial Bldg Singapore 368363 800 7339 8766 65 6383 4400 FAX 65 6383 4664 www extron com 2007 Extron Electronics All rights reserved im Vertrieb von CAMBOARD Electronics www camboard de Tel 07131 911201 Fax 07131 911...

Reviews: