Extron electronics HDMI DA Series User Manual Download Page 20

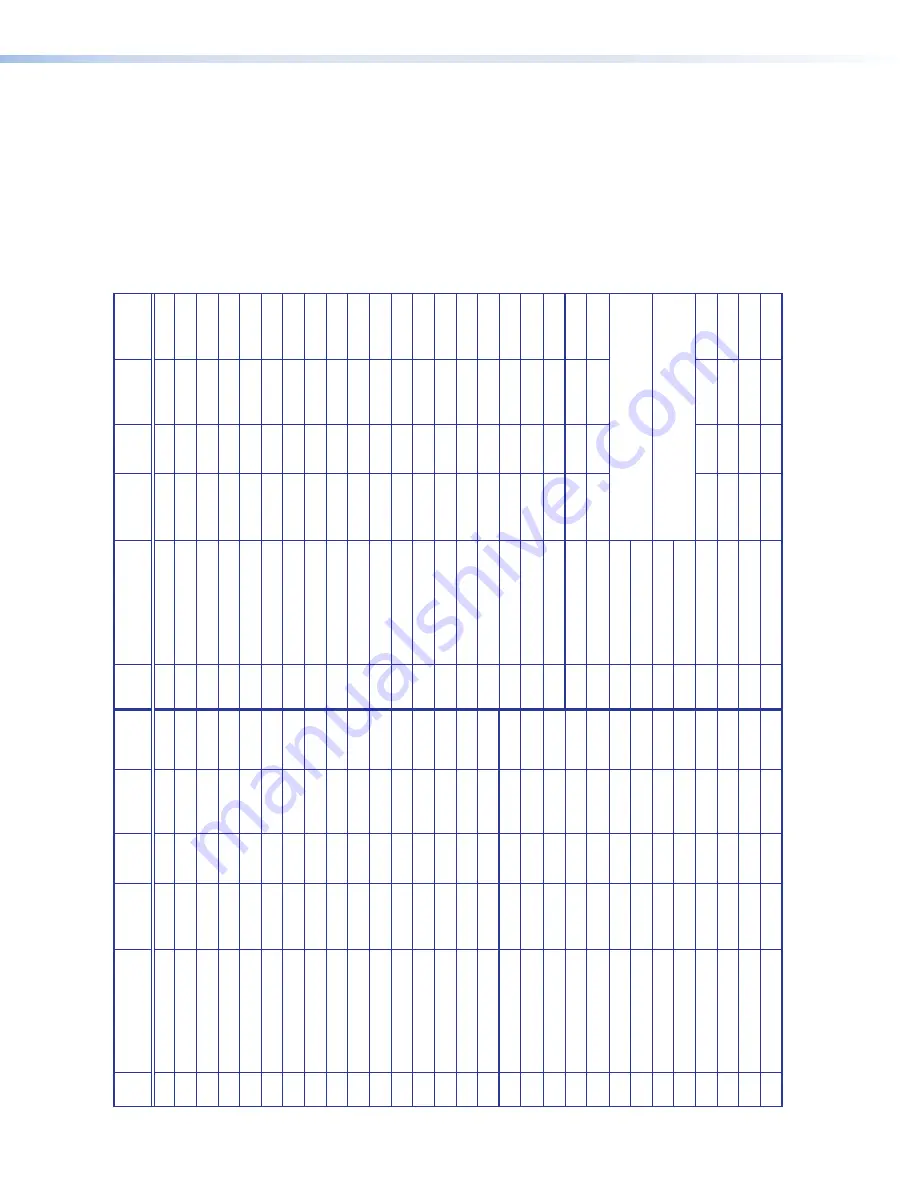
HDMI DA2, HDMI DA4, and HDMI DA6 EDID Lookup T

able

X%

Native 

Resolution

Refr

esh 

Rate

1

Rate  Type

2

V

ideo 

Format

3

Audio  T

ype

X%

Native 

Resolution

Refr

esh 

Rate

1

Rate  Type

2

V

ideo 

Format

3

Audio  T

ype

1

800x600

60 Hz

PC

DVI

n/a

30

2048x1080

60 Hz

PC

HDMI

2-ch

2

1024x768

60 Hz

PC

DVI

n/a

31

480p

60 Hz

HDTV

HDMI

2-ch

3

1280x720

60 Hz

PC

DVI

n/a

32

576p

50 Hz

HDTV

HDMI

2-ch

4

1280x768

60 Hz

PC

DVI

n/a

33

720p

50 Hz

HDTV

HDMI

2-ch

5

1280x800

60 Hz

PC

DVI

n/a

34

720p (default)

60 Hz

HDTV

HDMI

2-ch

6

1280x1024

60 Hz

PC

DVI

n/a

35

1080i

50 Hz

HDTV

HDMI

2-ch

7

1360x768

60 Hz

PC

DVI

n/a

36

1080i

60 Hz

HDTV

HDMI

2-ch

8

1366x768

60 Hz

PC

DVI

n/a

37

1080p

50/25 Hz

HDTV

HDMI

2-ch

9

1400x1050

60 Hz

PC

DVI

n/a

38

1080p

50 Hz

HDTV

HDMI

2-ch

10

1440x900

60 Hz

PC

DVI

n/a

39

1080p

60/24 Hz

HDTV

HDMI

2-ch

11

1600x900

60 Hz

PC

DVI

n/a

40

1080p

60 Hz

HDTV

HDMI

2-ch

12

1600x1200

60 Hz

PC

DVI

n/a

41

720p

50 Hz

HDTV

HDMI

multi-ch

13

1680x1050

60 Hz

PC

DVI

n/a

42

720p

60 Hz

HDTV

HDMI

multi-ch

14

1920x1080

60 Hz

PC

DVI

n/a

43

1080i

50 Hz

HDTV

HDMI

multi-ch

15

1920x1200

60 Hz

PC

DVI

n/a

44

1080i

60 Hz

HDTV

HDMI

multi-ch

16

2048x1080

60 Hz

PC

DVI

n/a

45

1080p

50/25 Hz

HDTV

HDMI

multi-ch

17

800x600

60 Hz

PC

HDMI

2-ch

46

1080p

50 Hz

HDTV

HDMI

multi-ch

18

1024x768

60 Hz

PC

HDMI

2-ch

47

1080p

60/24 Hz

HDTV

HDMI

multi-ch

19

1280x768

60 Hz

PC

HDMI

2-ch

48

1080p

60 Hz

HDTV

HDMI

multi-ch

20

1280x800

60 Hz

PC

HDMI

2-ch

49

Output 1

21

1280x1024

60 Hz

PC

HDMI

2-ch

50

Output 2

22

1360x768

60 Hz

PC

HDMI

2-ch

51

Output 3

Outputs 3 and 4 ar

e available only on 

the HDMI DA4 and HDMI DA6

23

1366x768

60 Hz

PC

HDMI

2-ch

52

Output 4

24

1400x1050

60 Hz

PC

HDMI

2-ch

53

Output 5

Outputs 5 and 6 ar

e available only on 

the HDMI DA6

25

1440x900

60 Hz

PC

HDMI

2-ch

54

Output 6

26

1600x900

60 Hz

PC

HDMI

2-ch

55

User loaded slot 1

27

1600x1200

60 Hz

PC

HDMI

2-ch

56

User loaded slot 2

28

1680x1050

60 Hz

PC

HDMI

2-ch

57

User loaded slot 3

29

1920x1200

60 Hz

PC

HDMI

2-ch

58

User loaded slot 4

Table 1.


HDMI DA4 and HDMI DA6 EDID Lookup T

able (

1,2,3

 see 

footnotes

 on the following page)


HDMI DA Series • Operation

14

Summary of Contents for HDMI DA Series

Page 1: ...68 1844 02 Rev B 09 14 HDMI DA Series User Guide HDMI Distribution Amplifiers...

Page 2: ...Inneren des Geh uses dieses Produktes gef hrliche Spannungen herrschen die nicht isoliert sind und die einen elektrischen Schlag verursachen k nnen VORSICHT Dieses Symbol I auf dem Produkt soll dem Be...

Page 3: ...ics All rights reserved Trademarks All trademarks mentioned in this guide are the properties of their respective owners The following registered trademarks registered service marks SM and trademarks T...

Page 4: ...X1 X2 X2 X2 CE NOTE For commands and examples of computer or device responses mentioned in this guide the character 0 is used for the number zero and O represents the capital letter o Computer respon...

Page 5: ...LED 12 EDID Minder 13 Factory EDID 13 Output EDID 13 User Slots 13 HDMI DA2 HDMI DA4 and HDMI DA6 EDID Lookup Table 14 Mounting 16 Desktop Placement 16 Rack Mounting 16 UL Guidelines for Rack Mountin...

Page 6: ...HDMI DA Series Contents vi...

Page 7: ...gnal outputs Supported HDMI specification features include data rates up to 6 75 Gbps Deep Color up to 12 bit 3D Lip Sync and HD lossless audio formats Supports high resolution video including compute...

Page 8: ...tus LEDs for the input and each output provide real time feedback and monitoring of signal presence and HDCP authentication The bi color EDID LED indicator notifies whether an internal or external EDI...

Page 9: ...ifiers follow these instructions 1 Mount the Distribution Amplifier in a suitable location see page 16 2 HDMI DA2 only Connect the provided 12 VDC 1 A power supply see page 5 3 HDMI DA4 and HDMI DA6 o...

Page 10: ...A MAX HDMI DA6 RS 232 4 3 6 5 2 1 Tx Rx G OUTPUTS REMOTE INPUT B B C C E E D D HDMI DA6 Figure 2 HDMI DA2 top HDMI DA4 middle and HDMI DA6 bottom A Power supply connector see page 5 B IEC connector se...

Page 11: ...certification de conformit r glementaire Unless otherwise stated the AC DC adapters are not suitable for use in air handling spaces or in wall cavities The power supply is to be located within the sam...

Page 12: ...uer un court circuit S ils sont un peu plus courts ils pourraient sortir m me s ils sont attach s par les vis captives Do not tin the wire leads before installing into the connector Tinned wires are n...

Page 13: ...connector securely against the lacing bracket tighten the tie wrap then remove any excess length Connecting the Output Displays Use a HDMI cable to connect up to two HDMI DA2 four HDMI DA4 or six HDMI...

Page 14: ...C 50 or UC 100 to the computer using a female 9 pin D connector see figure 3 Data received by the computer pin 2 Data transmitted by the computer pin 3 Ground pin 5 2 Wire the opposite end of the cabl...

Page 15: ...USB Port 2 If this is the first time a HDMI DA series device has been connected to the PC the Found New Hardware Wizard opens Connect to Windows Update to search the web for the driver needed for the...

Page 16: ...location on the hard drive 5 When the Completed screen appears click Finish to close the wizard NOTE The wizard opens only on the first occasion you connect the distribution amplifier to that USB por...

Page 17: ...IER CONFIG HDCP 1 2 3 4 SIGNAL INPUT OUTPUTS EDID A A B B C C D D E E HDMI DA6 HDMI DA6 HDMI DISTRIBUTION AMPLIFIER CONFIG HDCP 1 2 3 4 SIGNAL INPUT OUTPUTS EDID 3 4 A A B B D D E E C C Figure 7 HDMI...

Page 18: ...gnal LEDs one for each of the outputs The LEDs light green when an active sink device is connected to the corresponding output based on hot plug detect HDCP LEDs Input HDCP LED The Input HDCP LED ligh...

Page 19: ...user can select from 48 factory loaded EDID files each catagorized by rate type PC or HDTV video format DVI or HDMI audio type 2 Ch or Multi Ch and native resolution Output EDID EDID from each connect...

Page 20: ...n a 42 720p 60 Hz HDTV HDMI multi ch 14 1920x1080 60 Hz PC DVI n a 43 1080i 50 Hz HDTV HDMI multi ch 15 1920x1200 60 Hz PC DVI n a 44 1080i 60 Hz HDTV HDMI multi ch 16 2048x1080 60 Hz PC DVI n a 45 10...

Page 21: ...128 byte EDID files which specify a DVI sink They do not contain an extension block HDMI These are 256 byte EDID files each containing a CEA extension block They each specify an HDMI sink device with...

Page 22: ...ipment gets adequate air flow for safe operation 3 Mechanical loading Mount the equipment in the rack so that uneven mechanical loading does not create a hazardous condition 4 Circuit overloading Conn...

Page 23: ...the front panel must be disconnected from the computer or other control device Host to Distribution Amplifier Communications SIS commands consist of strings one or more characters per command field N...

Page 24: ...3 4 5 or 6 HDMI DA6 X Video mute status 0 disabled 1 video mute 2 video and sync mute X Status 0 disabled off or undetected 1 enabled on or detected X Video bit depth mode 0 auto based on EDID of sink...

Page 25: ...audio mute Audio mute all outputs X Z AmtX Audio mute all outputs Query Audio mute status Z AmtX X X Audio mute status of outputs 1 to 2 HDMI DA2 1 to 4 HDMI DA4 or 1 to 6 HDMI DA6 Video Bit Depth Mod...

Page 26: ...on page 14 View EDID assignment EAEDID X Save EDID of output to user location ESX X EDID EdidSX X Store the EDID of output X into EDID memory location X 55 58 View Read EDID in Hex EREDID X Read out...

Page 27: ...led on your computer download it as follows 1 Go to www extron com and click the Download tab 2 On the Download Center screen click the Software link on the left sidebar menu 3 On the next Download Ce...

Page 28: ...ese issues do not affect you you may decide not to upgrade the firmware 4 Click Download for the firmware you require 5 On the next screen that appears enter the requested user information then click...

Page 29: ...t Figure 10 Opening Firmware Loader 5 Select the HDMI DA product from the Device Name menu 6 Select either RS 232 or USB from the Connection Method menu 7 Depending on the connection method that you s...

Page 30: ...ional devices by repeating this step When you are about to add the last device or if you are only updating a single unit press Add do not press Add Next The device is added to the device list in the F...

Page 31: ...ron and ask for an Application Engineer to receive an RA Return Authorization number This will begin the repair process USA 714 491 1500 or 800 633 9876 Europe 31 33 453 4040 Asia 65 6383 4400 Japan 8...

Reviews: