background image


Extron DTP HD DA 4K Series • Installation and Operation

10

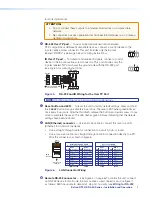
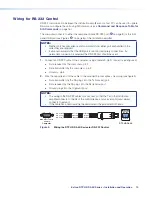
   Wiring for RS-232 Control

RS-232 communication between the distribution amplifi er and a host PC can be used to update 
fi rmware or confi gure the unit using SIS commands (see 

Command and Response Table for 

SIS Commands

 on page 16).

The computer connects to either the rear panel 3-pole RS-232 port (

K

 on 

page 8

) or the front 

panel USB port (see Figure 4 

B

 on 

page 6

) of the distribution amplifi er.

NOTES:

• 

Neither port has precedence and commands from either port are handled in the 
order they are received.

• 

Extron recommends that the USB port is used for temporary connections. If a 
permanent connection is required, the RS-232 port should be used.

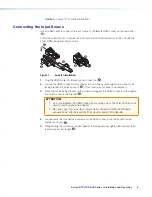
1. 

Connect an RS-232 cable to the computer, using a female 9-pin D connector (see figure 4):


z

Data received by the computer = pin 2


z

Data transmitted by the computer = pin 3


z

Ground = pin 5

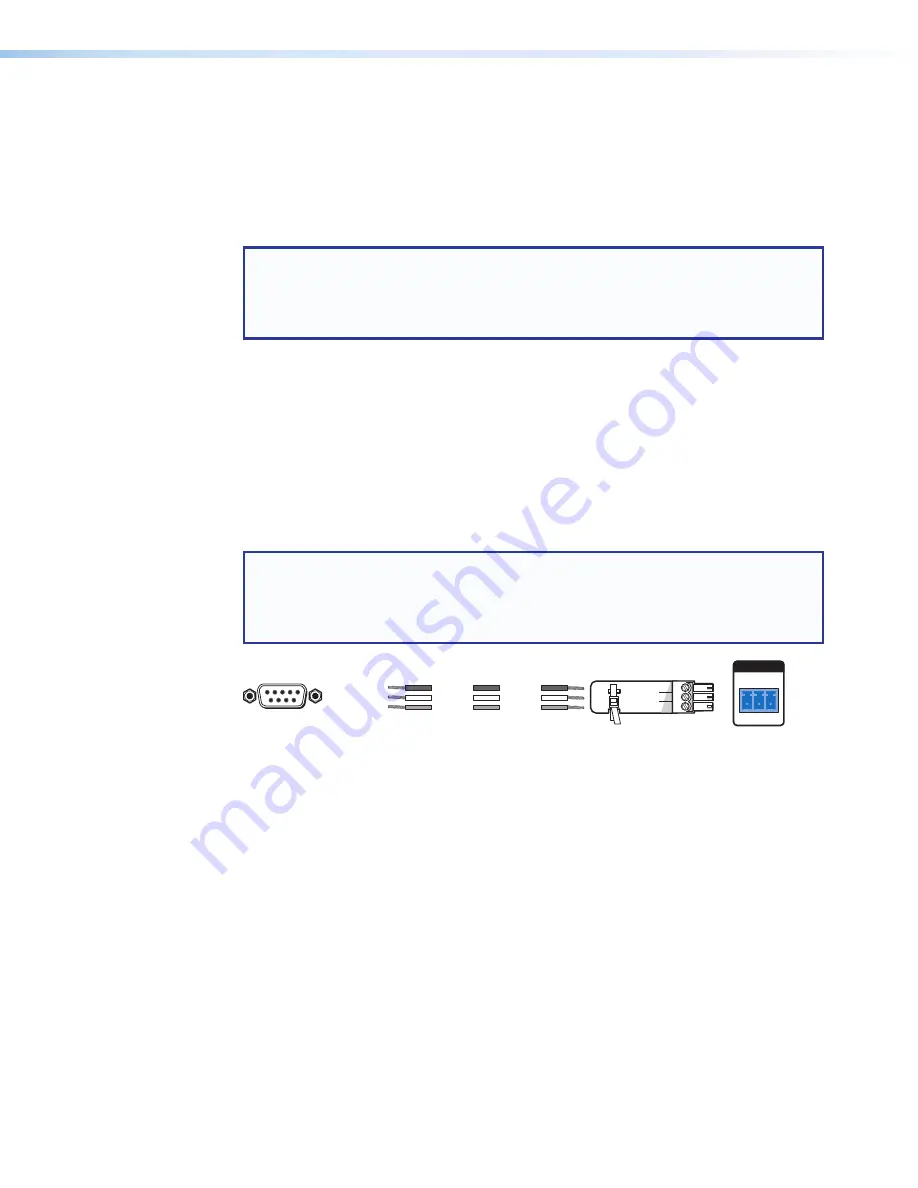
2. 

Wire the opposite end of the cable to the provided 3-pole captive screw plug (see figure 9):


z

Data transmitted by the DA plugs into the Tx (transmit) port


z

Data received by the DA plugs into the Rx (receive) port


z

Ground plugs into the G (ground) port

NOTES:

• 

The wiring in the RS-232 cables crosses over so that the Tx on the distribution 
amplifier connects to the Rx of the control device and vice versa. Ground always 
connects to ground.

• 

If the cable has a drain wire, tie the drain wire to the ground at both ends.

RS-232

Tx Rx G

REMOTE

Transmit

Receive

Receive

Transmit

Ground

Ground

DB9 Pin Locations

Female

5

1

9

6

Pin 2 = Rx
Pin 3 = Tx
Pin 5 = G

Computer

DTP HD DA 4K

Figure 9. 

Wiring the DTP HD DA 4K Series for RS-232 Control


Summary of Contents for DTP HD DA4 4K 230

Page 1: ...User Guide DTP HD DA 4K Series Video Products DTP HDMI Distribution Amplifiers 68 2545 01 Rev E 01 19 ...

Page 2: ... maintenance importantes qui se trouvent dans la documentation fournie avec le matériel Pour en savoir plus sur les règles de sécurité la conformité à la réglementation la compatibilité EMI EMF l accessibilité et autres sujets connexes lisez les informations de sécurité et de conformité Extron réf 68 290 01 sur le site Extron www extron com Istruzioni di sicurezza Italiano AVVISO Questo simbolo qu...

Page 3: ... この記号 が製品上に表示されている場合は 本機の取扱説明書に 記載されている重要な操作と保守 整備 の指示についてユーザーの注意 を喚起するものです 安全上のご注意 法規厳守 EMI EMF適合性 その他の関連項目に ついては エクス トロンのウェブサイ ト www extron com より Extron Safety and Regulatory Compliance Guide P N 68 290 01 をご覧ください 안전 지침 한국어 경고 이 기호 가 제품에 사용될 경우 제품의 인클로저 내에 있는 접지되지 않은 위험한 전류로 인해 사용자가 감전될 위험이 있음을 경고합니다 주의 이 기호 가 제품에 사용될 경우 장비와 함께 제공된 책자에 나와 있는 주요 운영 및 유지보수 정비 지침을 경고합니다 안전 가이드라인 규제 준수 EMI EMF 호환성 ...

Page 4: ...cer la pile par le mauvais type de pile Débarrassez vous des piles usagées selon le mode d emploi Copyright 2018 Extron Electronics All rights reserved Trademarks All trademarks mentioned in this guide are the properties of their respective owners All trademarks mentioned in this guide are the properties of their respective owners The following registered trademarks registered service marks SM and...

Page 5: ... or device responses mentioned in this guide the character 0 is used for the number zero and O is the capital letter o Computer responses and directory paths that do not have variables are written in the font shown here Reply from 208 132 180 48 bytes 32 times 2ms TTL 32 C Program Files Extron Variables are written in slanted form as shown here ping xxx xxx xxx xxx t SOH R Data STX Command ETB ETX...

Page 6: ......
Page 7: ...mmands 11 Introduction to SIS 11 Host to Distribution Amplifier Communications 11 Distribution Amplifier initiated Messages 11 Copyright Information 11 Symbols Used in this Guide 12 Symbol Definitions 12 Error Messages 14 EDID 14 DTP HD DA 4K Series EDID Memory Locations 15 Command and Response Table for SIS Commands 16 Reference Information 21 Using the Internal Web Pages 21 Accessing the Interna...

Page 8: ...Extron DTP HD DA 4K Series Introduction viii ...

Page 9: ... scans each output device to ensure that the output signal is compatible with the color depth and format requirements of the device Each output is adjusted independently Features Distributes HDMI plus control and analog audio up to 230 feet 70 meters or 330 feet 100 meters over STP cable depending on the model Inputs One HDMI with buffered input loop through one 3 5 mm stereo mini jack for audio w...

Page 10: ... automatically manages EDID communication between connected devices EDID Minder ensures that the source powers up properly and reliably outputs content for display Supports EDID and HDCP transmission DDC channels are actively buffered allowing continuous communication between source and display HDCP authentication and signal presence confirmation Provides real time verification of HDCP status for ea...

Page 11: ...232 IR Tx Rx Tx Rx G RS 232 IR OVER TP 3 4 5 6 7 8 1 2 DTP HDBT OUTPUTS INPUT HDMI LOOP THRU REMOTE Tx Rx RS 232 G RESET DTP HDBT Tx Rx Tx Rx G RS 232 IR Tx Rx Tx Rx G RS 232 IR OVER TP DTP HDBT DTP HDBT Tx Rx Tx Rx G RS 232 IR Tx Rx Tx Rx G RS 232 IR OVER TP DTP HDBT Tx Rx Tx Rx G RS 232 IR Tx Rx Tx Rx G RS 232 IR OVER TP DTP HDBT DTP HDBT AUDIO SIG OUT LINK SIG OUT LINK SIG OUT LINK SIG OUT LINK...

Page 12: ... placed on a table mounted in a rack or mounted under a desk or table Tabletop Use Attach the included rubber feet to the bottom of the unit and place it in any convenient location Mounting Kits Mount the unit using any optional compatible mounting kit listed on the Extron website www extron com in accordance with the directions included with the kit For rack mounting see UL Rack Mounting Guidelin...

Page 13: ...e 3 DTP HD DA 4K Series Front Panel A Power status LED Lights green when power is applied to the unit B USB Config port Used for firmware updates SIS configuration and software control This port can be used as an alternative to the rear panel Remote RS 232 captive screw connector See Rear Panel Features on the following page NOTES Neither port has precedence and commands from either port are handl...

Page 14: ...uts Use STP cables to connect these 4 DA4 models or 8 DA8 models outputs see Figure 4 on the previous page to the inputs of a compatible receiver see Twisted Pair Recommendations for DTP Communication on page 9 A Power input G DTP HDBaseT outputs B Analog audio input H Over TP RS 232 IR connectors C Analog audio Loop Thru I Reset button and LED D HDMI input J LAN connector E HDMI Loop Thru K Remot...

Page 15: ... and quickly press it once more to complete the reset The LED flashes green 3 times indicating that the default settings have been restored J LAN Ethernet connector Use an RJ 45 cable to connect this jack to a LAN Ethernet for control of the device Use a straight through cable for connection to a switch hub or router Use a crossover cable or a straight through cable for connection directly to a PC...

Page 16: ...o allow the LockIt lacing bracket to be placed over it 2 The screw does not have to be removed 3 Place the LockIt lacing bracket on the screw and against the HDMI connector then tighten the screw to secure the bracket 3 ATTENTION Do not overtighten the HDMI connection mounting screw The shield it fastens to is very thin and can easily be stripped Ne serrez pas trop la vis de montage de la connexio...

Page 17: ...istances and reduce transmission errors Use the following Extron XTP DTP 24 SF UTP cables and connectors for the best performance XTP DTP 24 1000 Non Plenum 1000 305 m spool 22 236 03 XTP DTP 24P 1000 Plenum 1000 305 m spool 22 235 03 XTP DTP 24 Plug Package of 10 101 005 02 If not using XTP DTP 24 cable at a minimum Extron recommends 24 AWG solid conductor STP cable with a minimum bandwidth of 40...

Page 18: ...ect an RS 232 cable to the computer using a female 9 pin D connector see figure 4 z Data received by the computer pin 2 z Data transmitted by the computer pin 3 z Ground pin 5 2 Wire the opposite end of the cable to the provided 3 pole captive screw plug see figure 9 z Data transmitted by the DA plugs into the Tx transmit port z Data received by the DA plugs into the Rx receive port z Ground plugs...

Page 19: ...s SIS commands consist of strings one or more characters per command field No special characters are required to begin or end a command sequence Unless otherwise stated upper and lower case characters can be used interchangeably Most responses from the distribution amplifier end with a carriage return and a line feed CR LF which signal the end of the response character string When the switcher deter...

Page 20: ...detected X Video color bit depth 0 auto based on EDID of sink default 1 force 8 bit X EDID memory location See the DTP HD DA4 DA8 EDID Memory Locations table on page 15 X EDID data as 256 bytes of hex data text representation X Native resolution and refresh rate translated from hex Example 1600x1200 60Hz X Controller firmware version to the second decimal place X Unit name Up to 24 alphanumeric ch...

Page 21: ... Verbose mode default for RS 232 and USB 2 Tagged responses for queries 3 Verbose mode and tagged responses for queries X1 Set date time MM DD YY HH MM SS Example 06 21 02 10 54 00 X1 IP address xxx xxx xxx xxx 192 168 254 254 default X1 MAC address 00 05 A6 xx xx xx X1 Subnet mask xxx xxx xxx xxx 255 255 0 0 default X1 Password 12 digits and alphanumeric characters for user or admin passwords X5 ...

Page 22: ...ideo format DVI or HDMI audio type 2 Ch or Multi Ch and native resolution The unit retains this setting after a power cycle Additionally two user loaded slots are available to save the EDID of any connected display EDID saved to these slots are retained after a power cycle Upon a factory reset these EDID revert to the factory default 720p 60 Hz 2 Ch audio A table showing the factory loaded EDID op...

Page 23: ...200 60 Hz PC DVI n a EXN_DVI15_1920x1200_60 bin 50 1080i 60 Hz HDTV HDMI multi ch EXN_HDMI34_1080i60_MultiCh Audio bin 16 2048x1080 60 Hz PC DVI n a EXN_DVI16_2048x1080_60 bin 51 1080p 50 25 Hz HDTV HDMI multi ch EXN_HDMI35_1080p50_25_MultiCh Audio bin 17 800x600 60 Hz PC HDMI 2 ch EXN_HDMI1_800x600_60_2Ch Audio bin 52 1080p 50 Hz HDTV HDMI multi ch EXN_HDMI36_1080p50_MultiCh Audio bin 18 1024x768...

Page 24: ... of outputs 0 to 4 0 loop out for DA4 or 0 to 8 0 loop out for DA8 HDMI embedded Audio Mute Audio mute single output EX X AFMT AfmtX X Audio mute output X only X 0 audio mute disabled or 1 audio mute Audio mute all outputs EX AFMT AfmtX Query audio mute status EAFMT X X X Audio mute status of outputs 0 to 4 0 loop out for DA4 or 0 to 8 0 loop out for DA8 TMDS Output Format Set format for single ou...

Page 25: ...ation status EEHDCP X EDID Minder Assign EDID to input EAX EDID EdidAX X EDID memory location 1 66 see the DTP HD DA4 DA8 4K EDID Memory Locations table on page 15 default is 39 720p 60 Hz 2 ch audio View EDID assignment EAEDID X Save EDID of output to user location ESX X EDID EdidSX X Store the EDID of output X into EDID memory location X 65 or 66 View Read EDID in Hex EREDID X Read out EDID in H...

Page 26: ...ess EX1 CG IpgX1 Default 0 0 0 0 View gateway IP address ECG X1 Set DNS server IP address EX1 DI IpdX1 Default 0 0 0 0 View DNS server IP address EDI X1 Get number of connections ECC Number of connections Set admin password EX1 CA Ipa X1 Clear admin password E CA Ipa View admin password ECA X1 Set user password EX1 CU Ipu X1 Clear user password E CU Ipu View user password ECU X1 RS 232 Insertion P...

Page 27: ...uery UART start point EMD X6 Read start point for UART Unit Name Set unit name EX CN Ipn X X Up to 24 alphanumeric characters including Set unit name to factory default E CN Ipn Default Example DTP HD DA8 4K 330 0B 4A 45 Model name and last 3 pairs of MAC address View unit name ECN X Other Set verbose mode EX1 CV VrbX1 In modes 2 and 3 all view commands return the prefix and the value just as the s...

Page 28: ... Command host to unit Response unit to host Additional Description View HDCP Notifications Set green screen E N 0 HDCP HdcpN 0 X6 0 Green Screen default Set black screen E N 1 HDCP HdcpN 1 1 Black Screen View HDCP notifications E N HDCP X6 HdcpNX6 Verbose 2 3 ...

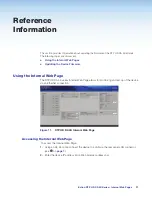
Page 29: ...ing the Device Firmware Using the Internal Web Page The DTP HD DA 4K series Internal Web Page allows for monitoring and set up of the device via an Ethernet connection Figure 11 DTP HD DA 4K Internal Web Page Accessing the Internal Web Page To access the Internal Web Page 1 Using an RJ 45 cable connect the device to a LAN via the rear panel LAN connector see J on page 7 2 Enter the device IP addre...

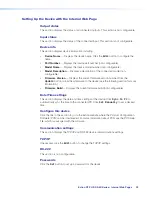
Page 30: ...mware version number Click the Update button to load new firmware to the device see the following section for more information Firmware Build Displays the current firmware build non configurable Date Time settings This section displays the date and time settings of the device Click Sync to PC to automatically sync the time to the connected PC Click Set Manually to set a desired time Configure this...

Page 31: ...rent device updating the firmware may not be necessary 5 On the next screen that appears enter the requested user information then click the Download button 6 Follow the instructions on the rest of the download screens to save the executable firmware file to the computer Note the folder to which the file was saved 7 In Windows Explorer or another file browser locate the downloaded executable file ...

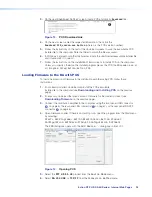
Page 32: ... to the DA with PCS To load a new version of firmware to the distribution amplifier using PCS follow these instructions 1 If not already installed download and install the PCS executable installer file to the computer see Downloading and Installing PCS on the previous page 2 If necessary download the latest version of firmware for the desired product see Downloading Firmware on the previous page 3...

Page 33: ...ny reason the unit reverts to the factory version By default when the firmware is downloaded from the Extron site it is saved in one of the following paths C Program Files Extron Firmware folder_name Windows XP or C Program Files x86 Extron Firmware folder_name Windows 7 where folder_name may be named for the specific model needed 10 If multiple units are connected to the computer it is possible t...

Page 34: ... HD DA 4K internal web page To update the firmware via the internal web page 1 Using an internet browser navigate to the device Internal Web Page 2 In the Device Info section click the Update button Figure 15 Device Info Section 3 Click the Browse button and locate and select the desired firmware file then click Open 4 Click the Upload button ...

Page 35: ...rab Emirates Dubai This Limited Warranty does not apply if the fault has been caused by misuse improper handling care electrical or mechanical abuse abnormal operating conditions or if modifications were made to the product that were not authorized by Extron NOTE If a product is defective please call Extron and ask for an Application Engineer to receive an RA Return Authorization number This will b...

Reviews: