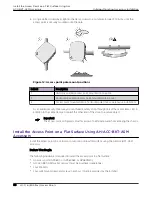
2. Attach the ASM accessory to the wall by using four M5 shoulder mounting screws.
Tip
The best practice is to use screw-in anchors with the mounting screws on a wood surface,
and concrete anchors on a concrete surface.
3. Insert the M5 shoulder mounting screws into the mounting holes.
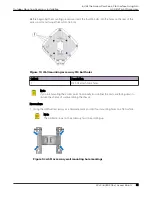
4. Torque the M5 shoulder mounting screws to 25 in-lbs.
5. Remove the two locking screws on the accessory.
Figure 15: ASM accessory locking screws
Note
The access point will not go onto the accessory if the locking screws are not removed.
6. Insert the M5 bolt heads on the access point into the large end of the accessory keyholes and slide
the access point down until the bolts rest in the narrow end of the keyholes.
7. Tighten the locking screws on the ASM accessory to secure the access point.
8.
Ground Connection
Safely ground the access point using the grounding hardware.
Before You Begin
The following hardware is required for ground connection:
•
An access point
•
One M4 ground screw
•
One star washer
•
One ground terminal
•
One ground wire
Note
The ground wire must be provided by the installer.
About This Task
When you install the access point on an outdoor environment, you must provide protective grounding
to prevent the access point from damages and failures.
Ground Connection
Outdoor Mounting Accessory Installation
32
Wi-Fi 6 (802.11ax) Access Points


