background image

Deploy the ExtraHop Discover 3000, 6000, or 8000 Appliances    3

10. Repeat steps 7-9 for each remaining digit you want to change.

11. Press the left arrow button to navigate to the up arrow   on the display and press the select button.

12. On the Save screen, select 

Yes

 and then press the select button.

13. Wait a moment to be redirected to the Net screen. Repeat the actions above to set the mask, gateway,

and up to two DNS servers.

14. Optional: Configure the iDRAC DHCP, IP, mask, gateway, and DNS in the same manner as the IP

address.

Configure the system time

The default time server setting is 

pool.ntp.org

. If you want to maintain the default setting, skip this

procedure and go to the next section.

1.

In the Appliance Settings section, click 

System Time

.

2.

Click 

Configure Time

.

3.

Click the Time Zone drop-down list and select a time zone.

4.

Click 

Save and Continue

.

5.

On the Time Setup page, select one of the following options:

Set time manually

Note: You cannot manually set the time if the Discover appliance is managed by a

Command appliance.

Set time with NTP server

6.

Select the 

Set time with NTP server

 radio button, then click 

Select

.

The 

pool.ntp.org

 public time server appears in the Time Server #1 field by default.

7.

Type the IP address or fully qualified domain name (FQDN) for the time servers in the Time Server
fields. You can add a maximum of nine time servers.

Tip: After adding the fifth time server, click 

Add Server

 to display up to four additional time

server fields.

8.

Click 

Save

, and then click 

Done

.

The NTP Status table displays a list of NTP servers that keep the system clock in sync. To sync the current
system time a remote server, click the 

Sync Now

 button.

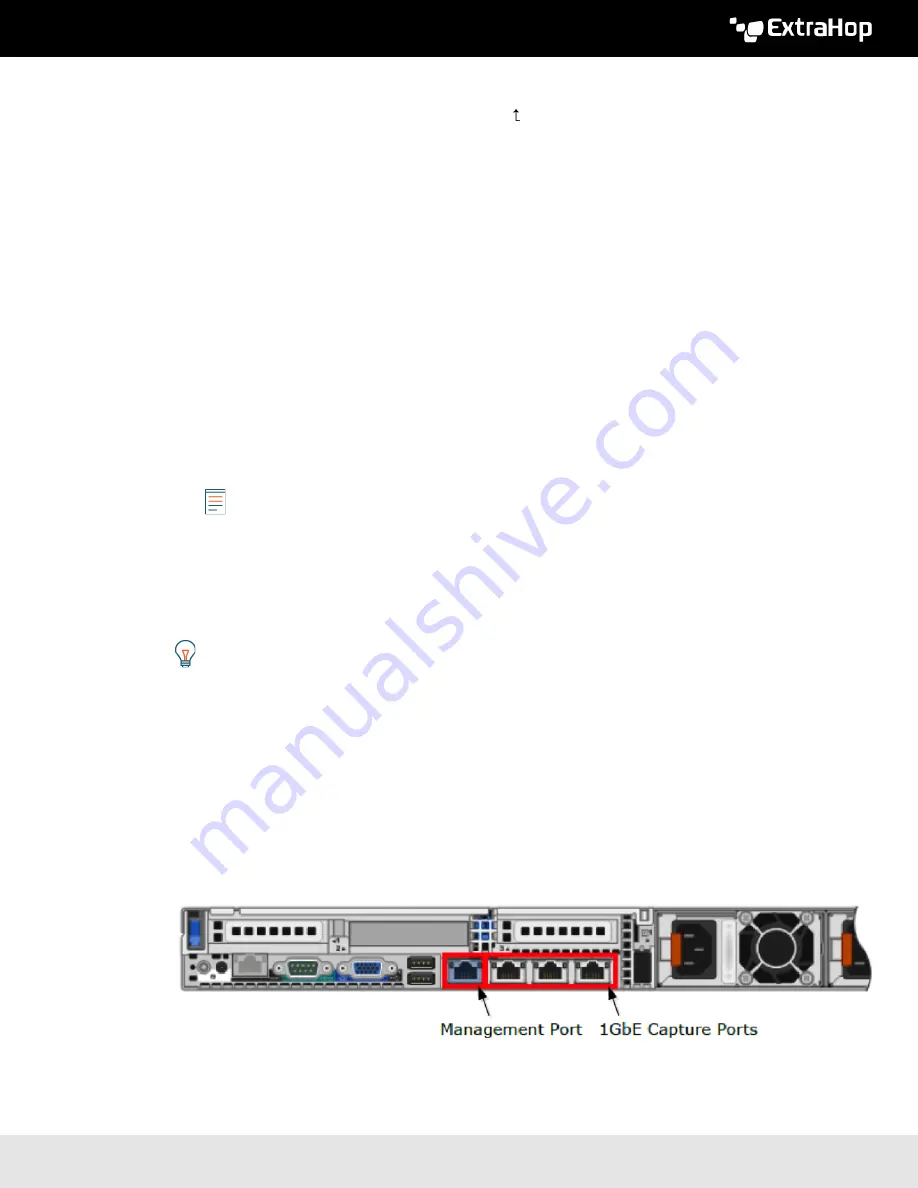
Connect the monitoring port

Use a network patch cable to connect the monitoring port on the ExtraHop appliance to a network tap
or mirror port on the switch.

Refer to the following diagrams.

EH3000

Summary of Contents for Discover 3000

Page 1: ...ce and 750W of power Network Access Four 10 100 1000 BASE T network ports and two 10G BASE SR ports Install the Discover appliance To install the Discover appliance complete the following steps 1 Rack Mount the Discover appliance Install the Discover appliance in your data center using the included rack mounting kit which supports most four post racks with either round or square holes 2 Connect Po...

Page 2: ... running_config save Would you like to write configuration changes to default config Y n y extrahop config After you assign a static IP address the IP address appears on the LCD at the front of the appliance Configure a static IP address through the front panel Complete the following steps to manually configure an IP address through the front panel LCD controls 1 Make sure that the default managem...

Page 3: ...Click Save and Continue 5 On the Time Setup page select one of the following options Set time manually Note You cannot manually set the time if the Discover appliance is managed by a Command appliance Set time with NTP server 6 Select the Set time with NTP server radio button then click Select The pool ntp org public time server appears in the Time Server 1 field by default 7 Type the IP address o...

Page 4: ...rts EH6000 8000 only On the EH6000 8000 the 10GbE ports support SFP SR fiber modules In certain circumstances you might want to configure the additional 10 100 1000 BASE T ports labeled Gb2 Gb3 and Gb4 on the Discover appliance for monitoring instead of the 10G BASE SR ports The Gb1 port is a dedicated management interface and cannot be configured for monitoring Depending on your license the Gb3 a...

Page 5: ...re interface 1 in the Admin UI 1 In the Interface 1 section click the Change button 2 Click the Interface Mode drop down list select Management Port change the other settings as needed and click Save For more information about throughput refer to the Connectivity section in the Admin UI Guide To configure interface 1 in the Admin UI enter the following commands extrahop configure extrahop config i...

Reviews: