DIVINA-DIVINA STEEL-DIVINA PLUS
ISTRUZIONI MONTAGGIO PIASTRELLE DIVINA E DIVINA PLUS
ASSEMBLY INSTRUCTIONS FOR DIVINA AND DIVINA PLUS TILES
INSTRUCTIONS DE MONTAGE DES CARREAUX DIVINA ET DIVINA PLUS
MONTAGEANLEITUNG FÜR DIE ABDECKPLATTEN BEI DIVINA UND DIVINA PLUS
fi gura
1
fi gura
2
fi gura
3
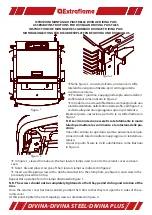
Nella fi gura 1, con vista dall’alto, si notano le 4 staff e
laterali che vengono utilizzate per il centraggio della
copertura ceramica.
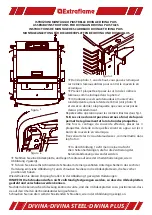
Prendere 1 piastrina e appoggiarla sopra ad una delle 4
staff e laterali come indicato in fi gura 2.
Introdurre una vite autofi lettante accompagnata da una
rondella dentellata nella feritoia della staff a, vedi fi gura 3, e
avvitarla alla piastrina appoggiata sopra in precedenza.
Ripetere questa operazione per tutte le 4 staff e illustrate in
fi gura 1.
N.B. Le viti non devono essere fi ssate totalmente in modo
tale da permettere lo scorrimento e la rotazione delle pia-
strine.
Una volta centrata la copertura ceramica posizionare le 4 pia-
strine in modo tale da risultare in appoggio sui 4 lati della ce-
ramica.
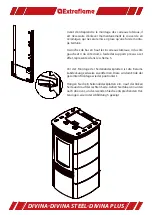
A questo punto fi ssare le 4 viti autofi lettanti come illustrato
in fi gura 4.
In fi gure 1, viewed from above, the four lateral clamps used to centre the ceramic cover can been
seen.
Take 1 tile and place it on one of the 4 lateral clamps as indicated in fi gure 2.
Insert a self-tapping screw with a notched washer into the clamp hole, see fi gure 3, and screw in the
previously placed tile on top.
Repeat this operation for all 4 clamps illustrated in fi gure 1.
N.B. The screws should not be completely tightened so that they permit sliding and rotation of the
tiles.
Once the ceramic cover has been centred, position the 4 tiles so that they rest upon the 4 sides of the ce-
ramic cover.
At this point, tighten the 4 self-tapping screws as illustrated in fi gure 4.


