background image

Legacy SPP/EPP/ECP PCI Card


2


Since  this  card  provides  legacy  parallel  port(s)  instead  of 
plug-and-play

s, its I/O port address won

t be assigned by the system 

automatically.  Instead,  it  needs  to  be  set  by  jumpers.  Please  move 
the  jumpers  (JP1  for  Port  1  and  JP2  for  Port  2)  to  the  designated 
address  shown  by  the  silkscreen  printing  next  to  the  jumper(s).  Then 
you need to do some installations manually to tell Windows where the 
legacy parallel  port  address is,  please  refer  to next  section for  more 
detail of the detail software installation.


Note:

  Please  verify  your  motherboard  BIOS

s  settings  to  prevent 

from  using  the  same  I/O  port  address  as  this  card,  otherwise  it  will 
cause a system resource conflicting problem. 


JP1 (for P1) 

JP2(for P2) 

Description 


I/O Port Address at 378 

(Default) 


I/O Port Address at 278 


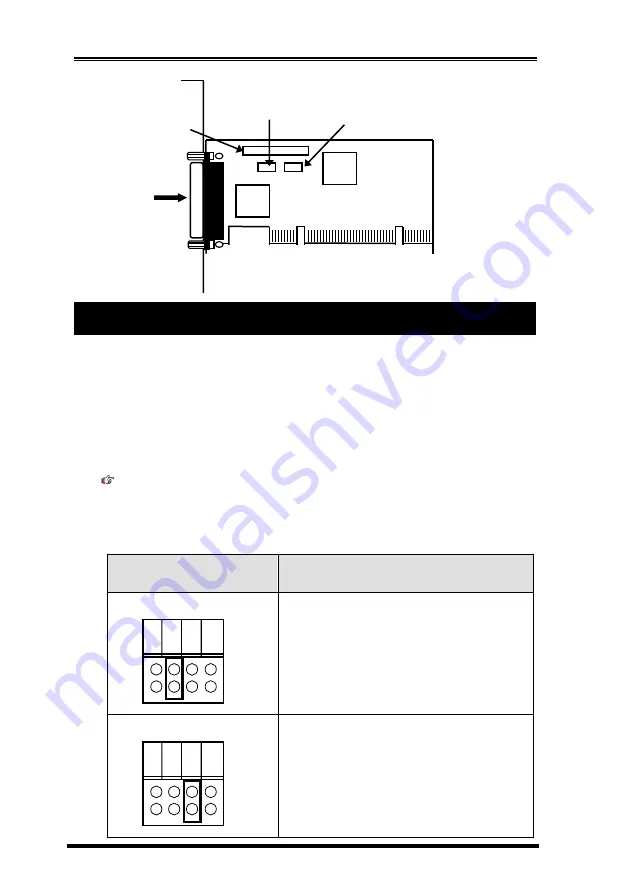
J1: Parallel 
Port 1 (P1) 

External 
Connector 

JP1: P1 Parallel Port 
Address Selector 

JP2: P2 Parallel Port 

Address Selector 

J2: Parallel Port 2 
(P2) Connector 
(Requires a DB25F 
Flat Cable) 

3. Selecting I/O Port Address 

27

8


DI

S


37

8


3BC


27

8


DI

S


37

8


3BC


Summary of Contents for EX-41021

Page 1: ...4 specifications Features Supports 1P or 2P SPP ECP EPP Parallel Port s over PCI Slot Supports PCI Bus Specifications 2 1 or above Selectable Legacy I O Port Address at 3BC 378 or 278 Provides one DB2...

Page 2: ...he legacy parallel port address is please refer to next section for more detail of the detail software installation Note Please verify your motherboard BIOS s settings to prevent from using the same I...

Page 3: ...the card indeed is a Legacy Parallel Card like ISA card You need to add it to Windows otherwise it won t function For the dual port model you need to do it twice for both parallel ports The installat...

Page 4: ...Legacy SPP EPP ECP PCI Card 4 2 Click Device Manager then choose Action select Add legacy hardware 3 With Add Hardware Wizard dialog box click Next to continue...

Page 5: ...Legacy SPP EPP ECP PCI Card 5 4 Click Install the hardware that I manually select from a list Advanced then click Next 5 Select Ports COM LPT then click Next...

Page 6: ...Legacy SPP EPP ECP PCI Card 6 6 Choose ECP Printer Port device driver then click Next 7 Click Next to proceed with ECP Port driver installation...

Page 7: ...ardware Wizard 9 The new created ECP Printer Port LPT3 was shown in the Device Manager but there is an exclamation mark next to it It is not usable until we changed its resource setting to match up wi...

Page 8: ...SPP EPP ECP PCI Card 8 To change its resource settings right click ECP Printer Port LPT3 choose Properties 10 In the ECP Printer LPT3 Properties dialog box click Resource tab then Set Configuration Ma...

Page 9: ...oose the I O address range please make sure it is the same as your jumper settings if the jumper was set at 3BC the factory default was 378 in this case you need to choose 0378 037A instead then the c...

Page 10: ...Legacy SPP EPP ECP PCI Card 10 window to see if there is any conflict If the resource was in conflict with other hardware the ECP Printer won t function correctly 13 Click OK to continue...

Page 11: ...Legacy SPP EPP ECP PCI Card 11 14 Click OK to complete the installation II Windows Vista XP 2003 2000 and 98 Parallel Port Installation...

Page 12: ...Legacy SPP EPP ECP PCI Card 12 1 Go to Control Panel click Add Hardware icon 2 With the Add Hardware Wizard click Next 3 Click Yes I have already connected the hardware then Next...

Page 13: ...Legacy SPP EPP ECP PCI Card 13 4 Click Add a new hardware device then Next 5 Click Install the hardware that I manually select from a list Advanced then Next...

Page 14: ...Legacy SPP EPP ECP PCI Card 14 6 Click Ports COM LPT then Next 7 To select device type click ECP Printer Port then Next...

Page 15: ...Legacy SPP EPP ECP PCI Card 15 8 Click Next to start the ECP Printer Port installation 9 Click Finish to complete creating the ECP Printer Port...

Page 16: ...0 The new created ECP Printer Port LPT3 is not ready to use for the time being because there is an exclamation mark next to it Right click the ECP Printer icon choose Properties 11 Click Resource tab...

Page 17: ...12 Click I O Range then Change Setting 13 Select the I O address that matches up with your jumper settings the following example is 3BC however the factory default settings is 378 if it is the case th...

Page 18: ...gs 14 Click Yes to reboot your system for it to take effect 15 After system reboot you can go to Device Manager again to check the status If there is no exclamation mark next to ECP Printer Port LPT3...

Page 19: ...Legacy SPP EPP ECP PCI Card 19...

Page 20: ...d 20 I Uninstalling Windows 7 and 2008 drivers Click Device Manager Ports COM LPT Right click the ECP Printer Port LPT3 Uninstall II To uninstall Windows Vista XP 2003 2000 and 98 drivers 4 Uninstalli...

Page 21: ...Legacy SPP EPP ECP PCI Card 21 Click Device Manager Ports COM LPT Right click the ECP Printer Port LPT3 Uninstall...

Reviews: