background image

31 

and 7 amps or less to avoid damaging the battery (see chart below for 
recommended charger settings). 

Voltage 

Reading 

Percent 

Charge 

Maximum  

Charger Settings 

Charging Interval 

12.6 or greater  100% 

16 volts/7 amps 

No Charging Required

12.4 – 12.6 

75 – 100% 

16 volts/7 amps 

30 Minutes 

12.2 – 12.4  

50 – 75% 

16 volts/7 amps 

1 Hour 

12.0 – 12.2 

25 – 50% 

14.4 volts/4 amps 

2 Hours 

11.7 – 12.0 

0 – 25% 

14.4 volts/4 amps 

3 Hours 

11.7 or less 

0% 

14.4 volts/2 amps 

6 Hours or More 

4.1.21  Change fuel filter:  


Service Interval: 400 hrs. 

a)


A fuel filter is installed between the fuel tank and the fuel pump.  Replace 
when necessary 

Replacement Filters 

Kubota

 P/N 12581-43012 

4.1.22 Wheel hub - slotted nut torque specification. 


Service Interval: 500 hrs


When tightening the slotted nut on the wheel motor tapered shaft: 


a) 

Torque the slotted nut to 125 ft. lbs (169 N-M). 

b) 

Check distance from bottom of slot in nut to inside edge of hole. Two 
threads (0.1”) or less should be showing. 

c) 

If more than two threads (0.1”) are showing remove nut and install washer 
(PN 1-523157) between hub and nut. 

d) 

Torque the slotted nut to 125 ft. lbs (169 N-m). 

e) 

Then tighten nut until the next set of slots line up with the cross hole in shaft. 


f) 

Replace cotter pin. 

NOTE:  Do not use antiseize on wheel hub. 

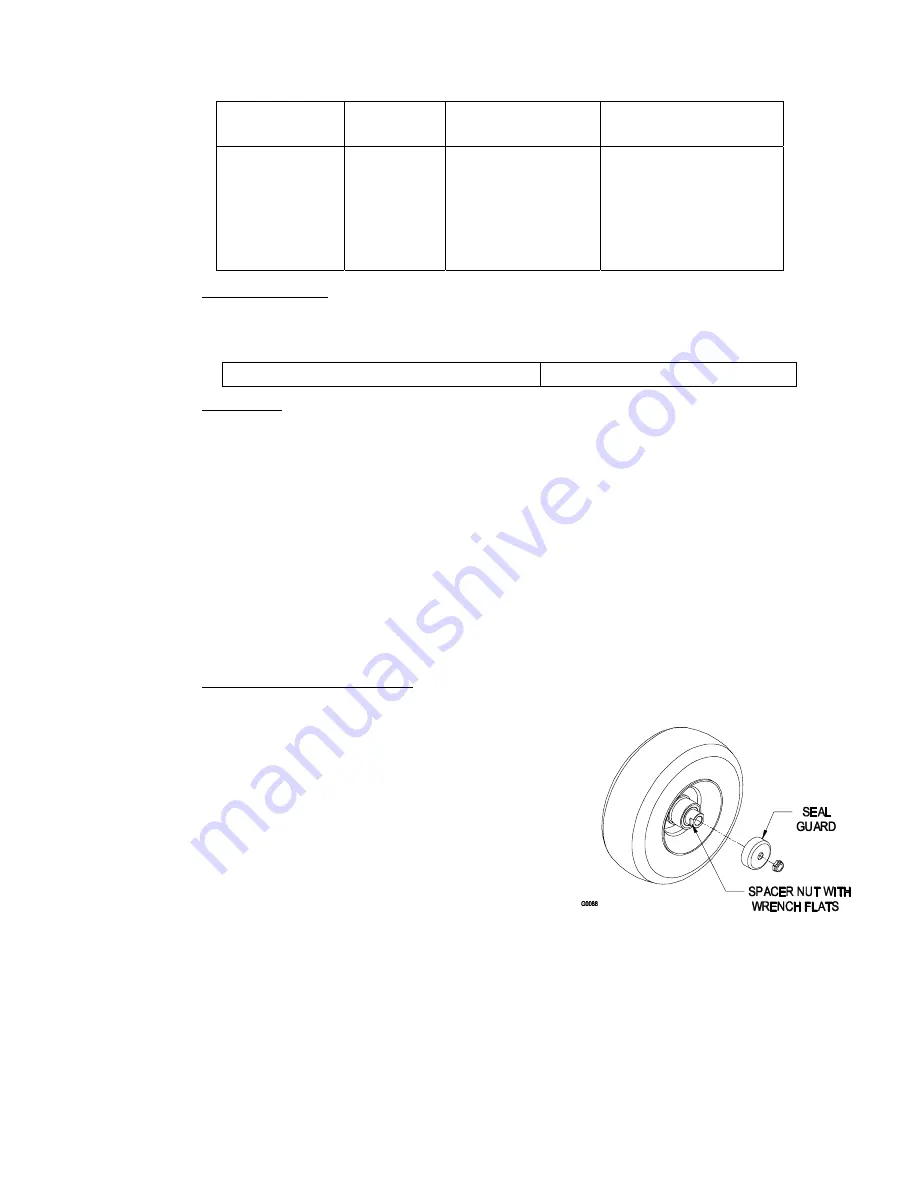
4.1.23  Lubricate caster wheel hubs: 


Service Interval:  Once Yearly 

a) 

Stop engine, wait for all moving parts to 
stop, and remove key.  Engage parking 
brake. 

b) 

Remove caster wheel from caster forks. 

c) 

Remove seal guards from the wheel hub. 

d) 

Remove one of the spacer nuts from the 
axle assembly in the caster wheel. Note 
that thread locking adhesive has been 
applied to lock the spacer nuts to the 
axle.  Remove the axle (with the other 
spacer nut still assembled to it) from the 
wheel assembly. 

e) 

Pry out seals, and inspect bearings for 
wear or damage and replace if necessary. 

f) 

Pack the bearings with a NGLI grade #1 multi-purpose grease. 

g) 

Insert (1) bearing, (1) new seal into the wheel.  

NOTE

: Seals (Exmark PN 103-0063) must be replaced. 

h) 

If the axle assembly has had both spacer nuts removed (or broken loose), 
apply a thread locking adhesive to (1) spacer nut and thread onto the axle 

FIGURE 4 

For Exmark Mower Parts Call 606-678-9623 or 606-561-4983

www.mymowerparts.com

Summary of Contents for Laser Z XS

Page 1: ...f you need to order replacement parts from your dealer always give the model number and serial number of your mower as well as the part number description and quantity of the part needed The Serial No plate is located on the right side of the console For ease of ordering and reference we suggest that you record the information requested in the following identification table Place Model No and Seri...

Page 2: ... animals WHAT CAN HAPPEN Failure to use caution may cause serious injury or illness HOW TO AVOID THE HAZARD Avoid prolonged breathing of vapors Keep face away from nozzle and gas tank container opening Keep away from eyes and skin Never siphon by mouth The enclosed Engine Owner s Manual is supplied for information regarding The U S Environmental Protection Agency EPA and the California Emission Co...

Page 3: ... Exmark by 3 00 p m central time the Distributor pays for the part and freight 3 Exmark being unable to ship the part and the Exmark parts order is received by 3 00 p m central time Exmark pays for the part and freight 4 If the part does not arrive overnight due to the shipper UPS the shipper pays for the freight and Exmark pays for the part The following restrictions apply The Exmark Parts Plus P...

Page 4: ...mote safe operation If additional information is needed or should you require trained mechanic service contact your authorized Exmark equipment dealer or distributor All Exmark equipment dealers and distributors are kept informed of the latest methods of servicing and are equipped to provide prompt and efficient service in the field or at their service stations They carry ample stock of service pa...

Page 5: ...ound Drive System 13 2 9 Tires Wheels 13 2 10 Cutting Deck 13 14 2 11 Dimensions 14 2 12 Torque Requirements 14 3 OPERATION INSTRUCTIONS 3 1 Controls 15 18 3 2 Pre Start 18 3 3 Operating Instructions 18 20 3 4 Transporting 20 21 4 MAINTENANCE ADJUSTMENTS 4 1 Periodic Maintenance 22 34 4 2 Adjustments 34 41 5 WASTE DISPOSAL 5 1 Motor Oil Disposal 42 5 2 Battery Disposal 42 6 TROUBLE SHOOTING 42 44 ...

Page 6: ... equipment and teach this regard to all who operate this unit 1 2 2 Read the instructions carefully Familiarize yourself with the controls and the proper use of the equipment If the operator s or mechanic s can not read English it is the owner s responsibility to explain this material to them 1 2 3 Do not allow operation of this machine by untrained personnel Never allow children teenagers or peop...

Page 7: ... barefoot or when wearing open sandals 1 3 4 Thoroughly inspect the area where the equipment is to be used and remove all stones sticks wires bones and other foreign objects which may damage the equipment or cause personal injury to the operator or bystanders WARNING POTENTIAL HAZARD Engine exhaust contains carbon monoxide which is an odorless deadly poison WHAT CAN HAPPEN Carbon monoxide can kill...

Page 8: ...fuel before starting the engine Never remove the cap of the fuel tank or add fuel when engine is running or when the engine is hot Never fill the fuel tank so that the fuel level rises above a level that is 1 2 below the bottom of the filler neck to allow for fuel expansion and prevent fuel spillage If fuel is spilled DO NOT attempt to start the engine Move away from the area of the spill and avoi...

Page 9: ... and engine area WARNING POTENTIAL HAZARD Hands feet hair clothing or accessories can become entangled in rotating parts WHAT CAN HAPPEN Contact with rotating parts can cause traumatic amputation or severe lacerations HOW TO AVOID THE HAZARD Do not operate the machine without guards shields and safety devices in place and working properly Keep hands feet hair jewelry or clothing away from rotating...

Page 10: ...eater care is needed as the slope increases Always avoid sudden starting or stopping on a slope If tires lose traction disengage the blades and proceed slowly off the slope Avoid sudden starts when mowing uphill Mower may tip backwards Be aware that loss of traction may occur going downhill Weight transfer to the front wheels may cause drive wheels to slip and cause loss of braking and steering Wa...

Page 11: ...r than grass and when transportingthe mower to and from the area to be mowed 1 4 9 Never operate the mower with damaged guards shields or covers Always have safety shields guards switches and other devices in place and in proper working condition 1 4 10 DO NOT change the engine governor settings or overspeed the engine Operating an engine at excessive speed may increase the hazard of personal inju...

Page 12: ...INTENANCE AND STORAGE 1 5 1 For engine maintenance follow the engine manufacturer s recommendations precisely as stated in the engine manual 1 5 2 Disconnect the battery cable from the negative battery post when the unit will be allowed to sit for more than 30 days without use 1 5 3 Allowing batteries to stand for an extended period of time without recharging them will result in reduced performanc...

Page 13: ...ses and lines are in good condition an all hydraulic connections and fittings are tight before applying pressure to hydraulic system Keep body and hands away from pinhole leaks or nozzles that eject high pressure hydraulic fluid Use cardboard or paper not your hands to find hydraulic leaks Safely relieve all pressure in the hydraulic system by placing the motion control levers in neutral and shutt...

Page 14: ...pose the adhesive surface Apply only to a clean dry surface Smooth to remove any air bubbles 1 6 6 Familiarize yourself with the following safety signs and instruction labels They are critical to the safe operation of your Exmark commercial mower PART NO 109 3148 LOCATION LH Side on Top Front of Mower Deck PART NO 109 2264 LOCATION On Main Frame Beneath Seat PART NO 98 5954 LOCATION Under Mower De...

Page 15: ...T NO 103 0261 LOCATION RH Front of Console PART NO 109 2358 LOCATION Top Front of RH Fuel Tank PART NO 109 3067 LOCATION Right of Throttle Control on RH Fuel Tank PART NO 109 2263 LOCATION Rear of Unit Near Hood Prop Rod PART NO 109 3066 LOCATION Top Front RH Fuel Tank PART NO 1 523552 LOCATION Top of Hydraulic Reservoir PART NO 19426 87903 LOCATION RH Air Cleaner Bracket PART NO 19426 87881 LOCAT...

Page 16: ...TION Top of Console PART NO 109 1399 LOCATION Front Center on Top of Mower Deck PART NO 109 0872 LOCATION Top of Mower Deck Front Left Edge near Area shown on Decal PART NO 109 2219 LOCATION Left of Center on Mower Deck Under Floor Pan For Exmark Mower Parts Call 606 678 9623 or 606 561 4983 www mymowerparts com ...

Page 17: ...n PTO is engaged brake is disengaged or motion control levers are moved in or engine will stop Engine will stop if either the left the right or both levers are moved from neutral lock position while brake is engaged 2 5 COOLING SYSTEM 2 5 1 Fan Electric with continuous operation with engine running 2 5 2 Coolant Liquid 50 50 mix of DexCool extended life antifreeze and water 2 5 3 Coolant Capacity ...

Page 18: ... not running 2 9 TIRES WHEELS Drive Front Caster Pneumatic Air Filled Semi Pneumatic Quantity 2 2 Tread Multi Trac C S Smooth Size 26 x 12 00 12 13 x 6 50 6 Ply Rating 4 Pressure 10 psi 69 kPa 2 10 CUTTING DECK 2 10 1 Cutting Width 60 in 152 4 cm 66 in 167 6 cm 72 in 182 9 cm 2 10 2 Discharge Side 2 10 3 Blade Size 3 ea 60 Deck 20 75 in 52 7 cm 66 Deck 22 75 in 57 8 cm 72 Deck 24 75 in 62 9 cm 2 1...

Page 19: ... 66 Deck 45 9 in 116 6 cm 42 3 in 107 4 cm 72 Deck 45 9 in 116 6 cm 47 3 in 120 1 cm 2 11 5 Wheel Base center of caster to center of drive tire 60 Deck 56 0 in 142 2 cm 66 Deck 57 6 in 146 3 cm 72 Deck 60 2 in 152 9 cm 2 11 6 Curb Weight 60 Deck 1545 lbs 701 kg 66 Deck 1595 lbs 723 kg 72 Deck 1645 lbs 746 kg 2 12 TORQUE REQUIREMENTS Bolt Location Torque Cutter Housing Spindle Nut 160 185 ft lbs 21...

Page 20: ...vement of the left lever forward will cause the left drive wheel to rotate in a forward direction Movement of the right lever forward will cause the right drive wheel to rotate in a forward direction To stop forward travel pull the levers back to the neutral position To turn left while moving forward move the left lever back toward neutral to slow the left drive wheel To turn right while moving fo...

Page 21: ... linkage adjustment 3 1 4 Brake Lever Located on left side of unit just to the front of the console The brake lever engages a parking brake on the drive wheels Pull the lever up and rearward to engage the brake Push the lever forward and down to disengage the brake The unit must be tied down and brake engaged when transporting 3 1 5 Fuel Shut Off Valve Located directly below right side of console ...

Page 22: ... to starting engine GLOW PLUG CHART Ambient Temperature Hold Glow Plugs On Above 50 F 10 C NO NEED 50 F 10 C to 23 F 5 C Approx 5 seconds Below 23 F 5 C Approx 10 seconds Limit of continuous use 20 seconds NOTE The glow plug light located near the glow plug switch will illuminate when the switch is depressed The glow plug light indicates the glow plugs are preheating the combustion chamber 3 1 14 ...

Page 23: ...use only clean fresh diesel fuel with a cetane rating of 40 or higher NOTE do not use kerosene or gasoline instead of diesel fuel Failure to observe this will damage the engine DO NOT add oil to fuel DO NOT overfill fuel tank Never fill the fuel tank so that the fuel level rises above a level that is 1 2 below the bottom of the filler neck to allow for fuel expansion and prevent fuel spillage 3 2 ...

Page 24: ...can cause serious injury or kill you HOW TO AVOID THE HAZARD DO NOT put hands or feet under the mower or mower deck when the blades are engaged DANGER POTENTIAL HAZARD An uncovered discharge opening will allow objects to be thrown in an operator s or bystander s direction Also contact with the blade could occur WHAT CAN HAPPEN Thrown objects or blade contact can cause serious injury or death HOW T...

Page 25: ... Use a heavy duty trailer or truck to transport the machine Lock brake and block wheels Securely fasten the machine to the trailer or truck with straps chains cable or ropes Be sure that the trailer or truck has all necessary lighting and marking as required by law Secure a trailer with a safety chain CAUTION POTENTIAL HAZARD This unit does not have proper turn signals lights reflective markings o...

Page 26: ...the tractor frame extends back between the rear wheels and serves as a stop for tipping backward Having a full width ramp provides a surface for the frame members to contact if the unit starts to tip backward If it is not possible to use one full width ramp use enough individual ramps to simulate a full width continuous ramp Ramp should be long enough so that the angles between the ramp and the gr...

Page 27: ...eck rollover protection system roll bar pins Service Interval Daily a Make sure latch pin and hair pin are fully installed and lanyard is in good condition b Check seat belt for cuts or wear Replace if necessary 4 1 2 Check for loose hardware Service Interval Daily a Stop engine wait for all moving parts to stop and remove key Engage parking brake b Visually inspect machine for any loose hardware ...

Page 28: ...us WHAT CAN HAPPEN Failure to use all original components and assembled as shown could allow a blade or blade component to be thrown out from under the deck resulting in serious personal injury or death HOW TO AVOID THE HAZARD Always install the original Exmark blades blade bushings spring disc washers and blade bolts as shown 4 1 4 Check engine oil level Service Interval Daily a Stop engine and w...

Page 29: ... Make sure unit is on a level surface b Check with engine cold c View coolant level in overflow bottle on the left side of the engine compartment Coolant level should be at the indicator line on the overflow bottle d If the coolant level is low open hood or raise radiator remove the cap to the overflow bottle and fill to the indicator line Units should only be filled with a 50 50 mix of Dex Cool e...

Page 30: ...vers in starter must not crank b Check the kill circuits Run engine at one third throttle disengage parking brake and raise off of seat but do not get off of machine engine must stop after approx 1 2 second has elapsed seat switch circuit has a time delay switch to prevent cut outs on rough terrain Run engine at one third throttle engage PTO and raise off of seat but do not get off of machine engi...

Page 31: ...ck Service Interval Daily a Stop engine wait for all moving parts to stop and remove key Engage parking brake b Raise deck to the transport 5 12 7 cm cutting height position Lift the front of unit and support unit using jack stands or equivalent support CAUTION POTENTIAL HAZARD Raising the mower deck for service or maintenance relying solely on mechanical or hydraulic jacks could be dangerous WHAT...

Page 32: ...rough 4 2 5 for belt adjustment 4 1 11 Check hydraulic oil level Service Interval 40 hrs a Stop engine and wait for all moving parts to stop b Clean area around hydraulic reservoir cap and remove cap Oil level should be to the top of the baffle inside the tank If not add oil Use only Mobil 1 15W 50 synthetic motor oil Replace hydraulic reservoir cap and tighten until snug Do not over tighten NOTE ...

Page 33: ... Interval 50 hrs Normal Service Interval 100 hrs Replacement Interval 600 hrs More often under severe conditions See Engine manual for additional information a Stop engine wait for all moving parts to stop and remove key Engage parking brake b Unhook 2 air filter canister latches to gain access to the air cleaner element c Remove air cleaner canister cover and remove outer element d Check the cond...

Page 34: ...l DO NOT overfill j Remove wire or tie wrap from belt spans k Start the engine at idle for 5 minutes Stop engine and wait three minutes then check the oil level If required add oil to bring level to the FULL mark on the dipstick DO NOT overfill l Check for leaks including around the oil filter 4 1 15 Drain fuel filter Service Interval 100 hrs a Stop engine wait for all moving parts to stop and rem...

Page 35: ...r equivalent support just high enough to allow drive wheels to turn freely g Start engine and move throttle control to full throttle position Move the speed control levers to the full forward position and run for several minutes Shut down machine and recheck oil level Do not change hydraulic system oil more frequently than recommended except for what can be drained when changing filter unless it i...

Page 36: ...and install washer PN 1 523157 between hub and nut d Torque the slotted nut to 125 ft lbs 169 N m e Then tighten nut until the next set of slots line up with the cross hole in shaft f Replace cotter pin NOTE Do not use antiseize on wheel hub 4 1 23 Lubricate caster wheel hubs Service Interval Once Yearly a Stop engine wait for all moving parts to stop and remove key Engage parking brake b Remove c...

Page 37: ...tment often Spin the caster tire The tire should not spin freely more than 1 or 2 revolutions or have any side play If the wheel spins freely adjust torque on spacer nut until there is a slight amount of drag Re apply threadlocking adhesive 4 1 24 Change engine coolant Service Interval 4 years 4000 hours Dex Cool extended life coolant orange color It is recommended to service at whichever interval...

Page 38: ...lant as specified in Section 4 1 24 allowing some room approximately 1 2 12 7 mm for expansion Add 50 50 coolant mix to overflow bottle on the left side of the engine as required to bring the level up to the indicator line on the bottle WARNING POTENTIAL HAZARD Engine compartment contains open belt drives and fans Rotating components can cause injury WHAT CAN HAPPEN Fingers hands loose clothing or...

Page 39: ...ft d Caster wheel spacer nuts e Fuel tank bulkhead fitting nuts f Bolts retaining stub shaft to engine flywheel Adhesives such as Loctite RC 609 or RC 680 or Fel Pro Pro Lock Retaining I or Retaining II are used on the following a Fuel tank studs where studs are inserted into tank 4 1 27 Mobil HTS grease or food grade antiseize is used in the following locations a Between the cutter housing spindl...

Page 40: ... Conditions Place rollers in one of the positions shown in Figure 10 Rollers will maintain 3 4 in 19 mm clearance to the ground to minimize gouging and roller wear or damage For Maximum Deck Flotation place rollers one hole position lower Rollers should maintain 1 4 in 6 4 mm clearance to ground DO NOT adjust rollers to support the deck Be sure roller bolts and nuts are installed with the spring d...

Page 41: ...each chain Tighten the jam nuts Tighten the chain bolts in the deck lift arms making sure they don t move while tightening i Loosen the four 4 nuts which secure the front swivels two per side until the front chains are loose and front of deck is supported by the 3 4 19 mm block Do not loosen the front chain hardware j On left side adjust front swivel using the locking nut behind the swivel until t...

Page 42: ...tion the center of the spring loaded pulley between the alignment holes 4 2 5 Deck Belt Tension a The deck belt is tensioned by a self tensioning idler no adjustment is necessary 4 2 6 Alternator Belt Tension a Stop engine wait for all moving parts to stop and remove key Engage parking brake b Tilt seat and remove air deflector panel c To tighten alternator belt loosen both upper and lower alterna...

Page 43: ... jam nut above the trunion roller Adjust the nyloc nut under the trunion roller until distance listed above exists between the spring retainer bracket and the adjacent nyloc nut Tighten the jam nut above the trunion roller g If a the correct gap can no longer be achieved because there is no clearance between nyloc nut below the spring and the jam nut above the trunion or there are no threads left ...

Page 44: ...d loosen the nut against the yoke and while applying slight rearward pressure on the motion control lever turn the head of the adjustment bolt in the appropriate direction until lever is centered keeping rearward pressure on the lever will keep the pin at the end of the slot and allow the adjustment bolt to move the lever to the appropriate position Tighten lock nut f Repeat on opposite side of un...

Page 45: ...e the hydraulic oil reservoir Temporarily install a jumper wire across the terminals in the connector of the wiring harness d Run the unit at least 5 minutes with the drive levers at full forward speed to bring hydraulic system oil up to operating temperature e Loosen lock nuts from the ball joints at each end of the RH pump control linkage See Figure 13 NOTE The nut to the front of the unit on th...

Page 46: ...on until the wheels slightly creep in reverse Move the motion control lever to the reverse position and while applying slight pressure to the lever allow the reverse indicator spring to bring the levers back to neutral The wheel must stop turning or slightly creep in reverse See Figure 13 k Shut off unit Remove jumper wire from wire harness connector and plug connector into seat switch 4 2 12 Moti...

Page 47: ...a local certified recycling center If no local recycling is available return the battery to any certified battery reseller 6 TROUBLE SHOOTING 6 1 MOWER PULLS LEFT OR RIGHT WITH LEVERS FULLY FORWARD a Check air pressure in the drive tires 10 psi Semi pneumatic casters tires do not require inflation b Refer to Tracking Adjustment Section 3 1 3 c Check reverse indicator and motion control linkage adj...

Page 48: ...ists some of the common causes of trouble Do not attempt to service or replace major items or any items that call for special timing or adjustments procedures such as valves governor etc Have this work done by your Engine Service Dealer ENGINE TROUBLESHOOTING TABLE PROBLEM NO FUEL IMPROPER FUEL WATER OR DIRT IN FUEL LINE DIRTY AIR FILTER ENGINE OVERLOADED BLOCKED FUEL FILTER INCORRECT OIL LEVEL IN...

Page 49: ...e If it does turn the unit off and allow the engine and engine components to cool 3 Check the coolant level If necessary fill with coolant as described in Section 4 1 5 4 Remove any debris on or around the radiator that may restrict airflow 5 Check to see if the water pump alternator belt is intact If belt is missing do not run unit as unit can overheat and damage the engine See Engine Service Dea...

Page 50: ...45 7 ELECTRICAL DIAGRAM For Exmark Mower Parts Call 606 678 9623 or 606 561 4983 www mymowerparts com ...

Page 51: ...46 8 HYDRAULIC DIAGRAM For Exmark Mower Parts Call 606 678 9623 or 606 561 4983 www mymowerparts com ...

Page 52: ...s or with the assistance provided contact us at Exmark Customer Service Department The Exmark Warranty Company 2101 Ashland Avenue Beatrice NE 68310 402 223 6375 or service exmark com Owner s Responsibilities The Exmark turf equipment including any defective part must be returned to an authorized Exmark service dealer within the warranty period This warranty extends only to turf equipment operated...

Page 53: ...48 NOTES For Exmark Mower Parts Call 606 678 9623 or 606 561 4983 www mymowerparts com ...

Page 54: ...49 SERVICE RECORD Date Description of Work Done Service Done By For Exmark Mower Parts Call 606 678 9623 or 606 561 4983 www mymowerparts com ...

Page 55: ...50 For Exmark Mower Parts Call 606 678 9623 or 606 561 4983 www mymowerparts com ...

Page 56: ... GRASS CATCHER MICRO MULCH SYSTEM STEERABLE SULKY SULKY HITCH KIT TURF STRIPER STANDON WARNING The engine exhaust from this product contains chemicals known to the State of California to cause cancer birth defects or other reproductive harm MFG CO 2004 2006 EXMARK MFG CO INC PART NO 109 4126 REV A INDUSTRIAL PARK BOX 808 402 223 6300 BEATRICE NE 68310 FAX 402 223 5489 ALL RIGHTS RESERVED PRINTED I...

Reviews: