background image

Chapter 5   

Room Control, Weather, and Music

5-8

Life|point

®

 InTouch Phone User Guide

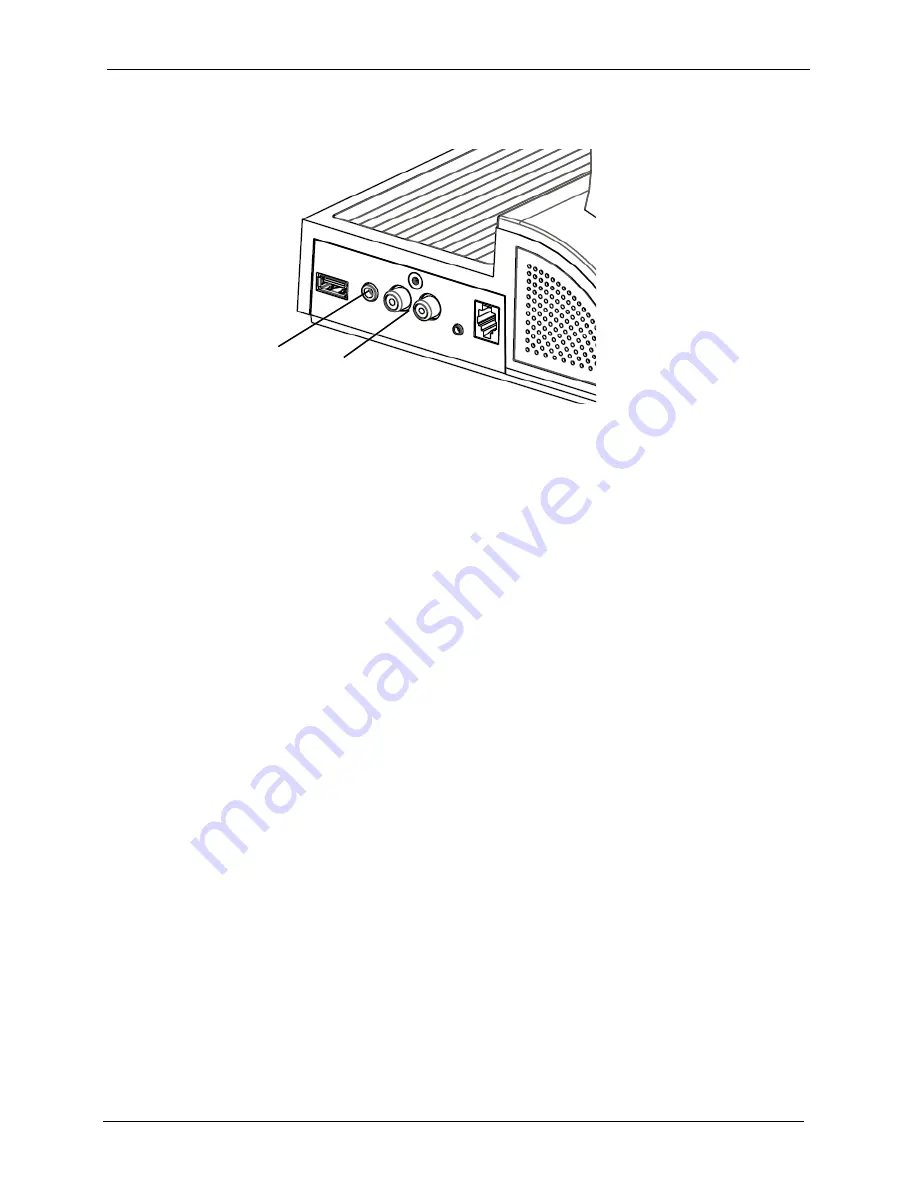
You can connect your music device to the side panel’s 3.5 mm or RCA audio inputs.


Side Panel Audio Connections

3.5 mm 

Audio 

Input

RCA 

Audio 

Inputs


To listen to your portable music device through the phone’s stereo speakers:

Connect the music device to the phone’s audio input with a 3.5 mm headphone cable or with the             

1. 

RCA audio inputs using a 3.5 mm-to-RCA cable.

From the main menu, select 

2. 

Music

.

Select 

3. 

My Device

, and adjust the portable device’s controls to enjoy your favorite music.

To control your music volume, adjust the volume controls on the portable music device.

4. 

Summary of Contents for Life point InTouch

Page 1: ...Life point InTouch Phone User Guide Cordless Handset Model Exceptional Innovation Manual Version Release 1 0 for The Cosmopolitan Implementation ...

Page 2: ...hen permitted shall bear this notice and the Exceptional Innovation LLC copyright notice As and when provided to any governmental entity government contractor or subcontractor subject to FARs this documentation is provided with RESTRICTED RIGHTS Third Party Software and Hardware Other product and company names or logos mentioned herein may be the trademarks of their respective owners Distribution ...

Page 3: ...7 Care and Maintenance 1 7 Protection from Impact 1 7 Cleaning 1 7 Technical Specifications 1 8 Important Safety Information 1 10 Safety Instructions 1 10 Regulatory Information 1 10 Warnings 1 11 Installation and Setup 2 1 Overview 2 1 Items Included with the Life point InTouch Phone 2 1 Items Required for Installation 2 1 Install a Cordless Life point InTouch Phone 2 2 Connect the phone to the n...

Page 4: ...erphone 3 6 Answering a Call with the Base Speakerphone 3 7 Recent Calls Menu 3 8 Viewing Recent Calls 3 8 Messages Menu 3 9 Voicemail Messages 3 9 Directory Menu 3 11 Placing a Call with an ADA Headset 3 12 Placing a Call with an ADA TTY Keyboard 3 13 Wake and Sleep 4 1 Overview 4 1 Wake and Sleep Menu 4 1 Wake Up Alarms 4 2 Set a Wake Up Alarm 4 2 Sounds Menu 4 2 TV Menu 4 3 Music Menu 4 4 Light...

Page 5: ... Forecast 5 5 Music 5 6 Music Menu Radio 5 6 Music Menu My Device 5 7 Charging USB Devices 6 1 Overview 6 1 Charging USB Devices 6 1 Standalone Charger 7 1 Overview 7 1 Charger and Power Supply 7 1 Charger Setup 7 2 Troubleshooting and Maintenance 8 1 Overview 8 1 Troubleshooting Chart 8 2 Returning Equipment for Repair Replacement 8 7 Handset Admin Menus 8 8 EI Website and Helpline 8 9 ...

Page 6: ...vi Life point InTouch Phone User Guide ...

Page 7: ...ety information About the Life point InTouch Phon e Unit Features and Connection s Cordless Handset Feature s User Interface Feature s Care and Maintenanc e Technical Specification s Important Safety Informatio n About the Life point InTouch Phone The Life point InTouch phone is a tabletop Voice Over Internet Protocol VoIP touch screen telephone for hospitality applications This stylish versatile ...

Page 8: ...ortable music devices and listen to music through the built in stereo speakers USB Port for connecting and charging USB devices The side panel has a USB port for charging USB devices Network Connections The rear of the base includes a POE enabled RJ45 jack for connecting the phone to the hotel network POE Ready The phone can be powered with power over Ethernet POE from a POE enabled hotel network ...

Page 9: ...touch screen display panel on the Base is tiltable and includes Raised buttons for Snooze Alarm OFF and Volume Up and Down Message indicator for incoming messages Light sensor for automatic display brightness Built in microphone Message Indicator Light Sensor Microphone Display Panel Features Snooze Alarm OFF Volume Up Down ...

Page 10: ...d with a straightened paper clip or other small shafted object Refer to the Troubleshooting chapter for information on the proper use of this switch DC Power Input The 48V DC power input jack accepts the barrel plug end of a 48 volt DC power supply not included with phone required for use with non POE networks RJ45 Ethernet Jack with POE This POE equipped RJ45 LAN jack is for connecting the phone ...

Page 11: ...mm Input 3 5 mm Audio Input USB Port RCA Audio Inputs USB Port USB port for charging USB devices or connecting a USB device for firmware upgrades 3 5 mm Stereo Audio Input 3 5 mm input for portable music devices to play music through the built in speakers RCA Stereo Audio Inputs RCA audio inputs for connecting portable music devices via RCA cables 2 5 mm Audio Jack 2 5 mm jack to connect ADA devic...

Page 12: ...ordless handset see diagram includes Full color LCD display Volume UP DOWN button Mute Hold Speaker numeric keypad and ten one touch dial buttons LED message and ringer indicator Speakerphone 3 7V rechargeable battery Numeric Keypad Volume UP DOWN Dial LCD Display Hold Mute Speaker One touch Dialing End Call Microphone Earpiece ...

Page 13: ... control Ability to listen to music through connected portable music devices Personalized room information Care and Maintenance Taking simple precautions and observing guidelines for care and maintenance will help ensure that the Life point InTouch phone remains in good operating condition Protection from Impact The LCD display screen on the Base is susceptible to damage from impact Place the phon...

Page 14: ...imum 48V DC 300 milliamps POE equipped LAN 10 100 Base T RJ45 Jack Optional PC Jack 10 100 Base T RJ45 Jack for connecting an External PC Side Panel Connections USB 2 0 1 1 For USB device charging 3 5 mm stereo audio input For connecting portable music devices 2 5 mm audio jack For connecting headset and TTY keyboard ADA RCA audio inputs 2 For connecting portable music devices Handset cord jack Ac...

Page 15: ...ns Speakerphone 3 7V Rechargeable Lithium Ion battery Talk Time on a single charge Up to 14 hours Standby Time on a single charge Up to 70 hours Range Approximately 100 feet Out of range alarm Battery charge indicator Weight 6 ounces Standalone Charger Vertical charging of cordless handset Time to fully charge 5 hours Blue LED charging indicator External Power Supply 5V DC 500ma Weight 8 ounces ...

Page 16: ...nit should be operated only from the type of power source indicated in the Technical Specifications section of this guide Connection to any other power source will void the warranty The external power supply is equipped with a three prong grounded power cord to ensure that the power supply is properly grounded when in use Do not remove the ground lug on the power supply or the warranty will be voi...

Page 17: ...compromettre le onctionnement NOTICE Changes or modifications made to this equipment not expressly approved by Exceptional Innovation may void the FCC authorization to operate this equipment NOTICE THIS INFORMATION TECHNOLOGY EQUIPMENT CONFORMS TO UL STD 60950 1 AND IS CERTIFIED TO CSA STD C22 2 NO 60950 1 Radiofrequency Radiation Exposure Information This equipment complies with FCC radiation exp...

Page 18: ...Chapter 1 Features Specifications and Safety Information 1 12 Life point InTouch Phone User Guide ...

Page 19: ...ordless Life point InTouch Phon e Commission a Phon e Connect Handset Batter y Register Handset s to Bas e Recommission a Phon e Register Additional Handsets to Bas e Items Included with the Life point InTouch Phone Check to make sure the following items are included in the shipping carton Life point InTouch phone Base Cordless handset and battery Items Required for Installation The following are ...

Page 20: ... handset to the Base 4 Connect the phone to the network Perform the following steps to connect the phone to the VoIP network in the hotel room When you have completed these steps go to the next section Commission a Phone Note Use cabling long enough to avoid placing stress on the input or output connections Place the Base on a stable flat surface such as a table desk or night stand close to a VoIP...

Page 21: ...se a 48V DC power supply if the network also provides POE to the LAN cable POE LAN Jack 48V DC Power Input Activity LED Link LED Reset Switch Verify that the 5 Activity LED on the NETWORK jack is flashing green to show the phone is communicating with the network If a high speed 100MB s link is present the Link LED turns green Wait for the phone to go through its boot process This can take from 5 t...

Page 22: ...g on updates Associate Base with a Room and Location Perform the following steps to associate the Base with a room and location Verify the room number to make sure you are working in the correct room 1 If this is the 2 first time the phone has been connected to the network the following screen displays This screen lets you enter a room number to associate the Base with the room and phone location ...

Page 23: ... Life point InTouch Phone User Guide Touch the location for the phone you are working on and touch 4 Next Verify the information on the confirmation screen and touch 5 Next to confirm Proceed to the next section Connect Handset Battery 6 ...

Page 24: ...over Do not attempt to use any other kind of tool to remove this screw Refer to the diagram below to remove the handset battery cover and connect the battery Connect Plug TORX Screwdriver TORX Screw When you have connected the handset battery replace the cover Place the handset in the Base or a charger and allow it to charge until the battery indicator on the handset s LCD screen is colored in ind...

Page 25: ...l to 12 Register Press the green phone button The handset LCD displays 13 Enter Password Enter the four digit access code from the Cordless Registration screen on the 14 Base display Press the green phone button The handset displays 15 Searching Please Wait When the handset displays 16 Please press OK to Register press the green phone button After a few moments the handset displays Registered A po...

Page 26: ...commissioned Before you begin Obtain the daily code from technical services 1 Verify the room number to make sure you are working in the correct room 2 Verify that the network is operating properly 3 Perform the following steps to recommission a phone Touch 1 Phone on the Base display s main menu The phone menu displays On the number keypad touch 2 1111 followed by the last four digits of the dail...

Page 27: ...u are in and touch 5 Next Note If there will only be one phone in the room skip Step 6 Touch the location for the phone you are working on and touch 6 Next Verify the information on the confirmation screen and touch 7 Next to confirm Perform the 8 Connect Handset Battery procedure earlier in this chapter ...

Page 28: ... Press the green phone button 13 Enter the four digit access code from the screen on the 14 Base Press the green phone button The handset displays 15 Searching Please Wait When the handset displays 16 Please press OK to Register press the green phone button After a few moments the handset displays Registered A popup will appear on the Base display telling you to wait 10 seconds for registration to...

Page 29: ...plementation calls placed on the cordless handset are independent of the touch screen menus on the Base Calls can be placed or received in two ways via the cordless handset or via the Base touch screen display using the speakerphone However calls placed on the cordless handset cannot be continued on the Base speakerphone and calls placed using the Base speakerphone cannot be continued on the cordl...

Page 30: ...ctivate the speakerphone Numeric Keypad Volume UP Down Dial LCD Display Hold Mute Speaker One touch Dialing End Call Note For The Cosmopolitan implementation calls placed on the cordless handset are independent of the touch screen menus on the Base Calls can be placed or received in two ways via the cordless handset or via the Base touch screen display using the speakerphone However calls placed o...

Page 31: ...et Call Volume To adjust the call volume Use the volume button on the left side of the cordless handset to adjust the volume up or down Placing a Call on Hold When you place a call on hold the call stays active but you and the other party cannot hear each other To place an active call on hold On the cordless handset press the 1 Hold button Press 2 Hold again to take a call off hold Muting a Call W...

Page 32: ...dset speakerphone to place a call Press the 1 Speaker button on the handset Use the number pad to enter the desired number or press the desired one touch button 2 Ending a Call To end a call do one of the following Place the handset in its cradle in the Base or in a charger Press the red phone button Voicemail Messages The Messages button on the handset lets you dial into your voicemails and liste...

Page 33: ...e Base Calls can be placed or received in two ways via the cordless handset or via the Base touch screen display using the speakerphone However calls placed on the cordless handset cannot be continued on the Base speakerphone and calls placed using the Base speakerphone cannot be continued on the cordless handset Note The user interface screens depicted in this guide are for a generic hospitality ...

Page 34: ...left side of the number display Touch 3 Speaker The indicator for the first available line turns green Touch 4 Talk to dial the number When the call connects you are on speakerphone Adjusting Call Volume To adjust the call volume Touch the speaker icons on the phone menu beneath the number keypad or the volume buttons to the top right of the display Placing a Call on Hold When you place a call on ...

Page 35: ...g calls display a popup asking if you want to ignore or answer the call 1 Touch 2 Answer to accept the call You are now on speakerphone with Line 1 active To ignore the call touch 3 Ignore Ending a Call with the Base Speakerphone To end a call while on speakerphone do one of the following On the phone menu touch End Call If using the speakerphone during a call with the handset in the cradle touch ...

Page 36: ...uch Viewing Recent Calls To view recent calls From the main menu touch 1 Phone The phone menu appears Touch 2 Recent Calls A list of the recent calls is displayed Viewing Incoming Calls To view incoming calls touch Incoming Viewing Outgoing Calls To view outgoing calls touch Outgoing Dialing Call Numbers To dial the number for a recent incoming or outgoing call touch the Dial button for that numbe...

Page 37: ...messages menu from the main menu the phone menu or the directory menu Voicemail Messages The messages menu s Voicemail tab lets you see how many voicemails you have and listen to them To see how many voicemails you have From the Main menu touch 1 Messages The number of current voicemails appears in red on the Voicemail tab 2 To listen to your voicemails Touch Dial Voicemail and your voicemails pla...

Page 38: ... current reminders appears on the reminders tab To see your reminders From the main menu touch 1 Messages The messages menu appears On the messages menu touch the 2 Reminders tab to see the list of reminders in your box To view a reminder touch the reminder you want to view and a full version opens in a popup To delete the reminder touch Delete To return to the previous menu touch Done ...

Page 39: ...an also view messages and schedule wake up calls Requesting Hotel Services To dial Room Service Spa Salon Bell Housekeeping and Wake Up services from the Directory menu From the main menu touch 1 Phone to see the phone menu From the phone menu touch 2 Directory to see the list of options From the directory menu touch the service you want to contact and the number is dialed 3 To return to the previ...

Page 40: ...low 1 Touch 2 Phone on the main menu The phone menu displays On the phone menu touch the keypad buttons to enter a number The number will be displayed 3 above the keypad Note To clear a digit touch the arrow with the x in it on the right side of the number display To clear the entire number touch the circle with the x in it on the left side of the number display Touch 4 Speaker The indicator for t...

Page 41: ...one on the main menu The phone menu displays On the phone menu touch the keypad buttons to enter a number The number will be displayed 3 above the keypad Note To clear a digit touch the arrow with the x in it on the right side of the number display To clear the entire number touch the circle with the x in it on the left side of the number display Touch 4 Speaker The indicator for the first availab...

Page 42: ...Chapter 3 Placing Calls and Other Phone Tasks 3 14 Life point InTouch Phone User Guide ...

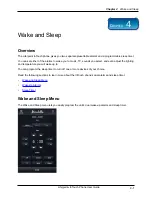
Page 43: ...ke you to music TV sounds you select and even adjust the lighting and temperature you will wake up to You can program the sleep timer to turn off one or more devices of your choice Read the following sections to learn more about the InTouch phone s dual alarms and sleep timer Wake and Sleep Menu Wake Up Alarm s Sleep Time r Wake and Sleep Menu The Wake and Sleep menu lets you easily program the un...

Page 44: ...lighting and temperature you will wake up to Set a Wake Up Alarm To set a wake up alarm From the main menu touch 1 Wake Sleep Touch 2 Alarm 1 or Alarm 2 Touch the up and down arrows and the buttons for AM or PM to set the time 3 To return to the previous menu touch 4 Done Sounds Menu The Sounds menu lets you select the alarm sound you wish to wake up to You can preview a sound and select the sound...

Page 45: ...ne TV Menu The TV menu lets you select the TV channel you wish to wake up to To preview and select the TV channel From the main menu touch 1 Wake Sleep From the 2 Wake Sleep menu under Action touch TV On the 3 TV menu touch a channel The green light tells you it is selected To adjust the volume touch the speaker icons or the volume buttons to the top right of the display 4 To return to the previou...

Page 46: ...he music 1 To adjust the volume touch the speaker icons or the volume buttons to the top right of the display 2 To return to the previous menu touch 3 Done Lights Menu The Lights menu lets you select the lighting you wish to wake up to To select the lighting level Under 1 Device touch one or more individual lights or All Lights Touch 2 On Low or Off to set the desired lighting level To return to t...

Page 47: ...one User Guide Climate Menu The Climate menu lets you select the temperature you wish to wake up to To adjust the temperature Under 1 Set touch the up or down arrows to select the desired temperature setting To return to the previous menu touch 2 Done ...

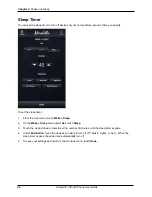
Page 48: ...timer From the main menu touch 1 Wake Sleep On the 2 Wake Sleep menu under Set touch Sleep Touch the up and down arrows to set the number of minutes until the sleep timer expires 3 Under 4 End Action touch the devices you want to turn off TV Music Lights or ALL When the sleep timer expires these devices automatically turn off To save your settings and return to the previous menu touch 5 Done ...

Page 49: ...llowing sections to learn more about accessing the phone s room control weather and music features Room Control Weathe r Musi c Room Control The Life point InTouch phone gives you access to room controls for individual and group lighting and climate settings You can turn lights on and off from the main menu and control individual lights or groups of lights from the lights menu The climate option o...

Page 50: ...de Main Menu Lighting Presets You can control lights via the two lighting presets on the main menu To adjust room lighting instantly via the main menu s one touch lighting presets Touch Lights On to instantly turn room lights on Touch Lights Off to instantly turn room lights off ...

Page 51: ... individual lighting From the main menu touch 1 Lights From the lighting menu touch the light you want to adjust 2 From the settings menu 3 Touch On to turn the light on Touch Off to turn the light off Touch High to turn the light to 100 brightness Touch Mid to turn the light to 75 brightness Touch Low to turn the light to 25 brightness To return to the previous menu touch 4 Done ...

Page 52: ...oling levels and fan mode To adjust the temperature Touch 1 Climate on the main menu On the climate menu touch the up or down arrows to set the temperature 2 To set the temperature mode Touch 1 Auto Eco or Off To return to the previous menu touch 2 Done To set the fan mode Touch the fan mode setting 1 To save your settings and return to the previous menu touch 2 Done ...

Page 53: ...locations Weather Forecast The Forecast option displays a multi day extended weather forecast for two locations To view the current conditions and three day weather forecast for a location Touch 1 Forecast on the main menu The weather menu appears On the weather menu touch the location you want to view the forecast for 2 To return to the previous menu touch 3 Done ...

Page 54: ...ls through your in room TV and play your favorite music from your personal music device through the phone s stereo speakers Music Menu Radio The Music menu lets you select from several music radio channels To select a music channel From the main menu select 1 Music On the Music menu touch the music channel you want 2 To return to the previous menu touch 3 Done ...

Page 55: ... Room Control Weather and Music 5 7 Life point InTouch Phone User Guide Music Menu My Device The My Device Music menu lets you enjoy music from your own personal music device through the phone s stereo speakers ...

Page 56: ... To listen to your portable music device through the phone s stereo speakers Connect the music device to the phone s audio input with a 3 5 mm headphone cable or with the 1 RCA audio inputs using a 3 5 mm to RCA cable From the main menu select 2 Music Select 3 My Device and adjust the portable device s controls to enjoy your favorite music To control your music volume adjust the volume controls on...

Page 57: ... USB devices Side Panel USB Connection USB Port To charge a USB device such as an MP3 player Connect one end of a USB cable to the USB jack on the phone s side panel 1 Connect the other end of the cable to the USB port on the device you are charging 2 Note To more quickly charge a USB device using the phone remove the cordless handset from its cradle while the USB device is connected When your USB...

Page 58: ...Chapter 6 Charging USB Devices 6 2 Life point InTouch Phone User Guide ...

Page 59: ...ovide fast charging of cordless handsets in locations away from the Base Standalone chargers can also be used as stations for additional cordless handsets in rooms which have corded or cordless Bases Note Before using cordless handset s that are included with the standalone charger refer to Chapter 2 Installation and Setup to connect the handset battery and register the handset to the Base Charger...

Page 60: ...am below and perform the following steps Charging a Cordless Handset USB Port Connect the USB end of the power supply s cable to the USB jack on the rear of the charger 1 Connect the prongs on the power supply end of the cable to a wall outlet 2 Insert the cordless handset into the charger base as shown 3 The blue LED on the front of the charger will turn on to indicate charging When the handset i...

Page 61: ... phone in case of problems It also covers procedures for replacing the handset battery returning equipment and contacting Life support as well as Admin Menus for the cordless handset Read the following sections to learn more about troubleshooting methods and procedures and how to get assistance Troubleshooting Char t Replace Handset Batter y Returning Equipment for Repair Replacemen t Handset Admi...

Page 62: ...roblem Solution The Base will not turn ON no display If using the external DC power supply for non POE networks make sure that the 48V DC supply s AC power cord is securely connected to the power supply and to the correct AC power source and that the power source is providing the correct voltage Make sure the DC power plug is connected to the DC power jack on the rear panel of the Base Make sure t...

Page 63: ...e buttons on the Base are not working Unplug power from the phone either the DC Power Supply for non POE networks or the LAN cable for POE networks and wait 5 seconds Reapply power Wait three minutes for phone to complete boot process If problem persists replace the Base or contact support Base display screen is too dim or too bright Ensure that no obstructions are blocking the light sensor see di...

Page 64: ...he handset are not working Refer to the Replace Handset Battery section of this chapter Open the battery compartment and unplug the battery from the phone and wait 10 seconds Reapply power and replace battery cover If the problem persists replace the handset or contact support Handset volume is low or off Increase the handset volume by pressing the top of the volume button on the left side of the ...

Page 65: ...set ringer cannot be heard is not loud enough or is too loud Adjust the ringer volume with the handset volume key while the handset is in the Base or when a call is not in progress Ensure the handset is not lying on its back with the keypad facing up Other party cannot hear your voice Make sure the handset mic is not muted Check for a Mute icon in the top status bar on the handset s LCD display If...

Page 66: ...tool to remove this screw Also do not attempt to use any other kind of battery than the original type used in this handset Installing any other type will void the warranty Follow the diagram below to remove the handset battery cover and replace the battery Connect Plug TORX Screwdriver TORX Screw When you have replaced the handset battery replace the battery cover place the handset in the Base or ...

Page 67: ...de any paperwork 2 that may have the RMA number inside this box Pack the box securely inside an outer box with packing peanuts or bubble wrap The original boxes 3 were not designed for standalone shipment through UPS FedEx Clearly write the RMA number on the outside of the carton Cover the number with clear shipping 4 tape to protect it during shipping Life support will coordinate receipt of the r...

Page 68: ...ontrols how long LCD backlight is on after pressing a button Options are 5 15 30 45 and 60 seconds Audio Ringtones Controls handset ringtone 8 different ringtones 1 8 can be selected by scrolling to the desired tone and pressing the green phone button Ringer Volume Controls ringer volume level Options are levels 1 2 3 4 OFF Phone Clock Controls date time date format and time format settings Reset ...

Page 69: ...fe ware and other control and entertainment products from Exceptional Innovation If you have questions about your Life point InTouch phone contact our Life support Helpline at 1 877 901 8886 Please read this User Guide carefully before contacting us When you call our helpline make sure your Life point InTouch phone is at hand so that technical support can more quickly help you correct the problem ...

Page 70: ...Chapter 8 Troubleshooting and Maintenance 8 10 Life point InTouch Phone User Guide ...

Reviews: