background image


02027011                                                                                                              ZSME300000342                                 

24 

EXCELL PRECISION CO., LTD.


Chapter 4 Wireless Connection Instruction 

 Baud rate must be set as 9600 (bits/sec) and Communication protocol must be set as n81. 


Step 1: Connect to your device   

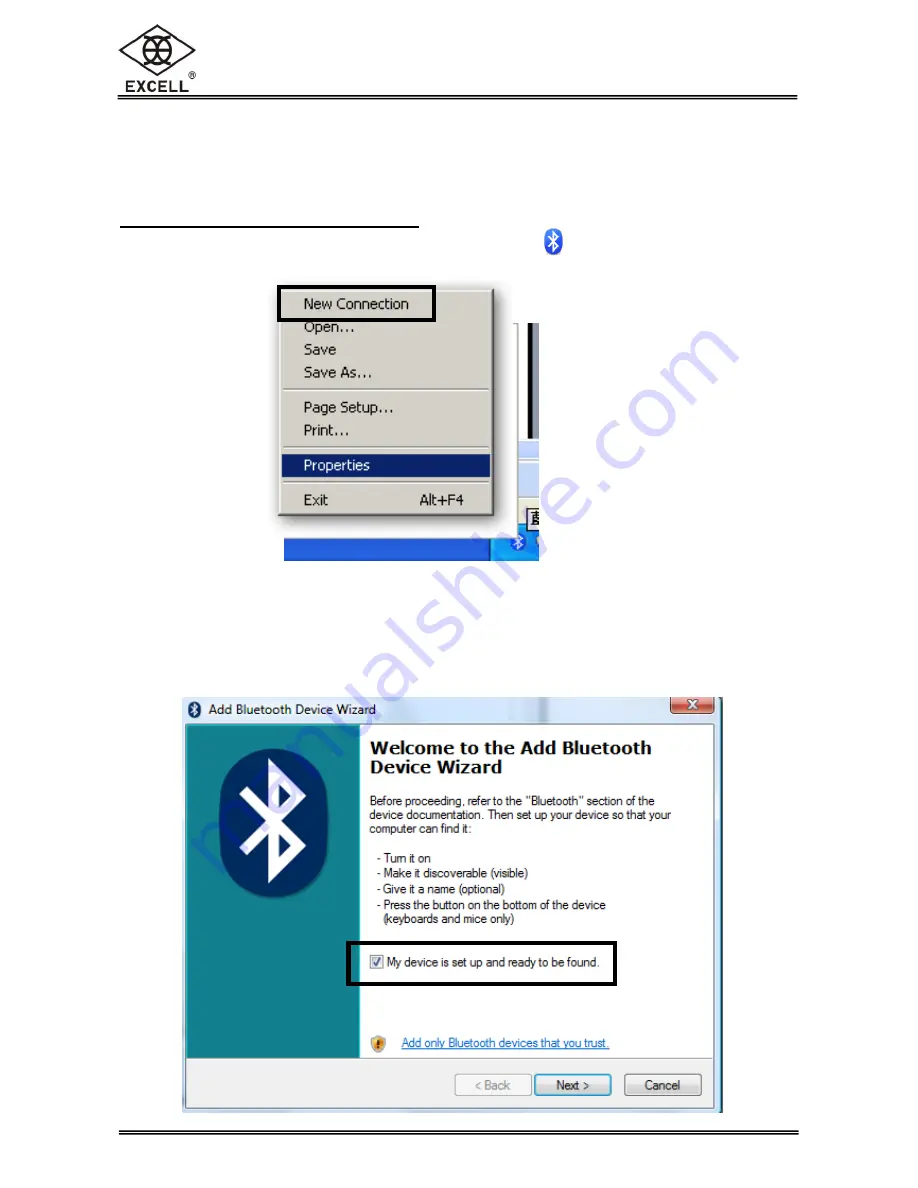
1. Enable Wireless on your computer. Right-click on the        icon of the bottom-right corner 

on taskbar, highlight “

New Connection

” and left click. 


Due to the different bluetooth supplier software could be installed, the setting dialogs 

shown below are just for reference. 

 
2. Check “

My device is set up and ready to be found

” in the dialogue box. 


Summary of Contents for GWS

Page 1: ...dwide The information contained herein is the property of Excell Precision Limited and is supplied without liability for errors or omissions No part may be reproduced or used except as authorised by c...

Page 2: ......

Page 3: ...12 2 3 Accumulation 13 2 4 Hold Mode Animal 14 2 5 Self Test Mode 15 Chapter 3 Further Function Setting 16 3 1 Enter Function Setting 16 3 2 Function Setting 16 3 2 1 Hi Lo OK Setting P0 ChK 17 3 2 2...

Page 4: ...to transmit Pr2 Press key to transmit bAud Baud rate setting 600 1200 2400 4800 9600 19200 Pr Communication setting n81 E71 o71 rPS Continuous Transmit rate 1 2 4 8 16 or MAX 3 2 6 PtyPE PtUP Print ty...

Page 5: ...nuous Pr1 Press key to transmit Pr2 Press key to transmit bAud Baud rate setting 600 1200 2400 4800 9600 19200 Pr Communication setting n81 E71 o71 rPS Continuous Transmit rate 1 2 4 8 16 or MAX 3 2 6...

Page 6: ...aterproof ability of this indicator Before opening the housing make sure the indicator is dry if there is any liquid on it please wipe it with a clean cloth HOW TO INSTALL THE HOUSING After installing...

Page 7: ...ac power outlet sockets which are adjacent to other appliances to minimise the possibility of interference affecting the performance of the scale 5 Remove any weight that might be on the weigh pan bef...

Page 8: ...3 Do not short the battery terminals to check whether there is current Please check whether the connection point is firm to guarantee good connection 4 The battery should be replaced by specialized pe...

Page 9: ...Pre tare Auto zero tracking Sampling counting Gross Net indication Hold function Check mode Lo Hi OK Auto average unit weight Adjustable gravity value Low power indication and auto power off AC DC pow...

Page 10: ...ECISION CO LTD Standard Option GWS Standard Option Power RS 232 Load Cell Power Foot switch or RS 485 Pressure relieve valve or RS 485 RS 232 Load Cell 90mm 156m m 238mm Power Load Cell RS 232 Footswi...

Page 11: ...O Zero indication Net Net indication Flashing Low Power indication 1 5 Power Supply Power Supply Selection 6V 4 5Ah rechargeable battery 110 230VAC 15 plugged in Power Consumption Approximately DC 31...

Page 12: ...t with printer According to the setting press this key to transmit simple or completed mode format Press this key to clear the entering numbers Accumulation key According to the setting press this key...

Page 13: ...is damaged Zero is higher than the zero range when switching the indicator on Zero is lower than the zero range when switching the indicator on ADIC value is over the maximum range The weight of the...

Page 14: ...e setting or press key to exit Default settings are marked by 2 2 Simple Counting Mode In weighing mode hold key to enter simple counting mode and display shows PCS 10 Use key to select sampling numbe...

Page 15: ...pacity of the system To check accumulation counts and accumulation weight by pressing key To print by pressing key To clear the accumulation data when there is no weight by pressing keys Then M indica...

Page 16: ...external variables Press any key to exit this mode Stable hold 2 mode When the weight is stable the LCD shows the current weight value Not changeable due to external variables When the weight backs t...

Page 17: ...sion Display Mode Press key to enter display shows the firmware version Press key again the display shows maintenance number for 2 seconds Press key to back to the last screen display shows Back to th...

Page 18: ...three keys in order before entering weighing mode 3 2 Function Setting Switch the switch SWA1 back to the LOCK position for approval models while switch the switch SWA1 to the ADJ position for non app...

Page 19: ...g Hi value Lo value display shows Error and then back to last saved value Please set weight as 000 000 kg and quantity as 000000 pcs to cancel Hi and Lo value If the weight is less than 20d check weig...

Page 20: ...etting Continuous Transmit rate Print type Output format Lab Output format Prt Language Please see 3 2 3 Time display Option Real time clock Option Please see 3 2 4 Year month date Date month year RS...

Page 21: ...ng and back to last setting ModE After all settings finished press key to back to weighing mode Please see Appendix 1 for output format Default settings are marked by Auto accumulate transmit Command...

Page 22: ...ss or key to move cursor Press key to save the setting Press key to save the setting and back to RTC setting Display last setting Default setting Time setting hour minute seconds Display last setting...

Page 23: ...00 the previous sampling number the scale will automatically adjust the unit weight Continuous tare If this function off it only can be tare for once It can not be tare until tare cancel If this funct...

Page 24: ...ase make sure the other two are off Otherwise the screen will display Error to indicate an error has occurred and the setting is not saved G Lb oZ are freely to set as on or off In dual range viss uni...

Page 25: ...al models Enter restore default setting P7 rSt and press key to restart the scale The defaults are included the following 1 External weight calibration 2 HI LO OK setting values 3 Parameters in P1 rEF...

Page 26: ...t as n81 Step 1 Connect to your device 1 Enable Wireless on your computer Right click on the icon of the bottom right corner on taskbar highlight New Connection and left click Due to the different blu...

Page 27: ...25 EXCELL PRECISION CO LTD 3 If the device is ready the device names Device C1 or C2 will be found Double click on Device C1 or Device C2 4 Circle Let me choose my own passkey input the passkey 111111...

Page 28: ...ISION CO LTD 5 Device is added so far Please disconnect COM port and click Finish Step 2 Connection test To test the connection use HyperTerminal recommended in Windows XP 1 go START All programs Acce...

Page 29: ...02027011 ZSME300000342 27 EXCELL PRECISION CO LTD 2 Key in a name and select icon then press OK 3 After select the COM port referred by step 1 point 5 and click OK...

Page 30: ...02027011 ZSME300000342 28 EXCELL PRECISION CO LTD 4 Click File Properties 5 Select settings from the menu and click ASCII setup on the bottom of the box...

Page 31: ...02027011 ZSME300000342 29 EXCELL PRECISION CO LTD 6 Check Send line ends with line feeds and Echo typed characters locally and click OK 7 Key in commands such S W T Z P in the main screen to test...

Page 32: ...02027011 ZSME300000342 30 EXCELL PRECISION CO LTD Appendix 1 Output Format A Accumulate output format ModE Auto or Pr2 Lab Prt 0 1 2 3 0 1 2 3 Quantities output format...

Page 33: ...of all individual weighings LF Space line PCS Quantities C Remote control Instructions Command Function description Printout examples S Stable Weighing value for the weight is sent via the RS 232 int...

Page 34: ...42H b 62H 1 31H C 43H c 63H 2 32H D 44H d 64H 3 33H E 45H e 65H 4 34H F 46H f 66H 5 35H G 47H g 67H 6 36H H 48H h 68H 7 37H I 49H i 69H 8 38H J 4AH j 6AH 9 39H K 4BH k 6BH 0DH L 4CH l 6CH M 4DH m 6DH...

Page 35: ...27011 ZSME300000342 33 EXCELL PRECISION CO LTD Appendix 3 7 Segment Display Characters Number Display Letter Display Letter Display 0 A N 1 B O 2 C P 3 D Q 4 E R 5 F S 6 G T 7 H U 8 I V 9 J W K X L Y...

Page 36: ...4 Wiring Instructions Load cell wiring method 1 As shown below when a load cell is connected with a 4PIN cable SEN and SEN can be unconnected J11 and J12 on PCB must be tin soldered in short circuit 2...

Page 37: ...tion Male 25 PINS Function QWS GWS 2 Receive Data SG 3 Transmit Data RxD 7 Signal Ground TxD RS 485 Wiring instruction To connect RS 485 please make J17 J18 short and J15 J16 open on main board PC PIN...

Reviews: