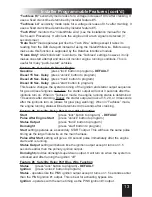
Excalibur RS-330-EDPB Operation Manual Download Page 10

10

Step 1 

Have all transmitters which are to operate the system at hand� Then, 

turn the ignition “on”�

If the Unauthorized Transmitter Alert feature is on, programming a trans-

mitter to the system will activate the “UTA” warning and the extended 

Status Light indication� For the next 48 hours, the horn will sound a brief 

series of chirps every time the vehicle’s ignition key is turned on� 


Step 3 

Press the “

lock

” button on each remaining transmitter one at a time� The 

system will chirp the horn once to confirm that each was learned. The transmitter’s 

other three button’s functions will automatically be assigned when the “

lock

” button 

is learned�  If a code is not received within a 10 second period, the learning process 

will automatically terminate, as indicated by another horn honk� 

Step 2 

within 5 seconds of turning on the ignition, press the Valet Switch 5 

times. The horn will briefly sound, confirming that for the next 10  seconds the sys

-

tem is ready to learn a transmitter/controller code� To enter a code, simply press and 

release the “

lock

” button.  When the first code is learned  all existing stored codes 

will be erased�

Special Programming procedure to turn On the UTA feature:  

Using this method 

to program transmitters or optional controllers, and to turn on the Unauthorized 

Transmitter Alert feature�

  Follow the same steps as the Standard Programming, but on any transmitter/con-

troller being programmed instead of pressing  the “

lock

” button, press the “

lock

” and 

the “

unlock

” buttons together�   This action turns 

on

 the Unauthorized Transmitter 

Alert feature and at the same time programs the transmitter or controller to operate 

the system�

Standard Programming:  

Using this method to program additional or replacement 

transmitters does not turn on or otherwise affect the Unauthorized Transmitter Alert 

(UTA) feature�

  Once the Unauthorized Transmitter Alert feature is turned on, the warning will 

sound for 48 hours after any transmitter programming, including the programming 

session which was used to turn it on� This feature can only be turned off again by 

sending the system back to Omega for a reset�

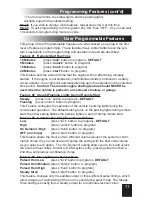
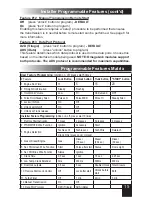
Programming Transmitters

Programming Features

Step 1

  Turn the ignition key “On”, then “OFF”

Step 2

  within 5 seconds of step 1, press the valet switch 5 times to access user 

features (10 times to access installer features)�

  ~ The horn will honk and the status light will turn on�

Step 3

  within 10 seconds of step 2, press the valet switch the number of times cor-

responding with the desired feature’s number�

  ~ The horn will honk, the status lights, and the parking lights 

  will flash equal to the selected feature.

Step 4

  Change the feature by pressing the transmitter button that corresponds with 


the desired setting�

Summary of Contents for RS-330-EDPB

Page 1: ...RS 340 EDP Deluxe Keyless Entry Remote Start Operation Guide June 29 2011 Temporary cover Color cover is in a separate file...

Page 2: ...Features 11 Installer Programmable Features 12 Programmable Features Matrix 15 This device complies with FCC Rules part 15 Operation is subject to the following two conditions 1 This device may not ca...

Page 3: ...bleshooting failed remote start attempts as well as in customizing the programmable features The specific opera tions of the lights are described on page 8 The Valet Switch is used to access transmitt...

Page 4: ...emble the transmitter case LOCK Press and release the LOCK button The doors will lock the parking lights will flash and the horn will honk once UNLOCK Press and release the UNLOCK button The doors wil...

Page 5: ...is active If the engine stalls the system will make up to 3 more attempts Each time you park your vehicle set the climate controls to give you the desired interior temperature when you use the remote...

Page 6: ...the vehicle s data network Consult with your installing dealer to find out if any of these functions are available for your vehicle If so confirm each operation with the transmitter and write each fu...

Page 7: ...l honk 3 times activating low voltage start mode To activate low temp starting enter low voltage start mode as described above but before the horn honks press the valet switch 1 time 15 degrees or 2 t...

Page 8: ...ess the programming functions With the system in a locked state simply turn the ignition key to the RUN ON position and press and release the valet switch once Using The Valet Switch Other Remote Star...

Page 9: ...the system in your car has the key to decipher this code and it is not replicable Automatic Transmitter VerificationTM There is also the potential threat of someone who has temporary access to your ve...

Page 10: ...turn on the Unauthorized Transmitter Alert feature Follow the same steps as the Standard Programming but on any transmitter con troller being programmed instead of pressing the lock button press the...

Page 11: ...eady press lock button to program DEFAULT Flashing press unlock button to program This Feature configures the operation of the vehicle s parking lights during the remote start operation The default se...

Page 12: ...button presses press trunk button to program 4 button presses press start button to program This feature allows you to choose the number of button presses AND pulses required on the White Blue activa...

Page 13: ...Gasoline the starter output will occur 3 seconds after the ignitions turn on When in Tachless mode the engine running status is determined 10 seconds after cranking Diesel the starter output will occ...

Page 14: ...ds on the correct connection of the neutral safety wire to the vehicle s parking brake Please refer to the installation manual for details Feature 8 Low Temp Crank Extender 0ms Off press lock button t...

Page 15: ...TE Wire Function Ignition Accessory Start 3 Engine Detection Tachless Hi Tachless Lo Tach Wire Datatach Crank Only press Lock Unlock 4 Gas or Diesel Engine Gas Diesel 15 sec Diesel 20 sec Diesel 30 se...

Page 16: ...Back Cover Color cover is in a separate file...

Reviews: