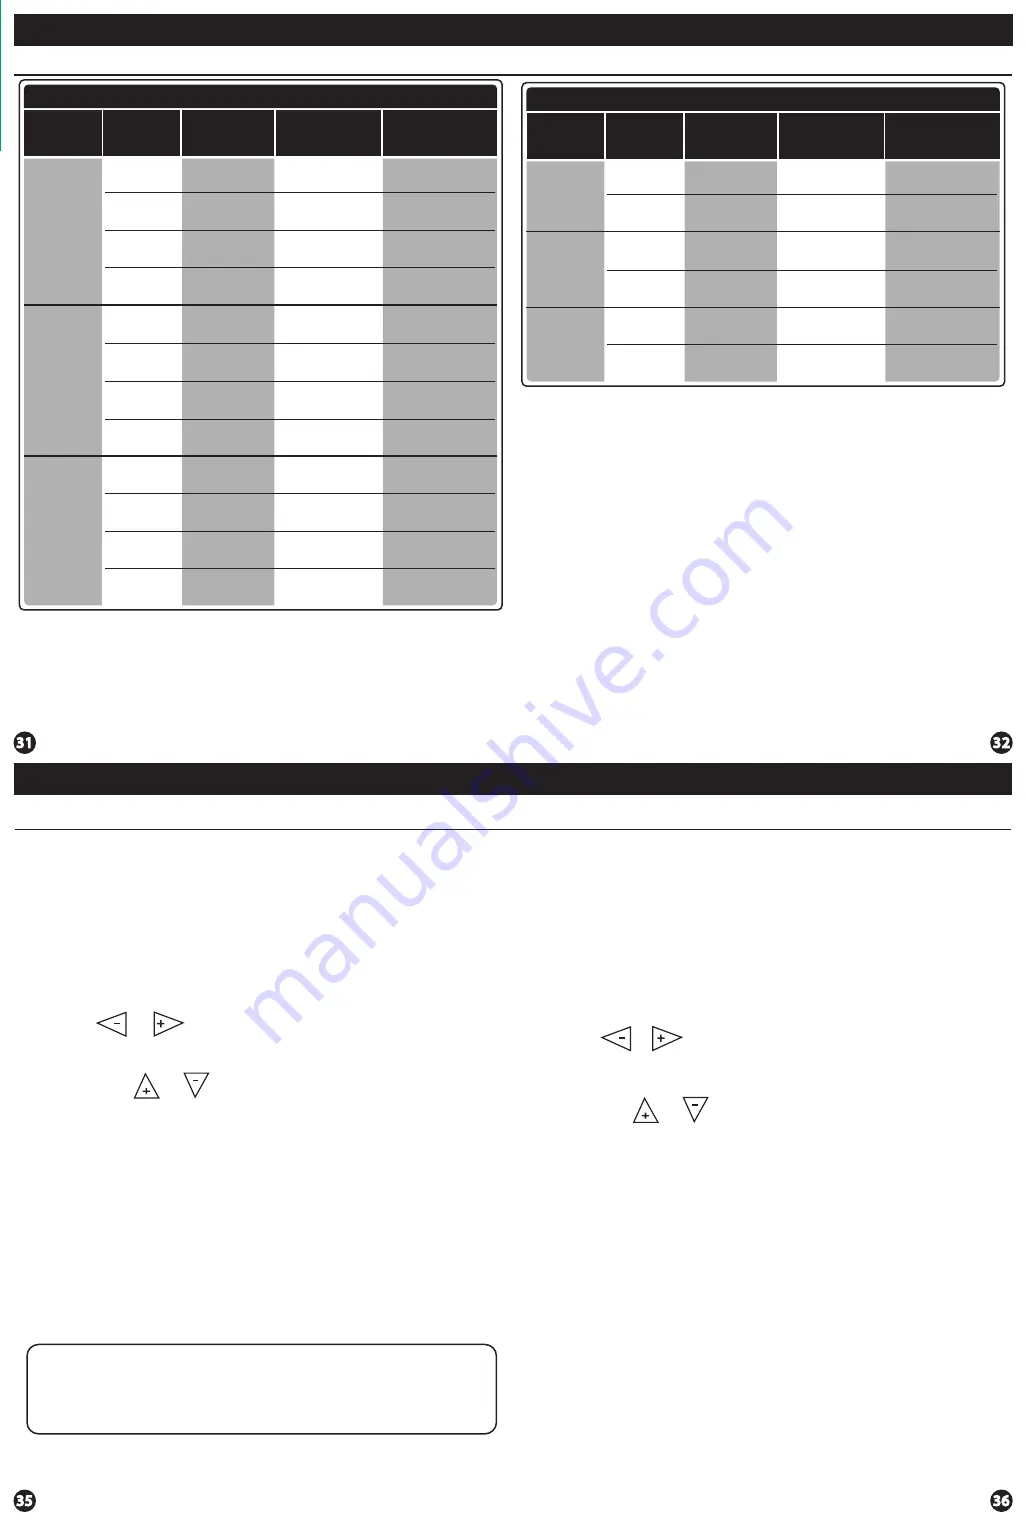
background image

Default Programming

Factory Default Program for 2 Time Periods

Day of 

the Week

Events

Time

Setpoint 

Temperature

(HEAT)

Setpoint 

Temperature

(COOL)

Weekday

Saturday

Sunday

OCCUPIED

UNOCCUPIED

OCCUPIED

UNOCCUPIED

OCCUPIED

UNOCCUPIED

8 AM

6 PM

6 PM

6 PM

8 AM

70

˚

F (21

˚

C)

64

˚

F (18

˚

C)

72

˚

F (22

˚

C)

80

˚

F (27

˚

C)

8 AM

70

˚

F (21

˚

C)

64

˚

F (18

˚

C)

70

˚

F (21

˚

C)

64

˚

F (18

˚

C)

72

˚

F (22

˚

C)

80

˚

F (27

˚

C)

72

˚

F (22

˚

C)

80

˚

F (27

˚

C)

You can use the table on the next page to plan your customized program 

schedule if using 5+1+1.

Programming

Programming

Programming 

Programming 

Default Programming

Factory Default Program

Day of 

the Week

Events

Time

Setpoint 

Temperature

(HEAT)

Setpoint 

Temperature

(COOL)

Weekday

Saturday

Sunday

Wake/OCC1

Leave/UNOCC1

Return/OCC2

Sleep/UNOCC2

Wake/OCC1

Leave/UNOCC1

Return/OCC2

Sleep/UNOCC2

Wake/OCC1

LeaveUNOCC1

Return/OCC2

Sleep/UNOCC2

6 AM

8 AM

6 PM

10 PM

6 AM

8 AM

6 PM

10 PM

6 AM

8 AM

6 PM

10 PM

70

˚

F (21

˚

C)

62

˚

F (17

˚

C)

70

˚

F (21

˚

C)

62

˚

F (17

˚

C)

70

˚

F (21

˚

C)

62

˚

F (17

˚

C)

70

˚

F (21

˚

C)

62

˚

F (17

˚

C)

70

˚

F (21

˚

C)

62

˚

F (17

˚

C)

70

˚

F (21

˚

C)

62

˚

F (17

˚

C)

75

˚

F (24

˚

C)

83

˚

F (28

˚

C)

75

˚

F (24

˚

C)

78

˚

F (26

˚

C)

75

˚

F (24

˚

C)

83

˚

F (28

˚

C)

75

˚

F (24

˚

C)

78

˚

F (26

˚

C)

75

˚

F (24

˚

C)

83

˚

F (28

˚

C)

75

˚

F (24

˚

C)

78

˚

F (26

˚

C)

A Note About Programmable Fan:

The programmable fan feature will run the fan continuously during any 

time period it is programmed to be on. This is the best way to keep the 

air circulated and to eliminate hot and cold spots in your building. 

1. 

 Select 

HEAT 

or

 COOL 

with the 

SYSTEM

 key. 


Note: 

You have to program heat and cool each seperately. 

2.

  Press the 

MENU

 button (If menu does not appear first press 


RUN SCHED

).

3.

  Press 

SET SCHED

.  

Note:

 Monday is displayed and the


OCCUPIED

 text is shown. You are now programming the 


OCCUPIED

 time period for that day.

4.

  Use the            or            key to make your time selection for the 


OCCUPIED

 time period.  

Note:

 If you want the fan to run continu

      ously during this time period, select 

ON

 with the 

FAN 

key. 

5.

  Then use the           or         key to make your setpoint selection 

      for that day’s 

OCCUPIED

 period.

6.

  Press 

NEXT.

7.

  Repeat steps 4 through 6 for 

that day’s


UNOCCUPIED


      time period.

Monday:

Repeat steps 4 through 6 for the remaining days of the week.

To customize your 7 day program schedule, follow these steps:

Set Program Schedule For Four Time Periods

1. 

 Select 

HEAT 

or

 COOL 

with the system key. 


Note: 

You have to program heat and cool each separately. 

2.

  Press the 

MENU

 button (If menu does not appear first press 


RUN SCHED

).

3.

  Press 

SET SCHEDULE

.  

Note:

 Monday-Friday is displayed and the


WAKE/OCC1

 icon is shown. You are now programming the 


WAKE/OCC1

 time period for the weekday setting.

4.

  Use the            or            key to make your time 

      selection for the weekday 

WAKE/OCC1

 time period.  


 Note:

 If you want the fan to run continuously during this time

      period, select 

ON

 with the 

FAN 

key. 

5.

  Then use the           or         key to make your setpoint selection for 

      the weekday 

WAKE/OCC1

      period.

6.

  Press 

Next Step.

7.

  Repeat steps 4 through 6 for the weekday 

LEAVE/UNOCC1


 time period, for the weekday 

RETURN/OCC2 

time period, 

      and for the weekday 

SLEEP/UNOCC2

 time period.

To customize your 5+1+1 Program schedule, follow these steps:

Weekday:

Repeat steps 4 through 6 for the Saturday 

WAKE/OCC1 

time period, 

LEAVE/UNOCC1

 time period, 

RETURN/OCC2

 time period, and for 

the Saturday 

SLEEP/UNOCC2

 time period.

Saturday:

Repeat steps 4 through 6 for the Sunday 

WAKE/OCC1 

time period, 

LEAVE/UNOCC1

 time period, 

RETURN/OCC2

 time period, and for 

the Sunday 

SLEEP/UNOCC2

 time period.

Sunday:

(WAKE, LEAVE, RETURN, SLEEP or OCCUPIED 1, UNOCCUPIED1, OCCUPIED 2, UNOCCUPIED 2)

Summary of Contents for EWT-955WH

Page 1: ...lation Tips 19 28 29 11 9 10 The thermostat and base module contain selectable wireless communication options Each component has a jumper switch label FSK and ASK Default setting FSK All components must be set to the same position for wireless communication Both modes utilize a 916 MHz frequency FSK frequency shift keying is the recommended mode ASK amplitude shift keying should be selected when u...

Page 2: ...ical Mount Horizontal Mount For horizontal mount put one screw on the left and one screw on the right For vertical mount put one screw on the top and one screw on the bottom To connect the base module to the master thermostat refer to the directions on page 13 of this manual Note Wire the base module s subbase the same way you would wire a hardwired thermostat subase Wiring Note The base module mu...

Page 3: ...ation Tips Do not install the base module in locations That are behind a chimney Where temperature could exceed 150 F Where rain or snow or extreme hot or cold is possible Note This base module is NOT weatherproof Wireless Communication Tips Follow these steps for a simple wireless communication setup Locate all components in area near equipment Wire base module with 8ft pigtail and temporarily mo...

Page 4: ...terminal block can keep the thermostat from fitting on the subbase correctly or cause system operation issues Installation Tip Max Torque 6in lbs Wiring If you are replacing a thermostat make note of the terminal connections on the thermostat that is being replaced In some cases the wiring connections will not be color coded For example the green wire may not be connected to the G terminal Loosen ...

Page 5: ... compressor run time to OFF 3 4 or 5 minutes If 3 4 or 5 is selected the compressor will run for at least the selected time before turning off Minimum Compressor OnTime OFF You can adjust the room temperature display to read up to 4 above or below the factory calibrated reading Adjustment Options Default LCDWillShow OFF 0 OFF This thermostat has a technician setup menu for easy installer configura...

Page 6: ...tup Steps Adjustment Options Default LCDWillShow You can configure the thermostat to operate a 3 stage heat pump system 2H 2C 2 heat 2 cool 3H 2C 3 heat 2 cool This feature is shown only if the HEAT PUMP technician setup step is ON Stages of Heat Use the or key to change between 2 or 3 stages of heat 2 heat will useY1 as first stage andW2 as auxiliary 3 heat will useY1 as the first stage Y2 as the...

Page 7: ...SOR FINDING SENSOR Disable the sensor on the master At least one indoor remote sensor must be connected to disable the local sensor LocalTemp Sensor YES enables local sensor NO disables local sensor YES YES LOCAL TEMP SENSOR Turns on the heat for 10 minutes each hour if unable to communi cate with the master thermostat if there has been a call for heat in the last 24 hours Freeze Protection YES en...

Page 8: ...hen completed Humidity Key Target humidity setpoint keys Note The target humidity setpoint is not programmable Unlike temperature humidity does not change quickly and should not be programmed Note Humidity is only energized during heat Dehumidity is only energized during cool Heat and cool each have their own target setpoints Ambient Humidity Display Ambient humidity will flash opposite the day an...

Page 9: ...u are now programming the OCCUPIED time period for that day 4 Use the or key to make your time selection for the OCCUPIED time period Note If you want the fan to run continu ously during this time period select ON with the FAN key 5 Then use the or key to make your setpoint selection for that day s OCCUPIED period 6 Press NEXT 7 Repeat steps 4 through 6 for that day s UNOCCUPIED time period Monday...

Page 10: ...o customize your 7 day Program schedule follow these steps Monday Repeat steps 4 through 6 for the remaining days of the week A Note About Auto Changeover In Auto you have the ability to switch between Auto Heat or Auto Cool by pressing the system key This can be done once the current mode has reached its setpoint For example if in Auto Heat the heat setpoint must be satisfied before the thermosta...

Reviews: