Evolution RAGE-B Original Instruction Manual Download Page 12

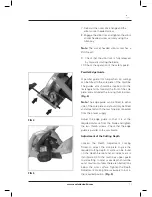
Adjustment of the Cutting Angle

1. Loosen the Bevel Locking Screw found at 
    the front of the saw. 

(Fig. 6)

2. Tilt the blade to the required angle.

 (Fig. 7)

3. Tighten the Bevel Locking Screw securely

Note:

 An angle scale (0

0

- 45

0

) is incorporated 

into the Bevel Locking quadrant to aid setting. 
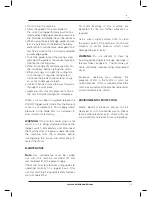
Operating Advice

Carry out routine safety checks each time you 
use the machine. Check that all safety guards 
are operating correctly, and that all adjustment 
handles/screws are tightened securely.
Check that the blade is secure and installed 
correctly. Also check that it is the correct 
blade for the material being cut.
Check the integrity of the power cord.
Always clamp the workpiece to a rigid support 
such as a bench or saw horse whenever 
possible.

ON/OFF Trigger Switch

This machine is equipped with a safety start 
trigger switch.
   To start the tool:
• Push in the safety lock button on the side of 
   the handle with your thumb.
• Depress the main trigger switch to start the 
   motor. 

(Fig. 8)

Cutting Advice

The operator should wear all relevant PPE 
(Personal Protection Equipment) necessary 
for the job at hand. This could include safety 
glasses, dust masks, safety shoes etc.
The operator should always be aware of the 
position and routing of the power cable.

www.evolutionbuild.com

12

FIG 6

FIG 7

FIG 8

0-45

o

Summary of Contents for RAGE-B

Page 1: ...www evolutionbuild com 185mm 7 1 4 Multipurpose Circular Saw Original Instruction Manual Read instructions before operating this tool...

Page 2: ...ffield S20 3FR Declare that the product Part numbers RAGE1B1851 RAGE1B1852 RAGE1B1852EU Evolution RAGEB Multipurpose Circular Saw 185mm Complies with the essential requirements of the following Europe...

Page 3: ...mponents are subject to respective manufacturers warranties All goods returned defective shall be returned prepaid freight to Evolution Power Tools Evolution Power Tools reserves the right to optional...

Page 4: ...r use reduces the risk of electric shock f If operating a power tool in a damp location is unavoidable use a residual current device RCD protected supply Use of an RCD reduces the risk of electric sho...

Page 5: ...different from those intended could result in a hazardous situation 5 Service Have your power tool serviced by a qualified repair person using only genuine replacement parts This will ensure that the...

Page 6: ...material If saw blade is binding it may walk up or kickback from the workpiece as the saw is restarted d Support large panels to minimise the risk of blade pinching and kickback Large panels tend to...

Page 7: ...us To obtain an additional copy of your manual please contact Evolution Power Tools at UK 0870 609 2297 WEB www evolutionpowertools com ADDITIONAL SPECIFIC SAFETY RULES a DANGER Keep hands away from c...

Page 8: ...ng Mild Steel Plate Max Thickness 6mm Mild Steel Box Section Max Wall Thickness 3mm Wood Max Thickness at 900 60mm SPECIFICATION RAGE1B1852 RAGE1B1852EU 1200W 230v 50 60 Hz Watts RAGE1B1851 1050W 110v...

Page 9: ...www evolutionbuild com MACHINE OVERVIEW KNOW YOUR PARTS 1 REAR HANDLE 2 FRONT HANDLE 3 UPPER BLADE GUARD 4 LOWER BLADE GUARD 5 SOLE PLATE 6 CHIP EXHAUST PORT 9 9 4 5 3 2 1 6...

Page 10: ...ne Ensure that the maximum speed of the blade is compatible with the machine Only perform this operation with the machine disconnected from the power supply Note It is recommended that the operator co...

Page 11: ...thumb screw Fig 4 Note The edge guide can be fitted to either side of the sole plate and should only be fitted and adjusted with the machine disconnected from the power supply Adjust the edge guide so...

Page 12: ...heck that it is the correct blade for the material being cut Check the integrity of the power cord Always clamp the workpiece to a rigid support such as a bench or saw horse whenever possible ON OFF T...

Page 13: ...is being attempted release the trigger switch immediately and disconnect the machine from the power supply Remove the machine from the workpiece before investigating the cause and attempting to resta...

Page 14: ...www evolutionbuild com 14 SERVICE PARTS DIAGRAM...

Page 15: ...www evolutionbuild com 15 NOTES...

Page 16: ...w w w e v o l u t i o n b u i l d c o m D11100...

Reviews: