Evolution FURY 52551 Original Instructions Manual Download Page 7

7

www.evolutionfury.com
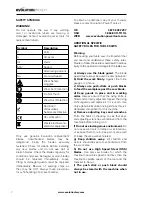
SAFETY SYMBOLS

WARNING! 

Do not operate the saw if any warning 
and / or instruction labels are missing or 
damaged. Contact evolution power tools for 
replacement labels.

Symbol

Description

V

Volts

A

Amperes

Hz

Hertz

Min

-1

Speed

~

Alternating Current

No

No Load Speed
Wear Safety 
Goggles
Wear Ear Protection

Do Not Touch

Wear Dust Protection

Restriction 
of Hazardous 
Substances Directive
CE certification

Waste electrical and 
electronic equipment

Only use genuine Evolution replacement 
blades. Unauthorized blades may be 
dangerous! Keep the blades securely 
fastened. Check for debris before installing 
any new blades and do not use dull or 
broken blades. Check the blades regularly for 
condition and wear. Damaged or worn blades 
should be replaced immediately. Loose 
fitting or damaged guards must be replaced 
immediately. Beware of ejecting chips as 
they may be HOT. Always make provisions 
for safe handling of excess material. 

To obtain an additional copy of your manual, 
please contact Evolution Power Tools at:

UK  

0870 609 2297

USA 

  1-866-EVO-TOOL

WEB www.evolutionpowertools.com

ADDITIONAL SPECIFIC 
SAFETY RULES FOR TABLE SAWS

Warning

Before using your table saw it is important that 
you read and understand these safety rules. 
Failure to follow these rules could result in serious 
injury to the operator or damage to the table saw.

a) Always use the blade guard.

 The blade 

guard must always be used in every operation.

b) Hold the work firmly.

 Against the mitre 

gauge or rip fence.

c) Always use push-sticks or push blocks 
to feed the workpiece past the saw blade.
d) Keep guards in place and in working 
order. 

Always ensure that the riving knife is 

fitted and correctly adjusted. Inspect the riving 
knife regularly and replace it if it is worn. Use 
only a genuine Evolution riving knife as this is a 
dedicated component for this machine.

e) Remove adjusting keys and wrenches. 

Form the habit of checking to see that keys 
and adjusting wrenches are removed from the 
machine before turning it on.

f) Do not use in dangerous environment.

 Do 

not use power tools in damp or wet locations, 
or expose them to rain. Keep work area well 
lit. Keep the area well ventilated.

g) Keep children away. 

All children and 

visitors should be kept at a safe distance from 
the work area.

h) Do not use High Speed Steel (HSS) 
blades. 

Use only saw blades for which the 

maximum possible speed is not less than the 
maximum spindle speed of the tool and the 
material to be cut.

i) The push stick or push block should 
always be stored with the machine when 
not in use.

Summary of Contents for FURY 52551

Page 1: ...255mm TCT Multipurpose Table Saw Original Instructions Read instructions before operating this tool www evolutionfury com...

Page 2: ...onformity 04 Important Information 05 12 Month Limited Warranty 05 General Safety Rules 05 Safety Precautions for Table Saws 07 Symbols 08 Additional Specific Safety Rules 08 Specification 09 Machine...

Page 3: ...ectives 2006 42 EC Machine Directive 2006 95 EC Low Voltage Directive 2004 108 EC EMC Directive 2002 95 EC Restriction of the use of Certain Hazardous Substances in Electrical and Electric equipment T...

Page 4: ...m There is no warranty written or verbal for saw blades In no event shall Evolution Power Tools be liable for loss or damage resulting directly or indirectly from the use of our merchandise or from an...

Page 5: ...e before servicing and when changing accessories such as blades bits and cutters disconnect tools from the power supply 16 Remove adjusting keys and wrenches Form the habit of checking to see that key...

Page 6: ...an and the thickness of the body of the saw blade shall not be more than the thickness of the riving knife d Take care that the selection of the saw blade is suitable for the material to be cut e Wear...

Page 7: ...r table saw it is important that you read and understand these safety rules Failure to follow these rules could result in serious injury to the operator or damage to the table saw a Always use the bla...

Page 8: ...hands out of the path of the saw blade r Never reach around the saw blade s Turn off machine and wait for saw blade to stop before making any fence adjustments t Never pull or carry the tool by the po...

Page 9: ...9 www evolutionfury com KNOW YOUR PARTS 1 Fixings grouped in sets 3 Table extensions and struts etc 2 Stand components 4 Other parts mitre gauge rip fence top guard fence rail...

Page 10: ...RIP FENCE 6 RIP FENCE LOCKING HANDLE 7 RIP FENCE SCALE MAGNIFIER 8 SLIDING MITRE FENCE 9 ANTI BOUNCE DEVICE 10 RISE FALL ADJUSTMENT HANDLE 11 BEVEL LOCKING LEVER 12 BEVEL ADJUSTMENT WHEEL 13 PUSH STI...

Page 11: ...s piece using four 6mm hex bolts This cross piece has sloped ends to accommodate the splay of the legs Ensure it is fitted correctly with slope facing upwards Do not fully tighten any of the bolts at...

Page 12: ...rough the four corner holes in the stand See Fig 5 3 Table Extensions Note The pressed steel table extensions are not handed and can fit on either side of the machine However the single hole in the en...

Page 13: ...ent of the table extensions is possible by repositioning the relevant fixing screw in their slots 4 Assembling the Rip fence The rip fence guide has an adjustable aluminium faceplate For normal use th...

Page 14: ...ut the following procedure The Fence Rail needs to be positioned correctly for its scale to read accurately 1 Locate the Rip Fence in the Fence Rail to the RH side of the Blade 2 Raise the saw blade s...

Page 15: ...d 6 Tighten and re check the Rip Fence when correct alignment has been achieved 7 Lower the blade 7 Sliding Mitre Gauge Note The sliding mitre gauge fits in either of the inverted T slots in the machi...

Page 16: ...the blade guard Ensure that it is working efficiently and covers the blade entirely at the sides as well as the crown 4 Lower the blade a little and recheck that the blade guard operation 5 When sati...

Page 17: ...ng and lowering handle is used to raise or lower the blade Turn clockwise to lower the blade and counter clockwise to raise the blade See Fig 19 3 Tilting the Blade The blade can be tilted up to 450 t...

Page 18: ...re attach the wing nuts See Fig 22 Adjust as above Remember to return to the original configuration when the rip fence is in the normal RH operating position 5 Mitre Gauge The mitre gauge can be used...

Page 19: ...djust the blade guard for mitre bevel or compound cutting as detailed in Assembly 8 1 Crosscutting Set the mitre gauge to 00 and tighten using the vertical handle Position in the desired T slot and ad...

Page 20: ...tre gauge positioned on the LH side of the machine with the rip fence on the RH side of the machine See Fig 29 The rip fence can be used as a length stop if it is properly set and adjusted Note Align...

Page 21: ...p fence Use smooth steady pressure and employ a push stick if necessary When the ripping width is greater than 300mm and with care both hands can be used to guide feed the material through the saw The...

Page 22: ...Replace the outer flange and nut and tighten securely with the spanners provided Check that both blade flanges are in contact with the blade 9 Replace the table access plate and its fixing screws Ens...

Page 23: ...blades onto the 25 4mm metal flange Secure the blades with the centre hand nut ENVIRONMENTAL PROTECTION Waste electrical products should not be disposed of with household waste Please recycle where fa...

Page 24: ...24 www evolutionfury com Parts Lists...

Reviews: